Arduino内置教程-控制结构-Switch Case
Switch (case) 声明, 附带传感输入
一个if声明允许你选择两个分开的选项,真或假。当有超过2个的选项,你可以用多个if声明,或者你可以用switch声明。switch允许你选择多个选项。这个教程示范怎样用它在四种光电阻的状态下切换开关:全黑,昏暗,中等,明亮。
这个程序首先读取光敏电阻。然后它用map()函数来使它的输出值符合四个值之一:0,1,2,3。最后,用switch()声明来打印对应的信息到电脑里。
硬件要求
- Arduino or Genuino开发板
- 光敏电阻, 或者 其他模拟传感器
- 10k ohm 电阻
- 连接线
- 面包板
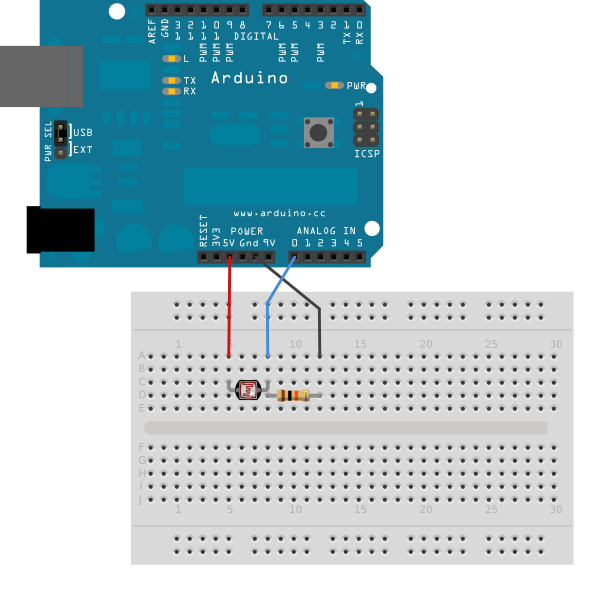
电路
光敏电阻通过一个分压电路连接到模拟输入pin0。一个10k ohm电阻补充分压器的另一部分,从模拟输入pin0连到地。analogRead()函数从这个电路返回一个0-600的范围值。
原理图

样例代码
/*
  Switch statement

 Demonstrates the use of a switch statement.  The switch
 statement allows you to choose from among a set of discrete values
 of a variable.  It's like a series of if statements.

 To see this sketch in action, but the board and sensor in a well-lit
 room, open the serial monitor, and and move your hand gradually
 down over the sensor.

 The circuit:
 * photoresistor from analog in 0 to +5V
 * 10K resistor from analog in 0 to ground

 created 1 Jul 2009
 modified 9 Apr 2012
 by Tom Igoe

 This example code is in the public domain.

 http://www.arduino.cc/en/Tutorial/SwitchCase
 */

// these constants won't change. They are the
// lowest and highest readings you get from your sensor:
const int sensorMin = 0;      // sensor minimum, discovered through experiment
const int sensorMax = 600;    // sensor maximum, discovered through experiment

void setup() {
  // initialize serial communication:
  Serial.begin(9600);
}

void loop() {
  // read the sensor:
  int sensorReading = analogRead(A0);
  // map the sensor range to a range of four options:
  int range = map(sensorReading, sensorMin, sensorMax, 0, 3);

  // do something different depending on the
  // range value:
  switch (range) {
    case 0:    // your hand is on the sensor
      Serial.println("dark");
      break;
    case 1:    // your hand is close to the sensor
      Serial.println("dim");
      break;
    case 2:    // your hand is a few inches from the sensor
      Serial.println("medium");
      break;
    case 3:    // your hand is nowhere near the sensor
      Serial.println("bright");
      break;
  }
  delay(1);        // delay in between reads for stability
}
更多
- serial.begin()
- analogRead()
- map()
- Serial.println()
- pinMode()
- digitalWrite()
- for()
- delay()
- 数组:一个在For循环的变量举例了怎样使用一个数组。
- IfStatementConditional:通过for循环来控制多个LED灯
- If声明条件:使用一个‘if 声明’,通过改变输入条件来改变输出条件
- Switch Case:怎样在非连续的数值里选择。
- Switch Case 2:第二个switch-case的例子,展示怎样根据在串口收到的字符来采取不同的行为
- While 声明条件:当一个按键被读取,怎样用一个while循环来校准一个传感器。