Arduino内置教程-控制结构-While 声明条件
While 循环
有时候当给定的条件为真时,你想程序所有东西都停止。你可以用while循环来做这件事。这个例子示范怎样用while循环来校准传感器的值。
在主循环里,下面程序在模拟引脚pin0里读取光敏电阻的值,并用它来使pin9的LED灯变亮或者变暗。而当一个按键(连接到数字引脚pin2)被按下时,程序运行一个叫 calibrate()的函数,寻找模拟传感值的最大和最小值。当你放开按键时,程序会继续主循环。
这个方法可以使你在光源环境改变的时候更新光敏电阻的最大值和最小值。
硬件要求
- Arduino or Genuino开发板
- 按键或者切换开关
- 光敏电阻或者其他模拟传感器
- 2 10k ohm 电阻
- 面包板
电路
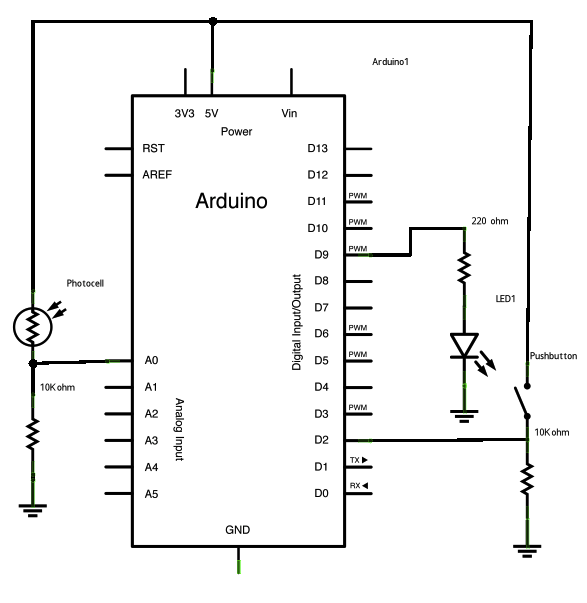
把你的模拟传感器(光敏电阻或者其他)通过10k ohm电阻下拉到地,再连接到模拟输入引脚pin0。连接你的按键(通过10k ohm电阻下拉到地)到数字引脚pin2。把你的LED灯串联一个220 ohm电阻连接到数字引脚pin9。
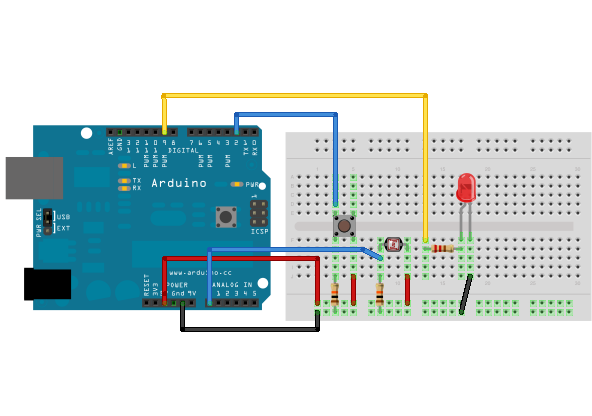
图是用 Fritzing 软件绘制。
原理图
样例代码
/*
  Conditionals - while statement

 This example demonstrates the use of  while() statements.

 While the pushbutton is pressed, the sketch runs the calibration routine.
 The  sensor readings during the while loop define the minimum and maximum
 of expected values from the photo resistor.

 This is a variation on the calibrate example.

 The circuit:
 * photo resistor connected from +5V to analog in pin 0
 * 10K resistor connected from ground to analog in pin 0
 * LED connected from digital pin 9 to ground through 220 ohm resistor
 * pushbutton attached from pin 2 to +5V
 * 10K resistor attached from pin 2 to ground

 created 17 Jan 2009
 modified 30 Aug 2011
 by Tom Igoe

 This example code is in the public domain.

 http://www.arduino.cc/en/Tutorial/WhileLoop

 */


// These constants won't change:
const int sensorPin = A2;       // pin that the sensor is attached to
const int ledPin = 9;           // pin that the LED is attached to
const int indicatorLedPin = 13; // pin that the built-in LED is attached to
const int buttonPin = 2;        // pin that the button is attached to


// These variables will change:
int sensorMin = 1023;  // minimum sensor value
int sensorMax = 0;     // maximum sensor value
int sensorValue = 0;         // the sensor value


void setup() {
  // set the LED pins as outputs and the switch pin as input:
  pinMode(indicatorLedPin, OUTPUT);
  pinMode(ledPin, OUTPUT);
  pinMode(buttonPin, INPUT);
}

void loop() {
  // while the button is pressed, take calibration readings:
  while (digitalRead(buttonPin) == HIGH) {
    calibrate();
  }
  // signal the end of the calibration period
  digitalWrite(indicatorLedPin, LOW);

  // read the sensor:
  sensorValue = analogRead(sensorPin);

  // apply the calibration to the sensor reading
  sensorValue = map(sensorValue, sensorMin, sensorMax, 0, 255);

  // in case the sensor value is outside the range seen during calibration
  sensorValue = constrain(sensorValue, 0, 255);

  // fade the LED using the calibrated value:
  analogWrite(ledPin, sensorValue);
}

void calibrate() {
  // turn on the indicator LED to indicate that calibration is happening:
  digitalWrite(indicatorLedPin, HIGH);
  // read the sensor:
  sensorValue = analogRead(sensorPin);

  // record the maximum sensor value
  if (sensorValue > sensorMax) {
    sensorMax = sensorValue;
  }

  // record the minimum sensor value
  if (sensorValue < sensorMin) {
    sensorMin = sensorValue;
  }
}
[Get Code]
更多
- while()
- digitalRead()
- digitalWrite()
- analogRead()
- analogWrite()
- map()
- constrain()
- if()
- 数组:一个在For循环的变量举例了怎样使用一个数组。
- IfStatementConditional:通过for循环来控制多个LED灯
- If声明条件:使用一个‘if 声明’,通过改变输入条件来改变输出条件
- Switch Case:怎样在非连续的数值里选择。
- Switch Case 2:第二个switch-case的例子,展示怎样根据在串口收到的字符来采取不同的行为
- While 声明条件:当一个按键被读取,怎样用一个while循环来校准一个传感器。