基于Arduino可编程无线遥控手柄V2.2

![]()
目录
1 简介
2 特性
3 程序下载连接图
4 GamePad v2.0 内部结构图
5 引脚定义
6 按键测试代码
简介
DFRobot特别推出Arduino无线遥控手柄 V2.2,在V1.1版本基础上再做大幅度升级!XBEE插
槽可以支持XBEE、WIFI、RF和蓝牙模块,让您可以与机器人、移动平台或无人机(UAV)等
任何您想要的控制设备进行通信。
与V1.1版本最大的区别在与使用了Arduino Leonado作为主微控器,这样它依然还是一个超
高个性化的游戏手柄,更妙的这是一个带震动电机的游戏手柄!可以适应Linux、Mac OS X以及Windows系统环境。电池盒可使用三节AAA电池或USB-ICSP电源输入。
整个手柄有两个模拟量的摇杆(每个带有模拟量按键),还有17个高性能按键,控制器采用
传统PS3游戏手柄布局,适合绝大多数类似的游戏,经过按键编程后也兼容XBOX系列游戏。
所有按键、摇杆以及震动电机都具备超高可定制化设计,每个按键和摇杆都可以重新定义其键值和功能,让你可以设计出无限的可能,更好地贴合你的项目需求。
特性
主控器选型:Arduino Leonardo
电源:三节AAA电池或USB供电
可编程资源:
两个模拟量摇杆
两个摇杆按键
17个个性按键
编程接口 ICSP(需使用专用USB转ICSP接线)
有一个RESET按钮(标称ANALOG)
可编程的LED
MODE:表示开关状态
RX:可编程的LED,根据需要自由编程
支持XBB、蓝牙、RF和WIFI
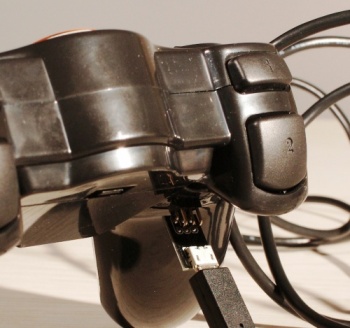
程序下载连接图
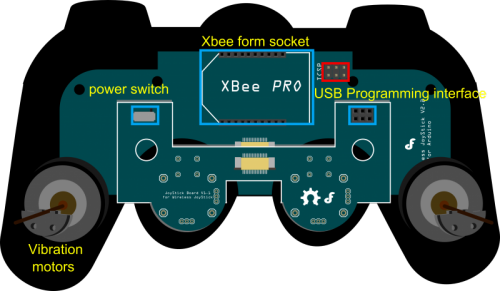
GamePad v2.0 内部结构图
引脚定义
无线模块(串口):D0,D1
1:D9
2:D11
3:D12
4:D10
UP:D5
LEFT::D6
DOWN:D7
RIGHT:D8
SELECT:D3
START:D4
左JOY:X-A4,Y-A5
左JOY_BUTTON:A0
右JOY:X-A2,Y-A3
右JOY_BUTTON:A1
左Z1:D15 Z2:D16
右Z1:D13 Z2:D14
MOTOR:D2
RXLED:D17
ANALOG:RESET
按键测试代码
![]()
使用xbee/ Ble-Link等模块时请将Serial改为Serial1,本程序只用于电脑上的串口调试。
/*
// #
// # Editor : Tong Hui from DFRobot, based on Lauren from DFRobot v1.0 code
// # Date : 12.24.2012
// # Product name: Wireless Joystick v2.2 for Arduino
// # Product SKU : DFR0182
// # Code Version: 2.0
// # Description:
// # The sketch for using the gamepad and print the button state and the analog values of the gamepad
// #
*/
int buttonState[17];
int joystick[4];
int AnalogButton[2];
void setup()
{
Serial.begin(57600); //Init the Serial baudrate
InitIO(); // Initialize the inputs/outputs and the buffers
}
void InitIO(){
for(int i = 0; i < 17; i++) pinMode(i, INPUT);
}
void loop()
{
DataUpdate(); //read the buttons and the joysticks data
printData(); //print the datas and states
delay(100);
}
void DataUpdate(){
for(int i = 3; i < 17; i++) buttonState[i] = digitalRead(i);
buttonState[
}
String Buttons[17] = {
"J2","J1",NULL,"S2","S1","UP","LEFT","DOWN","RIGHT","1","4","2","3","RZ1","RZ2","LZ1","LZ2"};
// Buttons Nmes
void printData(){
for(int i = 0; i < 17; i++) Serial.print(buttonState[i]),Serial.print(" ");
for(int i = 0; i < 4; i++) Serial.print(joystick[i]),Serial.print(" ");
for(int i = 0; i < 2; i++) Serial.print(AnalogButton[i]),Serial.print(" ");
Serial.println("");
Serial.print("Button Pressed:");
for(int i = 0; i < 2; i++) if(buttonState[i] < 100) Serial.print(Buttons[i]),Serial.print(",");
for(int i = 3; i < 17; i++) if(buttonState[i] == 0) Serial.print(Buttons[i]),Serial.print(",");
Serial.println("");
Serial.print("Analog Sticks:");
for(int i = 0; i < 4; i++) Serial.print(joystick[i]),Serial.print(",");
for(int i = 0; i < 2; i++) Serial.print(AnalogButton[i]),Serial.print(",");
Serial.println("");
Serial.println("");
}
![]() 商城购买链接
商城购买链接