Wido WIFI物联网节点控制器 兼容Arduino 内测版
<img alt="DFR0321.jpg" src="http://images.ncnynl.com/arduino/2016/300px-DFR0321.jpg" width="300" height="300" />
目录
1 简介
2 产品参数
3 应用
4 引脚图
5 使用教程
5.1 实例一
5.1.1 硬件清单
5.1.2 软件工具
5.1.3 操作步骤
5.1.4 软件说明
5.2 实例二
5.2.1 软件工具
5.2.2 操作步骤
5.3 实例三
5.3.1 硬件清单
5.3.2 DF物联网与Wido简易操作步骤
6 疑难解答
7 更多
简介
Wido是一款轻量化WIFI传感器节点控制器,兼容Arduino Leonardo. 通过Wido你可以轻松对接国内外各大物联网平台,监控环境与设备数据。
产品参数
Arduino Leonardo兼容设计
支持Micro USB直插供电与编程
外接电源电压范围:7-12v
板载WIFI嵌入式模组,2.4GHz IEEE 802.11 b/g
SPI驱动WIFI模组
板载Micro SD卡槽
PCB 2.4G天线,提供接近手机的WIFI信号
驱动引脚:
WIFI模块—D7(IRQ),D5(VBAT),D10(CS),D14(MISO),D15(SCK),D16(MOSI)
MicroSD —D4(CS),D14(MISO),D15(SCK),D16(MOSI)
PS:4个Arduino Leonardo占用,MicroSD和CC3000都通过SPI驱动,固有硬件串口资源可扩展其他功能
应用
M2M传感器节点
玩具
实体游戏
智能家居智能电子设备
引脚图
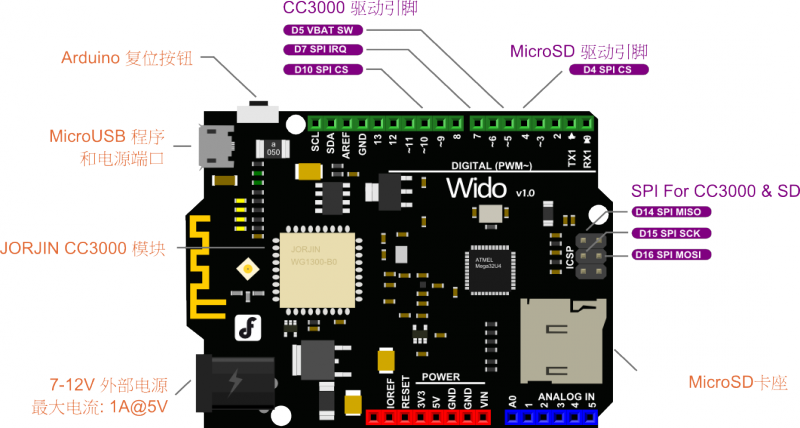
注意:
如图所示,如果想驱动Wido自带的CC3000 WIFI功能需要占用扩展引脚上的3个数字口;
Wido 的主控为Leonardo,如果需要使用串口通信,请使用Serial1.()与相连的模块通信,Serial.()通过USB口与电脑通信。
使用教程
实例一
在开始玩Wido接入各种传感器并向云服务或者网络传输数据前,我们先得将Wido连入本地的路由器或者中继。顾...
该样例会先帮助大家扫描附近已有的路由器信号,并配置Wido接入附近的路由器或者中继,Ping一个ip地址,同时了解Wido的一些基本功能。
硬件清单
Wido
Micro USB线
软件工具
Arduino IDE软件
下载并安装CC3000软件库
操作步骤
1.在以上链接下载CC3000 Arduino库并安装到Arduino库目录下(如何安装Arduino库)

![]() Fig2: Windows下库安装目录
Fig2: Windows下库安装目录
2.从菜单栏,文件下样例程序中,Adafruit_CC3000分类中,打开buildtest.ino样例程序.

![]() Fig3: 打开样例
Fig3: 打开样例
3.在菜单栏工具中,选择Arduino Leonardo并选择正确的串口号,上传样例程序,并打开串口调试助手。看到如图。

![]() Fig4: 扫描路由器
Fig4: 扫描路由器
如图所示,Wido会在串口调试中打印出CC3000固件的版本,Wido模块的mac地址以及附近路由器的数量,SSID,信号强度以及加密类型。
4.更新您希望连入的路由器信息至程序中的以下内容:
//Please enter the SSID and password of the router you want to connect
#define WLAN_SSID "myNetwork" // cannot be longer than 32 characters!
#define WLAN_PASS "myPassword"
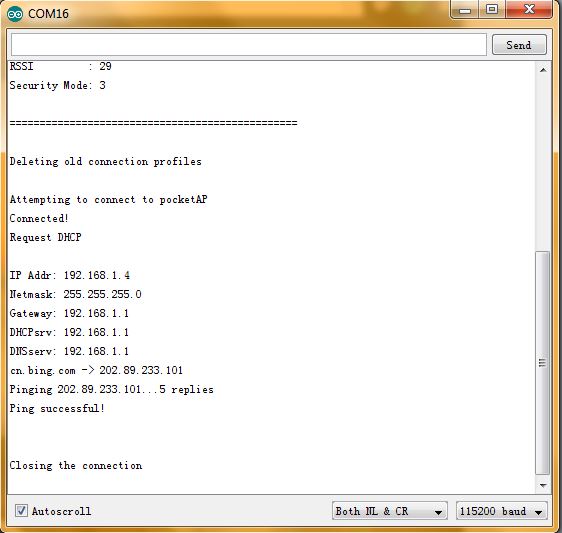
![]() Fig5: Ping cn.bing.com
Fig5: Ping cn.bing.com
软件说明
通过以上操作步骤您的Wido已经能够正常连入您本地的路由器,并且与网络对接,包括访问网站,上传数据,建立TCP链接等等。
接下来我们简单地看下buildtest样例程序中几个主要用于建立网络连接的基础函数。
1.初始化Wido模块包括驱动引脚配置
/* Initialise the module */
Serial.println(F("\nInitialising the CC3000 ..."));
if (!cc3000.begin())
{
Serial.println(F("Unable to initialise the CC3000! Check your wiring?"));
while(1);
}
/* NOTE: Secure connections are not available in 'Tiny' mode!
By default connectToAP will retry indefinitely, however you can pass an
optional maximum number of retries (greater than zero) as the fourth parameter.
*/
if (!cc3000.connectToAP(WLAN_SSID, WLAN_PASS, WLAN_SECURITY)) {
Serial.println(F("Failed!"));
while(1);
}
/* Wait for DHCP to complete */
Serial.println(F("Request DHCP"));
while (!cc3000.checkDHCP())
{
delay(100); // ToDo: Insert a DHCP timeout!
}
软件工具
Tcp Server Tool - 用于在电脑端创建一个简单地TCP Server
操作步骤
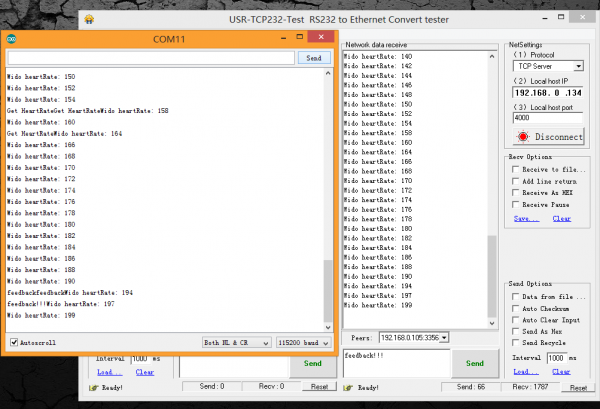
1.打开Tcp服务器创建工具(USR-TCP232-Test),配置本地端口,点击Listening监听端口数据

![]() Fig1: 创建TCP端口
Fig1: 创建TCP端口
2.打开Wido2LocalTcpServer样例程序
输入您本地路由器的SSID和密码配置和Tcp服务器端口和IP配置,并上传程序到Wido
/* Set the target ip address and connection port */
uint32_t ip = WiDo.IP2U32(192,168,0,134);
tcpClient = WiDo.connectTCP(ip, 4000);
#include <Adafruit_CC3000.h>
#include <ccspi.h>
#include <SPI.h>
#include <string.h>
#include "utility/debug.h"
#define WiDo_IRQ 7
#define WiDo_VBAT 5
#define WiDo_CS 10
Adafruit_CC3000 WiDo = Adafruit_CC3000(WiDo_CS, WiDo_IRQ, WiDo_VBAT,
SPI_CLOCK_DIVIDER); // you can change this clock speed
#define WLAN_SSID "myNetwork" // cannot be longer than 32 characters!
#define WLAN_PASS "myPassword"
// Security can be WLAN_SEC_UNSEC, WLAN_SEC_WEP, WLAN_SEC_WPA or WLAN_SEC_WPA2
#define WLAN_SECURITY WLAN_SEC_WPA2
#define TIMEOUT_MS 1000
void setup(){
Serial.begin(115200);
/* Initialise the module */
Serial.println(F("\nInitialising the CC3000 ..."));
if (!WiDo.begin())
{
Serial.println(F("Unable to initialise the CC3000! Check your wiring?"));
while(1);
}
/* NOTE: Secure connections are not available in 'Tiny' mode!
By default connectToAP will retry indefinitely, however you can pass an
optional maximum number of retries (greater than zero) as the fourth parameter.
*/
Serial.println(F("Connecting Router/AP"));
if (!WiDo.connectToAP(WLAN_SSID, WLAN_PASS, WLAN_SECURITY)) {
Serial.println(F("Failed!"));
while(1);
}
Serial.println(F("Router/AP Connected!"));
/* Wait for DHCP to complete */
Serial.println(F("Request DHCP"));
while (!WiDo.checkDHCP())
{
delay(100); // ToDo: Insert a DHCP timeout!
}
}
void loop(){
static Adafruit_CC3000_Client tcpClient;
static unsigned long heartRate = millis();
if(!tcpClient.connected()){
Serial.println("Try to connect the Local Server");
tcpClient.close();
/* Set the target ip address and connection port */
uint32_t ip = WiDo.IP2U32(192,168,0,134);
tcpClient = WiDo.connectTCP(ip, 4000);

if(!tcpClient.connected()){
  Serial.println(F("Couldn't connect to server! Make sure TCP Test Tool is running on the server."));
  while(1);
}
}
else if(millis() - heartRate > 1000){
heartRate = millis(); // Update time stamp of the microcontroller system
char clientString[30];
sprintf(clientString, "%s%d%s", "Wido heartRate: ",heartRate/1000," s\r\n");

Serial.println(clientString);
tcpClient.fastrprintln(clientString);
}
/* Read data until either the connection is closed, or the timeout is reached. */
unsigned long lastRead = millis();
while (tcpClient.connected() && (millis() - lastRead < TIMEOUT_MS)) {
while (tcpClient.available()) {
char c = tcpClient.read();
Serial.print(c);
lastRead = millis();
  // Disable sending message for a moment
  heartRate = millis();
}
}
}
实例三
硬件清单
Wido
LM35温度传感器
DF物联网与Wido简易操作步骤
1.DF物联网内置在DF创客社区中,登陆您的用户账号(QQ/weibo也都支持)后,点击您的头像进入个人专区,选择选项卡中的物联网,即可进入IoT功能模块
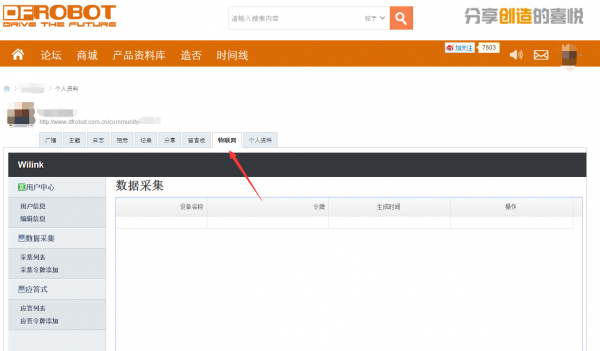
![]() Fig1: 登陆页面
Fig1: 登陆页面
2.在数据采集模式,点击添加,系统会自动生成一个数据记录选型。您可以自定义这个数据记录模组的名字。

![]() Fig2: 获取令牌
Fig2: 获取令牌
3.打开软件库中的样例程序Example下的,Wido2DFIoT。需要注意将第2步中生成的令牌数据(Token)更新到软件程序中:
// Attach your own token generated from the DFRobot community website
#define TOKEN "7dafd269e271c9bcd0b69f61c3ff6af4"
/***************************************************
- This is an example for the DFRobot WiDo - Wifi Integrated IoT lite sensor and control node
- Designed specifically to work with the DFRobot WiDo products:
- The main library is forked from Adafruit
- Written by Lauren
- BSD license, all text above must be included in any redistribution
****************************************************/
#include <Adafruit_CC3000.h>
#include <ccspi.h>
#include <SPI.h>
#include <string.h>
#include "utility/debug.h"
#define WiDo_IRQ 7
#define WiDo_VBAT 5
#define WiDo_CS 10
Adafruit_CC3000 WiDo = Adafruit_CC3000(WiDo_CS, WiDo_IRQ, WiDo_VBAT,
SPI_CLOCK_DIVIDER); // you can change this clock speed
#define WLAN_SSID "myNetwork" // cannot be longer than 32 characters!
#define WLAN_PASS "myPassword"
// Security can be WLAN_SEC_UNSEC, WLAN_SEC_WEP, WLAN_SEC_WPA or WLAN_SEC_WPA2
#define WLAN_SECURITY WLAN_SEC_WPA2
#define TOKEN "7dafd269e271c9bcd0b69f61c3ff6af4" //attach your own token generated from the DFRobot community website
// To get the full feature of CC3000 library from Adafruit, please comment the define command below
// #define CC3000_TINY_DRIVER // saving the flash memory space for leonardo
#define TIMEOUT_MS 2000
void setup(){
Serial.begin(115200);
Serial.println(F("Hello, Wido!\n"));
/* Initialise the module and test the hardware connection */
Serial.println(F("\nInitialising the CC3000 ..."));
if (!WiDo.begin())
{
Serial.println(F("Unable to initialise the CC3000! Check your wiring?"));
while(1);
}
/* NOTE: Secure connections are not available in 'Tiny' mode!
By default connectToAP will retry indefinitely, however you can pass an
optional maximum number of retries (greater than zero) as the fourth parameter.
*/
if (!WiDo.connectToAP(WLAN_SSID,WLAN_PASS,WLAN_SECURITY)) {
Serial.println(F("Failed!"));
while(1);
}
Serial.println(F("Connected!"));
/* Wait for DHCP to complete */
Serial.println(F("Request DHCP"));
while (!WiDo.checkDHCP())
{
delay(100); // ToDo: Insert a DHCP timeout!
}
}
void loop(){
static Adafruit_CC3000_Client IoTclient;
if(IoTclient.connected()){
//Convert LM35 sensor reading to degrees
int sensValue = analogRead(0) *0.0048828125 * 100;
char clientString[50];
sprintf(clientString,"%s%s%s%d%s","GET /data?token=",TOKEN,"&param=",sensValue," HTTP/1.1");
Serial.println(clientString);

// attach the token to the IOT Server and Upload the sensor dataIoTclient
IoTclient.fastrprintln(clientString);

IoTclient.fastrprint(F("\r\n"));
IoTclient.fastrprint(F("\r\n"));

Serial.println();
// Serial.println("Upload data to the IoT Server");
/* Read data until either the connection is closed, or the idle timeout is reached. */
unsigned long lastRead = millis();
while (IoTclient.connected() && (millis() - lastRead < TIMEOUT_MS)) {
  while (IoTclient.available()) {
    char c = IoTclient.read();
    Serial.print(c);
    lastRead = millis();
  }
}
IoTclient.close();
}
else{
// Config the Host IP and DFRobot community IoT service port
// Data Upload service PORT: 8124
// Real time controling service PORT: 9120
uint32_t ip = WiDo.IP2U32(182,254,130,180);
IoTclient = WiDo.connectTCP(ip,8124);
Serial.println("Connecting IoT Server...");
}
delay(5000);
}
结果 完成程序上传后,打开串口调试助手,即可查看到DFRobot IoT服务器收到Http GET请求后的反馈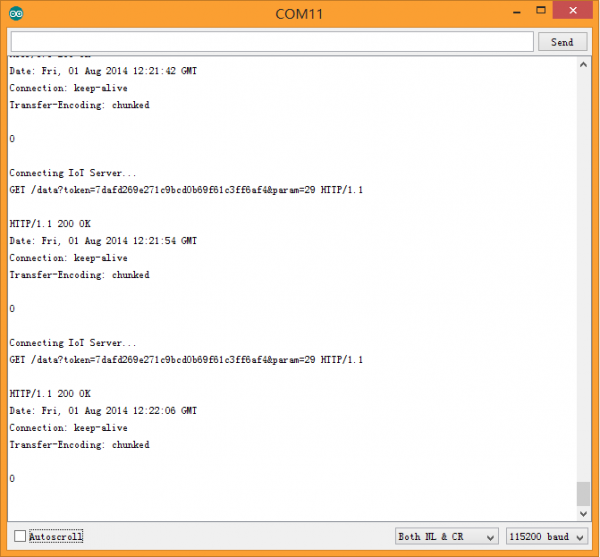
![]() Fig3: IoT server Http反馈
Fig3: IoT server Http反馈
5.点击网站上查看数据按钮即可查看实时上传的LM35温度实时数据了哈。自制云服务WIFI温度监控站原型完成。☺
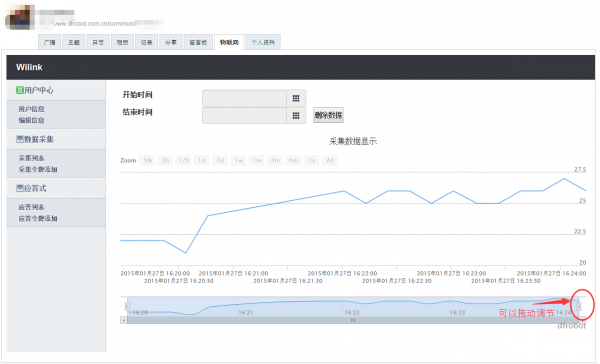
![]() Fig4: LM35云数据上传
Fig4: LM35云数据上传
PS:数据实时显示过程中,峰值的32摄氏度是小编在数据上传时对LM35温度传感器哈了一口热腾腾的气
疑难解答
更多问题及有趣的应用,请访问论坛
更多
Wido v1.0 原理图
WG1300 数据手册
Github 硬件资源链接
![]() 购买
购买