SIM800H GPRS Shield V1.0通信模块
![]()
SIM800H GPRS Shield V1.0通信模块
目录
1 概 述
2 技术规格
3 扩展板接口功能及说明
4 功能简介
4.1 开启模块
4.2 常用AT指令简介
5 功能介绍及库函数的使用
5.1 打电话
5.2 接电话
5.3 使能来电显示
5.4 接收DTMF数据
5.5 语音合成及播报
5.6 发送短信
5.7 综合应用
6 库函数说明
6.1 初始化部分
6.2 TTS语言播报部分
6.3 电话部分
6.4 DTMF部分
6.5 短信部分
7 字符串转UCS2编码方法
8 开发资料
概 述
这是DFRobot研发的一款GPRS/GSM Arduino扩展板。它及GPRS、DTMF、TTS语音播报等功能于一身的shield模块,工作频率为EGSM 900MHz/DCS 1800MHz和GSM850 MHz/PCS 1900MHz,请容我自豪的说一句,它是小伙伴们做DIY的神器。
它同时支持UCS2编码数据和直接文本数据格式,能让你的机器人随时进行语音合成然后TTS语音播报。它支持DTMF,当使能了DTMF功能后,就能将在通话过程中按下的按键转换成字符反馈回来,可以用来做远程控制。
它是通过AT指令来控制的,您能直接通过电脑串口和Arduino主板来启动它的功能。这款SIM800H GPRS Shield板内嵌有SIMCom公司的SIM800H芯片,具有良好的稳定性。
更多的功能升级,请参考SIM800H芯片的说明。同时我们还给出了SIM800H的简单应用库文件,小伙伴们可以参考示例代码进行应用。
技术规格
供电电源<Vin>:6-12V
低功耗模式下:sleep模式下的电流为0.7mA
低电量消耗(100mA@7V-GSM模式)
四频 850/900/1800/1900MHz
GPRS multi-slot class 1~12
GPRS mobile station class B
采用GSM phase 2/2+标准
Class 4 (2 W @ 850/900 MHz)
Class 1 (1 W @ 1800/1900MHz)
通过AT指令控制
USB/Arduino控制开关
串口波特率自适应
支持实时时钟(RTC)
支持语音合成及播报
支持DTMF
LED指示灯能显示电源供应状态,网络状态和工作模式
大小:81*53mm
扩展板接口功能及说明

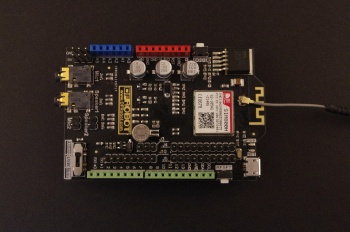
![]() SIM800H GPRS Shield V1.0
SIM800H GPRS Shield V1.0
1、模拟口、数字接口及各种电源接口完全兼容Arduino:
2、状态指示灯:
    PWR:电源指示灯;

    NET:网络状态指示灯:
        熄灭——模块没有工作,
        64ms亮/800ms熄灭——模块没有找到网络,
        64ms亮/3000ms灭——模块注册到网络。
   给模块供电,按住按钮约2s,模块启动,同理,如果模块正处于工作状态,按住按钮2s,模块关机。
   boot键是接到Arduino的digital 12脚,也可以通过软件控制12脚来启动模块。
   如图中所示,拨到“Arduino”端,模块与Arduino通信,拨到“USB”端,可以通过Arduino主板与PC机进行通信和调试;
   如果使用的主板是UNO、mega等主板因为下载串口和SIM800H模块通信共用,在下载程序时需要将开关拨到“None”位置, 更新好程序拨到“Arduino”端。
用于语音播报和接听电话用,可以通过AT指令来设置TTS播报输出的通道。
功能简介
注意:由于模块在使用GSM获取信号的时候功耗大,所以需要Arduino外部供电或者直接从Vin供点。
开启模块
1、硬件连接
扩展板接到主控板UNO,USB线连接好,串口切换开关拨到USB端。
2、启动模块按住boot键2秒或者下载下面程序启动模块。
void setup()
{
    //设置引脚为输出模式
    pinMode(12,OUTPUT);
    //GSM开机时序
    digitalWrite(12,HIGH);
    delay(2000);
    digitalWrite(12,LOW);
}
void loop()
{
}
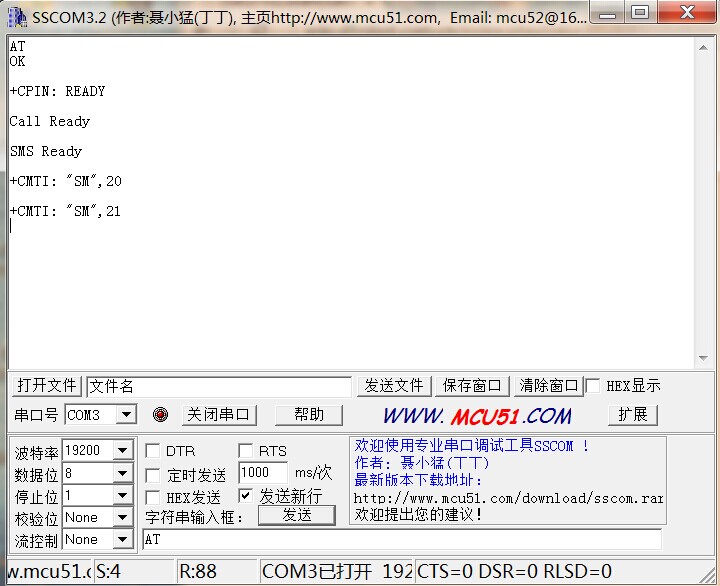
![]() uart display
uart display
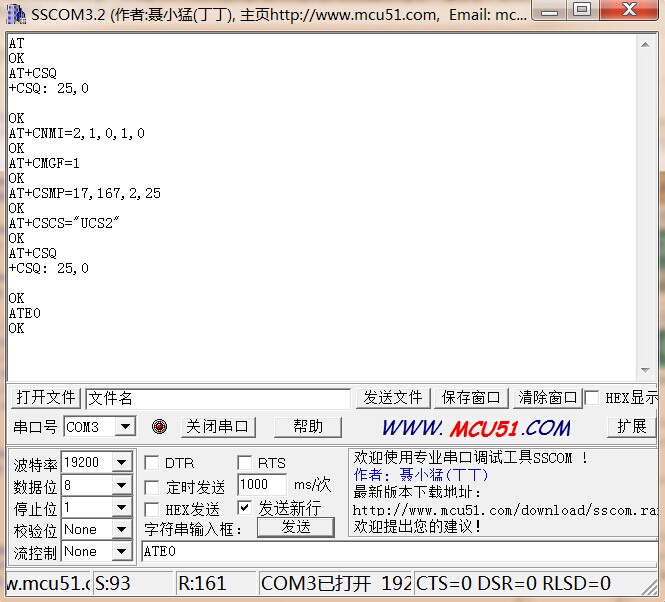
常用AT指令简介
1、“AT\r\n”
返回:AT\r\n OK\r\n
说明:AT指令测试,可以用于检测模块时候启动
返回:ATE0\r\n OK\r\n
说明:关闭回显
返回:OK\r\n
说明:设置新短消息URC上报格式 此命令要在SMS ready后才能设置,即当SIM800H模块告知Arduino“SMS ready”后才能设置,收到短信后URC上报,1为短信息在存储器中的序号,+CMTI:"SM",1
返回:OK\r\n
说明:设置短消息为文本模式
返回:OK\r\n
说明:设置短消息使用UCS2编码
返回:OK\r\n
说明:设置文本模式短消息参数
返回:+CSQ:<rssi>,<ber> OK\r\n
<rssi>
0 小于等于-115dBm
1 -111dBm
2...30 -110... -54dBm
31 大于等于-52dBm
99 未知或者不可测
<ber> (百分比):
0...7 表中的RXQUA值,参考GSM 05.08 [20] 章节7.2.4
99 未知或者不可测
返回:OK\r\n
参数说明:
第一个参数:音量调节 0~100
第二个参数:模式 0~3
第三个参数:音调调节 0~100
第四个参数:语速调节 0~100
第五个参数:通道设置 0~1
返回:OK\r\n
说明:停止当前播报
返回:OK\r\n
说明:使用UCS2编码合成语言并播报
返回:OK\r\n
说明:接听电话
返回:OK\r\n
说明:挂掉电话
返回:OK\r\n
说明:开启来电显示
返回:OK\r\n
说明:拨打电话
返回:OK\r\n
说明:开启DTMF功能
返回:>
说明:引号内为手机号码的UCS2-BIG编码。发送短信,当返回“>”字符后,输入要发送的短信内容,内容编码为UCS2编码(前面设置的),然后勾选HEX发送,发送“1a”,表示以CTRL+Z(0x1A)结束。
返回:+CMTI:........
说明:读取短信,返回为短信的内容
参数说明:“1”为短信在SIM800H模块中存储的序号
返回:OK\r\n
说明:删除存储器中序号为1的短消息
功能介绍及库函数的使用
[http:/https://github.com/dfrobot-Andy/SIM800H_LIB SIM800H Arduino Library]
注意:请在1.0.X版本的IDE下编译,高版本IDE因库的更新将导致编译失败。
注意:在使用库函数的时候,由于接收到的串口数据过大,所以需要将原有的Arduino的串口缓存buffer改大,方法有两种:
第一种方法,将hardware.zip解压,如果你的Arduino编译器是1.5.5以下版本,就将HardwareSerial.cpp文件剪切到Arduino\hardware\arduino\cores\arduino下,覆盖原来的文件,如果是1.5.5以上版本,就将HardwareSerial.h文件剪切到
Arduino\hardware\arduino\cores\arduino下,覆盖原来的文件;
第二种方法,如果你的Arduino编译器是1.5.5以下版本,打开Arduino\hardware\arduino\cores\arduino下的HardwareSerial.cpp文件,将#define SERIAL_BUFFER_SIZE 64改成#define SERIAL_BUFFER_SIZE 140即可,如果是1.5.5以上版本,则打开
HardwareSerial.h文件,做同样的修改。
/***************************************************
SIM800H GPRS Shield V1.0
<http://www.dfrobot.com.cn/goods-1129.html>
This example show you how to use SIM800H GPRS Shield V1.0 to make a call.
Created 2016-1-20
By Andy zhou <Andy.zhou@dfrobot.com>
GNU Lesser General Public License.
See <http://www.gnu.org/licenses/> for details.
All above must be included in any redistribution
****************************************************/
/***********Notice and Trouble shooting***************
1.Connection and Diagram can be found here
<http://wiki.dfrobot.com.cn/index.php/(SKU:TEL0089)SIM800H_GPRS_Shield_V1.0%E9%80%9A%E4%BF%A1%E6%A8%A1%E5%9D%97>
2.This code is tested on SIM800H GPRS Shield V1.0.
****************************************************/
// libraries
#include <sim800cmd.h>
//initialize the library instance
//fundebug is an application callback function,when someon is calling.
Sim800Cmd sim800demo(fundebug);
//the setup routine runs once when you press reset:
void setup()
{
//initialize the digital pin as an output.
pinMode(13,OUTPUT);
//initialize SIM800H,return 1 when initialize success.
while((sim800demo.sim800init()) == 0);
}
//the loop routine runs over and over again forever:
void loop()
{
//Signal strength
unsigned char csq = 0;
//To obtain the signal strength, return 1 when obtain success.
if( sim800demo.callReadCSQ(&csq) )
{
//Make Voice Call
sim800demo.dialTelephoneNumber("15982373181;");
while(1);
}
digitalWrite(13,HIGH);//turn the LED on by making the voltage HIGH
delay(500);
digitalWrite(13,LOW);//turn the LED off by making the voltage LOW
delay(500);
}
//application callback function
void fundebug(void)
{
}
1、Sim800Cmd sim800demo(fundebug);在构造sim800demo函数时,如果传入指向函数的指针为参数时,表示使能了打电话的功能,同时,当有来电时,系统会自动调用fundebug这个函数,函数内的内容是小伙伴自己的处理函数,你可以接电话也可以挂电话,
或者什么都不做。但是,切记,不要在这个回调函数中处理过多的任务,这个回调函数更多的是用于消息的传递,告知你有电话来了,这样避免你采用循环去查看是否有来电。
2、sim800demo.dialTelephoneNumber("15982373181;");在输入电话号码时,一定不要忘记加“;”,因为在前面提到过,我们拨打电话是“ATD=15982373181;”后面是有“;”的,小伙伴们千万千万千万不要忘了哟。
3、值得注意的是,我们的库文件在启动的时候已经将SIM800H模块的初始化设置都设置完成,sim800demo.sim800init()是进行初始化任务,所以,小伙伴在时候时,就不需要去进行前面说的那些繁琐的设置工作了,是不是很方便啦???
接电话
打开Arduino编译器下Examples\sim800program\ReceiveVoiceCall程序,编译后下载到Arduino主板上,然后将SIM800H GPRS Shield模块插在Arduino主板上,串口切换开关拨到Arduino端,拔掉USB,用Vin供电,这样准备工作完成。
功能简介:初始化SIM800H模块,13脚灯闪烁,如果有电话拨入,则接听电话。
核心AT指令:ATA\r\n
/***************************************************
SIM800H GPRS Shield V1.0
<http://www.dfrobot.com.cn/goods-1129.html>
This example show you how to use SIM800H GPRS Shield V1.0 to receive a call.
Created 2016-1-20
By Andy zhou <Andy.zhou@dfrobot.com>
GNU Lesser General Public License.
See <http://www.gnu.org/licenses/> for details.
All above must be included in any redistribution
****************************************************/
/***********Notice and Trouble shooting***************
1.Connection and Diagram can be found here
<http://wiki.dfrobot.com.cn/index.php/(SKU:TEL0089)SIM800H_GPRS_Shield_V1.0%E9%80%9A%E4%BF%A1%E6%A8%A1%E5%9D%97>
2.This code is tested on SIM800H GPRS Shield V1.0.
****************************************************/
//libraries
#include <sim800cmd.h>
//initialize the library instance
//fundebug is an application callback function,when someon is calling.
Sim800Cmd sim800demo(fundebug);
//the setup routine runs once when you press reset:
void setup()
{
//initialize the digital pin as an output.
pinMode(13,OUTPUT);
//initialize SIM800H,return 1 when initialize success.
while((sim800demo.sim800init()) == 0);
}
void loop()
{
digitalWrite(13,HIGH);//turn the LED on by making the voltage HIGH
delay(200);
digitalWrite(13,LOW);//turn the LED off by making the voltage LOW
delay(200);
}
//application callback function
//Note that not too much to handle tasks in this function
void fundebug(void)
{
//answer the call
sim800demo.answerTelephone();
}
可以看到,接电话的代码中,fundebug函数中有了处理的任务,即,当有电话来的时候就接听电话,当然你也可以用sim800demo.cancelCall()函数挂电话
使能来电显示
打开Arduino编译器下Examples\sim800program\DisplayCallNumber程序,编译后下载到Arduino主板上,然后将SIM800H GPRS Shield模块插在Arduino主板上,串口切换开关拨到Arduino端,拔掉USB,用Vin供电,这样准备工作完成。
功能简介:初始化SIM800H模块,使能来电显示,如果有电话拨入,则先获取来电号码,判断是否是15982373181,如果是,则接听,如果不是,则挂断。
核心AT指令:AT+CLIP=1\r\n
/***************************************************
SIM800H GPRS Shield V1.0
<http://www.dfrobot.com.cn/goods-1129.html>
This example show you how to use SIM800H GPRS Shield V1.0 to enable the caller phone number.
Created 2016-1-20
By Andy zhou <Andy.zhou@dfrobot.com>
GNU Lesser General Public License.
See <http://www.gnu.org/licenses/> for details.
All above must be included in any redistribution
****************************************************/
/***********Notice and Trouble shooting***************
1.Connection and Diagram can be found here
<http://wiki.dfrobot.com.cn/index.php/(SKU:TEL0089)SIM800H_GPRS_Shield_V1.0%E9%80%9A%E4%BF%A1%E6%A8%A1%E5%9D%97>
2.This code is tested on SIM800H GPRS Shield V1.0.
****************************************************/
// libraries
#include <sim800cmd.h>
//initialize the library instance
//fundebug is an application callback function,when someon is calling.
Sim800Cmd sim800demo(fundebug1);
//phone number buffer
char str[15] = {'\0'};
//the setup routine runs once when you press reset:
void setup()
{
//initialize the digital pin as an output.
pinMode(13,OUTPUT);
//initialize SIM800H,return 1 when initialize success.
while((sim800demo.sim800init()) == 0);
//enable SIM800H Modular Caller ID
sim800demo.DisplayPhoneNumber(OPEN);
}
//the loop routine runs over and over again forever:
void loop()
{
}
//application callback function
//Note that not too much to handle tasks in this function
void fundebug1(void)
{
//get the phone number
sim800demo.getCallnumber(str);
if(memcmp(str,"15982373181",11) == 0)
sim800demo.answerTelephone(); //answer
else
sim800demo.cancelCall();//hangs up
}
1、初始化代码和前面一样。
2、使能来电显示sim800demo.DisplayPhoneNumber(OPEN)函数,当有来电时,可以获取电话号码,当然如果传递的参数是CLOSE,则关闭回显。
3、在fundebug1回调函数中,我们先用sim800demo.getCallnumber(str)函数,获取来电号码,并传递给str,然后判断str是不是我们要的号码,如果是就接听,否则挂断。通过这个功能,小伙伴们可以建立一个自己简单的电话号码簿。
接收DTMF数据
打开Arduino编译器下Examples\sim800program\ReceiveDTMFNumber程序,编译后下载到Arduino主板上,然后将SIM800H GPRS Shield模块插在Arduino主板上,串口切换开关拨到Arduino端,拔掉USB,用Vin供电,这样准备工作完成。
功能简介:初始化SIM800H模块,使能DTMF,注册DTMF数据回调函数,如果有电话拨入,则接听电话,如果在通话中有DTMF数据输入,则获取,并判读,如果是‘1’,则将13脚置高,如果是‘0’,则置低。
当我们使能了DTMF后,在通话的过程中,按下电话上的键盘,SIM800H通信模块就可以将键值转换成数据发送给arduino了。
核心AT指令:AT+DDET=1\r\n\r\n
/***************************************************
SIM800H GPRS Shield V1.0
<http://www.dfrobot.com.cn/goods-1129.html>
This example show you how to use SIM800H GPRS Shield V1.0 to receive the DTMF data.
Created 2016-1-20
By Andy zhou <Andy.zhou@dfrobot.com>
GNU Lesser General Public License.
See <http://www.gnu.org/licenses/> for details.
All above must be included in any redistribution
****************************************************/
/***********Notice and Trouble shooting***************
1.Connection and Diagram can be found here
<http://wiki.dfrobot.com.cn/index.php/(SKU:TEL0089)SIM800H_GPRS_Shield_V1.0%E9%80%9A%E4%BF%A1%E6%A8%A1%E5%9D%97>
2.This code is tested on SIM800H GPRS Shield V1.0.
****************************************************/
//libraries
#include <sim800cmd.h>
//initialize the library instance
//fundebug1 is an application callback function,when someon is calling.
Sim800Cmd sim800demo(fundebug1);
//the setup routine runs once when you press reset:
void setup()
{
//initialize the digital pin as an output.
pinMode(13,OUTPUT);
//turn the LED off by making the voltage LOW
digitalWrite(13,LOW);
//initialize SIM800H,return 1 when initialize success.
while((sim800demo.sim800init()) == 0);
delay(1000);
//enable DTMF
sim800demo.setDTMFenable(OPEN);
//registration fundebug2 function
sim800demo.setDTMFHandlefunction(fundebug2);
}
//the loop routine runs over and over again forever:
void loop()
{
}
//application callback function,when Someone is calling,callback this function
//Note that not too much to handle tasks in this function
void fundebug1(void)
{
sim800demo.answerTelephone();
}
//application callback function,when a DTMF data input,callback this function
//Note that not too much to handle tasks in this function
void fundebug2(void)
{
char x = 0;
//get DTMF data
sim800demo.getDTMFresult(&x);
if(x == '1')
digitalWrite(13,HIGH); //turn the LED on by making the voltage HIGH
else if(x == '0')
digitalWrite(13,LOW);//turn the LED off by making the voltage LOW
}
1、初始化代码和前面打电话接电话一样。
2、sim800demo.setDTMFenable(OPEN)函数使能DTMF功能
3、sim800demo.setDTMFHandlefunction(fundebug2)函数注册回调函数,即当在通话中,有DTMF数据出入时,回调fundebug2函数。
4、sim800demo.getDTMFresult(&x)函数读取DTMF数据,当读取数据完成后,系统会自动清除DTMF接收标志位,fundebug2函数不回被调用,直到有新的DTMF数据传入。
语音合成及播报
打开Arduino编译器下Examples\sim800program\MakeTTSSpeak程序,编译后下载到Arduino主板上,然后将SIM800H GPRS Shield模块插在Arduino主板上,串口切换开关拨到Arduino端,拔掉USB,用Vin供电,这样准备工作完成。
核心AT指令:AT+CTTSPARAM=50,0,50,50,0\r\n AT+CTTS=1,6B228FCE4F7F75288BED97F3540862107CFB7EDF\r\n
功能简介:初始化SIM800H模块,设置TTS播报参数,非强制播报数据,延迟,然后强制播报数据。
/***************************************************
SIM800H GPRS Shield V1.0
<http://www.dfrobot.com.cn/goods-1129.html>
This example show you how to use SIM800H GPRS Shield V1.0 to speech synthesis and broadcast.
Created 2016-1-20
By Andy zhou <Andy.zhou@dfrobot.com>
GNU Lesser General Public License.
See <http://www.gnu.org/licenses/> for details.
All above must be included in any redistribution
****************************************************/
/***********Notice and Trouble shooting***************
1.Connection and Diagram can be found here
<http://wiki.dfrobot.com.cn/index.php/(SKU:TEL0089)SIM800H_GPRS_Shield_V1.0%E9%80%9A%E4%BF%A1%E6%A8%A1%E5%9D%97>
2.This code is tested on SIM800H GPRS Shield V1.0.
****************************************************/
// libraries
#include <sim800cmd.h>
//initialize the library instance
//fundebug is an application callback function,when someon is calling.
Sim800Cmd sim800demo;
//the setup routine runs once when you press reset:
void setup()
{
//initialize the digital pin as an output.
pinMode(13,OUTPUT);
//initialize SIM800H,return 1 when initialize success.
while((sim800demo.sim800init()) == 0);
delay(1000);
}
void loop()
{
//set TTS parameters
sim800demo.setTTSParameter(50,0,50,50,0);
digitalWrite(13,HIGH);//turn the LED on by making the voltage HIGH
//send data to speaker buffer use UCS2 and default speaker channel
sim800demo.sendTTSUCS2Speak("0031002C5F00706FFF0C0030002C5173706F",UCS2);
digitalWrite(13,LOW);//turn the LED off by making the voltage LOW
delay(3000);
digitalWrite(13,HIGH);//turn the LED on by making the voltage HIGH
//send data to speaker buffer use UCS2 and speaker channel 1
sim800demo.sendTTSUCS2Compulsory("0031002C5F00706FFF0C0030002C5173706F",UCS2,1);
digitalWrite(13,LOW);//turn the LED off by making the voltage LOW
delay(3000);
}
1、初始化代码和前面不一样,构造函数的时候没有传递fundebug参数,说明没有使能电话功能,当我们没有SIM卡的时候,只是使用TTS语言功能时,就可以采用这种方法。
2、采用sim800demo.setTTSParameter(50,0,50,50,0)函数来设置语音播报的参数
3、sim800demo.sendTTSUCS2Speak("0031002C5F00706FFF0C0030002C5173706F",UCS2)函数是非强制播报,如果当前正在播报,则不播报此内容,如果当前没有播报,则播报此内容;
4、sim800demo.sendTTSUCS2Compulsory("0031002C5F00706FFF0C0030002C5173706F",UCS2,1)函数是强制播报,当执行这行代码时,即使TTS当前正在播报,也会停止当前播报,然后播报现在发送的内容。
发送短信
打开Arduino编译器下Examples\sim800program\SendSMS程序,编译后下载到Arduino主板上,然后将SIM800H GPRS Shield模块插在Arduino主板上,串口切换开关拨到Arduino端,拔掉USB,用Vin供电,这样准备工作完成。
核心AT指令:AT+CMGS="00310038003600310036003300360036003500340037"\r\n
功能简介:初始化SIM800H模块,使能短信通知,发送短信。
/***************************************************
SIM800H GPRS Shield V1.0
<http://www.dfrobot.com.cn/goods-1129.html>
This example show you how to use SIM800H GPRS Shield V1.0 to send a message.
Created 2016-1-20
By Andy zhou <Andy.zhou@dfrobot.com>
GNU Lesser General Public License.
See <http://www.gnu.org/licenses/> for details.
All above must be included in any redistribution
****************************************************/
/***********Notice and Trouble shooting***************
1.Connection and Diagram can be found here
<http://wiki.dfrobot.com.cn/index.php/(SKU:TEL0089)SIM800H_GPRS_Shield_V1.0%E9%80%9A%E4%BF%A1%E6%A8%A1%E5%9D%97>
2.This code is tested on SIM800H GPRS Shield V1.0.
****************************************************/
// libraries
#include <sim800cmd.h>
//initialize the library instance
//fundebug is an application callback function,when someon is calling.
Sim800Cmd sim800demo(fundebug);
//the setup routine runs once when you press reset:
void setup()
{
//initialize SIM800H,return 1 when initialize success.
while((sim800demo.sim800init()) == 0);
delay(1000);
//enable SMS prompt
sim800demo.setSMSEnablePrompt(OPEN);
}
void loop()
{
//send message to telephone,use UCS2 code
sim800demo.sendSMS("00310035003900380032003300370033003100380031","4F60597DFF0C6B228FCE4F7F752800530049004D0038003000300048");
//while, do not return
while(1);
}
//application callback function
//Note that not too much to handle tasks in this function
void fundebug(void)
{
}
1、初始化代码和打电话接电话一样。
2、采用sim800demo.setTTSParameter(50,0,50,50,0)函数来设置语音播报的参数
3、sim800demo.setSMSEnablePrompt(OPEN)函数使能短信功能;
4、sim800demo.sendSMS("00310035003900380032003300370033003100380031","4F60597DFF0C6B228FCE4F7F752800530049004D0038003000300048")函数是发送短信,第一个参数是电话号码,第二个参数是要发送的内容,两个参数都是UCS2编码方式
注意,发送的短信内容不能大于20个字符,即80个UCS2编码。
综合应用
打开Arduino编译器下Examples\sim800program\sim800test程序,编译后下载到Arduino主板上,然后将SIM800H GPRS Shield模块插在Arduino主板上,串口切换开关拨到Arduino端,拔掉USB,用Vin供电,这样准备工作完成。
核心AT指令:AT+CMGS="00310038003600310036003300360036003500340037"\r\n'
功能简介:初始化SIM800H模块,使能短信通知,使能DTMF功能,注册DTMF回调函数,如果有来电,则接听,并rqt置1,语音播报,如果有DTMF数据输入,则赋值给rqt,然后判断rqt,进行相应的操作。
/***************************************************
SIM800H GPRS Shield V1.0
<http://www.dfrobot.com.cn/goods-1129.html>
This example show you how to use SIM800H GPRS Shield V1.0 to do some comprehensive application.
Created 2016-1-20
By Andy zhou <Andy.zhou@dfrobot.com>
GNU Lesser General Public License.
See <http://www.gnu.org/licenses/> for details.
All above must be included in any redistribution
****************************************************/
/***********Notice and Trouble shooting***************
1.Connection and Diagram can be found here
<http://wiki.dfrobot.com.cn/index.php/(SKU:TEL0089)SIM800H_GPRS_Shield_V1.0%E9%80%9A%E4%BF%A1%E6%A8%A1%E5%9D%97>
2.This code is tested on SIM800H GPRS Shield V1.0.
****************************************************/
//libraries
#include <sim800cmd.h>
//initialize the library instance
//fundebug is an application callback function,when someon is calling.
Sim800Cmd sim800demo(fundebug);
//return DTMF value
char rqt = 0;
//the setup routine runs once when you press reset:
void setup()
{
pinMode(13,OUTPUT);
//turn the LED off by making the voltage LOW
digitalWrite(13,LOW);
while((sim800demo.sim800init()) == 0);
delay(1000);
sim800demo.setSMSEnablePrompt(OPEN);
//enable DTMF
sim800demo.setDTMFenable(OPEN);
//registration fundebug2 function
sim800demo.setDTMFHandlefunction(fundebug2);
}
//the loop routine runs over and over again forever:
void loop()
{
//calling
if(rqt == 1)
{
rqt = 0;
sim800demo.sendTTSUCS2Compulsory("003253D1900177ED4FE1FF0C00315F00706FFF0C00305173706F",UCS2);
}
else if(rqt == '3')
{
rqt = 0;
sim800demo.sendTTSUCS2Compulsory("6B63572853D1900177ED4FE1",UCS2);
delay(2000);
sim800demo.cancelCall();
delay(2000);
sim800demo.sendSMS("00310035003900380032003300370033003100380031","4F60597DFF0C6B228FCE4F7F752800530049004D0038003000300048");
}
else if(rqt == '1')
{
rqt = 0;
digitalWrite(13,HIGH);//turn the LED off by making the voltage LOW
sim800demo.sendTTSUCS2Compulsory("706F5DF25F00",UCS2);
}
else if(rqt == '0')
{
rqt = 0;
digitalWrite(13,LOW);//turn the LED off by making the voltage LOW
sim800demo.sendTTSUCS2Compulsory("706F5DF25173",UCS2);
}
}
//application callback function
void fundebug(void)
{
rqt = 1;
sim800demo.answerTelephone();
}
//application callback function
void fundebug2(void)
{
//get DTMF data
sim800demo.getDTMFresult(&rqt);
}
1、初始化代码和打电话接电话一样。
2、样例代码中使用的函数在前面都介绍过,这里不再撰述;
3、这里rtq有两个功能,一个是通知loop循环,有电话来了,另一个是DTMF值。
4、值得小伙伴们注意的是,这里所有的回调函数都是采用函数指针的形式,在中断里面调用回调函数,所以,切记不要在回调函数里面做太多的任务。
库函数说明
初始化部分
1、Sim800Cmd()函数:不带参数的构造函数,适用于只使用TTS功能,而不使用GSM功能部分;
2、Sim800Cmd(void (*pRf)())函数:带指针函数的构造函数,适用于TTS功能,同时也使能了GSM电话功能;
3、sim800init()函数:SIM800H模块初始化,完成一系列的初始化工作;
4、sim800open()函数:开启SIM800H电源;
5、sim800close()函数:关闭SIM800H电源
字符串转UCS2编码方法
在下面链接中,下载UCS2编码转换软件,当然小伙伴们也可以自己在网上下载。
打开CharCoder.exe软件,在Text中输入你要转换的字符串,UCS2-BIG就是你转换后的内容,如图所示:

![]() 购买SIM800H GPRS Shield V1.0通信模块 (SKU:TEL0089)
购买SIM800H GPRS Shield V1.0通信模块 (SKU:TEL0089)
开发资料
转换工具
SIM800H GPRS Shield 原理图
SIM800H GPRS Shield V1.0资料集锦