L293 Shield 1A双路H桥电机驱动扩展板
概述
- Arduino控制器兼容的电机驱动扩展板,支持双路电机控制,单路最大电流可达1A。
- Arduino标准插针设计接口,可与其他扩展板模块叠层配合使用。可应用于小型移动机器人的开发。
技术规格
- 驱动芯片:L293B
- 逻辑工作电压:5V DC
- 电机驱动电压:7-12V DC
- 最大驱动电流:1A(每路)
- 电机驱动使用引脚:PIN4/5/6/7(Arduino控制器)
- 平面尺寸:56x57mm
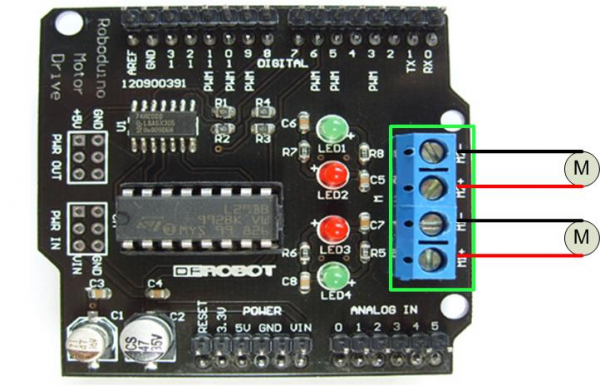
连线图

引脚分配图
| Pin | Function |
|---|---|
| Digital 4 | Motor 2 转向控制,高电平正转,低电平反转 |
| Digital 5 | Motor 2 PWM调速控制,范围0-255,0电机停转,255电机最大速度 |
| Digital 6 | Motor 1 PWM调速控制,范围0-255,0电机停转,255电机最大速度 |
| Digital 7 | Motor 1 转向控制,高电平正转,低电平反转 |
示例代码
//This motor shield use Pin 6,5,7,4 to control the motor
// Simply connect your motors to M1+,M1-,M2+,M2-
// Upload the code to Arduino/Roboduino
// Through serial monitor, type 'a','s', 'w','d','x' to control the motor
// www.dfrobot.com
// Last modified on 24/12/2009

int EN1 = 6;
int EN2 = 5;  //Roboduino Motor shield uses Pin 9
int IN1 = 7;
int IN2 = 4; //Latest version use pin 4 instead of pin 8

void Motor1(int pwm, boolean reverse)
        {
          analogWrite(EN1,pwm); //set pwm control, 0 for stop, and 255 for maximum speed
         if(reverse)
         {
          digitalWrite(IN1,HIGH);
         }
        else
        {
          digitalWrite(IN1,LOW);
         }
        }

void Motor2(int pwm, boolean reverse)
        {
          analogWrite(EN2,pwm);
         if(reverse)
         {
          digitalWrite(IN2,HIGH);
         }
        else
        {
          digitalWrite(IN2,LOW);
         }
        }

void setup()
{
    int i;
   // for(i=6;i<=9;i++) //For Roboduino Motor Shield
   // pinMode(i, OUTPUT);  //set pin 6,7,8,9 to output mode

    for(i=4;i<=7;i++)  //For Arduino Motor Shield
    pinMode(i, OUTPUT);  //set pin 4,5,6,7 to output mode

    Serial.begin(9600);
}


void loop()
{
  int x,delay_en;
  char val;
  while(1)
  {
    val = Serial.read();
    if(val!=-1)
       {
          switch(val)
           {
             case 'w'://Move ahead
                        Motor1(100,true);  //You can change the speed, such as Motor(50,true)
                        Motor2(100,true);

                         break;
             case 'x'://move back
                        Motor1(100,false);
                        Motor2(100,false);
                         break;
             case 'a'://turn left
                        Motor1(100,false);
                        Motor2(100,true);
                         break;
             case 'd'://turn right
                        Motor1(100,true);
                        Motor2(100,false);
                        break;
               case 's'://stop
                        Motor1(0,false);
                        Motor2(0,false);
                         break;

           }

       }

  }
}
本文整理于DFRobot wiki