Bluno控制灯带
最近到手一套蓝牙炫彩LED灯带套件,听起来就酷的不行。。。正直双蛋期间,可是我木有圣诞树做装饰,暂且只能玩玩灯带,还望各位看官忍受一下
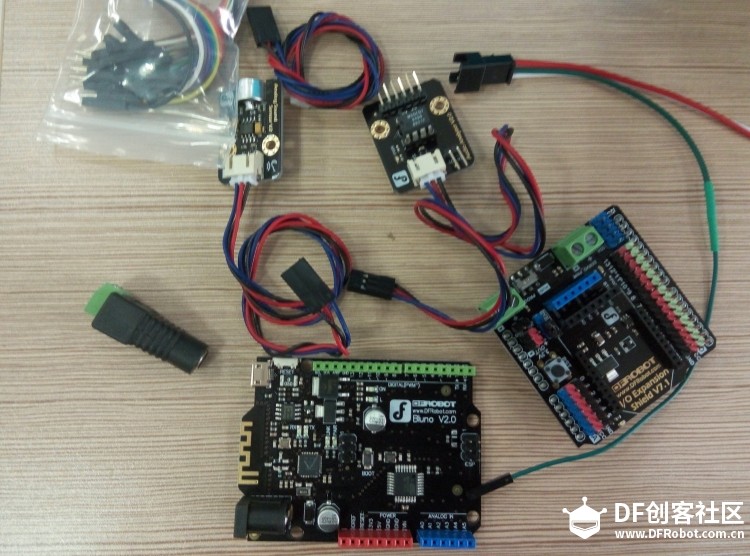
1、套件清单
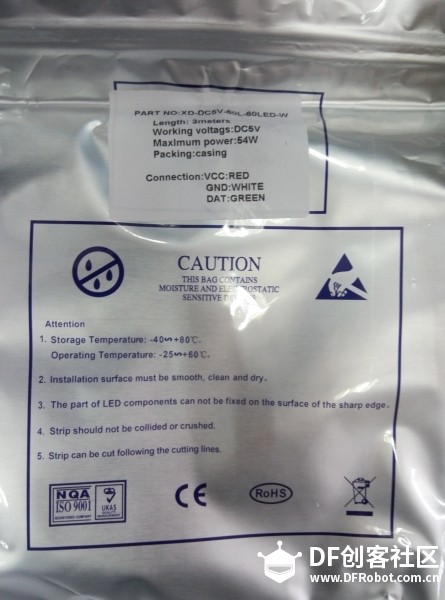
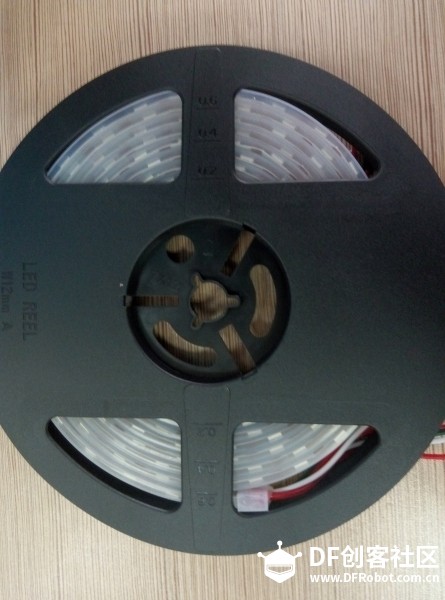
BLUNO控制器 1个模拟声音传感器 1个音频分析模块 1个3米WS2812灯带 1条传感器扩展板V7 1个电源转接头 1个5V@3.6A电源适配器1个
P51225-143807.jpg (116.6 KB, 下载次数: 3)
下载附件
保存到相册
2015-12-27 14:39 上传

P51225-143739.jpg (119.21 KB, 下载次数: 3)
下载附件
保存到相册
2015-12-27 14:39 上传
P51225-143350.jpg (55.72 KB, 下载次数: 3)
下载附件
保存到相册
2015-12-27 14:39 上传
P51225-143342.jpg (55.47 KB, 下载次数: 3)
下载附件
保存到相册
2015-12-27 14:40 上传
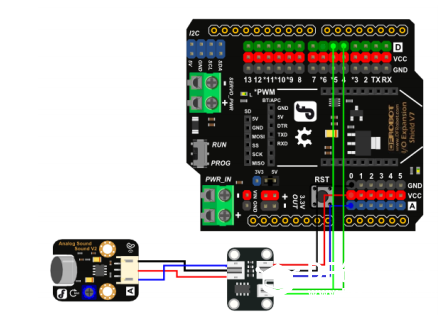
2、连接
Bluno和扩展板连接

QQ截图20151227144327.png (81.56 KB, 下载次数: 3)
下载附件
保存到相册
2015-12-27 14:44 上传
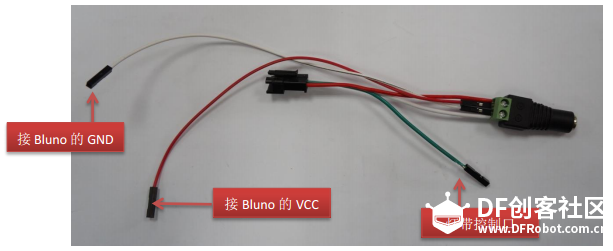
电源转接头连接
QQ截图20151227144419.png (89.32 KB, 下载次数: 3)
下载附件
保存到相册
2015-12-27 14:44 上传

P51227-140934.jpg (100.9 KB, 下载次数: 3)
下载附件
保存到相册
2015-12-27 14:39 上传
传感器连接
QQ截图20151227144351.png (79.03 KB, 下载次数: 3)
下载附件
保存到相册
2015-12-27 14:45 上传
整体连接起来

P51227-143541.jpg (140.19 KB, 下载次数: 3)
下载附件
保存到相册
2015-12-27 14:40 上传
3、编程控制(用的官网代码示例)
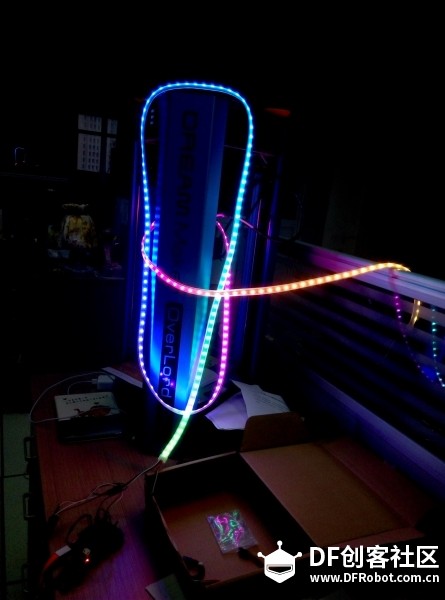
first sample,不用蓝牙模块,也不需要传感器,效果如下图
P51227-141747.jpg (43.39 KB, 下载次数: 3)
下载附件
保存到相册
2015-12-27 14:39 上传
代码
/* This code can be a good test code for your strip function: leds.setPixelColor(i,y) can be used to let number i of your led turn on with color of y and you can draw your idea easily with this function but never forget function: led.show() */ #include <Adafruit_NeoPixel.h> #define PIN 6 //The signal pin connected with Arduino #define LED_COUNT 180 // the amount of the leds of your strip // Create an instance of the Adafruit_NeoPixel class called "leds".// That'll be what we refer to from here on...Adafruit_NeoPixel leds = Adafruit_NeoPixel(LED_COUNT, PIN, NEO_GRB + NEO_KHZ800); void setup(){leds.begin();// Call this to start up the LED strip.clearLEDs(); // This function, defined below, turns all LEDs off...leds.show(); // ...but the LEDs don't actually update until you call this.} void loop(){ for (int i=0; i<LED_COUNT; i++){ rainbow(i); delay(50);// Delay between rainbow slides}} // Sets all LEDs to off, but DOES NOT update the display;// call leds.show() to actually turn them off after this.void clearLEDs(){for (int i=0; i<LED_COUNT; i++){ leds.setPixelColor(i, 0);}} // Prints a rainbow on the ENTIRE LED strip.//The rainbow begins at a specified position. // ROY G BIV!void rainbow(byte startPosition) {// Need to scale our rainbow. We want a variety of colors, even if there// are just 10 or so pixels.int rainbowScale = 192 / LED_COUNT; // Next we setup each pixel with the right colorfor (int i=0; i<LED_COUNT; i++){ // There are 192 total colors we can get out of the rainbowOrder function. // It'll return a color between red->orange->green->...->violet for 0-191. leds.setPixelColor(i, rainbowOrder((rainbowScale * (i + startPosition)) % 192));}// Finally, actually turn the LEDs on:leds.show();} // Input a value 0 to 191 to get a color value.// The colors are a transition red->yellow->green->aqua->blue->fuchsia->red...//Adapted from Wheel function in the Adafruit_NeoPixel library example sketchuint32_t rainbowOrder(byte position) {// 6 total zones of color change:if (position < 31)// Red -> Yellow (Red = FF, blue = 0, green goes 00-FF){ return leds.Color(0xFF, position * 8, 0);}else if (position < 63)// Yellow -> Green (Green = FF, blue = 0, red goes FF->00){ position -= 31; return leds.Color(0xFF - position * 8, 0xFF, 0);}else if (position < 95)// Green->Aqua (Green = FF, red = 0, blue goes 00->FF){ position -= 63; return leds.Color(0, 0xFF, position * 8);}else if (position < 127)// Aqua->Blue (Blue = FF, red = 0, green goes FF->00){ position -= 95; return leds.Color(0, 0xFF - position * 8, 0xFF);}else if (position < 159)// Blue->Fuchsia (Blue = FF, green = 0, red goes 00->FF){ position -= 127; return leds.Color(position * 8, 0, 0xFF);}else//160 <position< 191 Fuchsia->Red (Red = FF, green = 0, blue goes FF->00){ position -= 159; return leds.Color(0xFF, 0x00, 0xFF - position * 8);}}复制代码
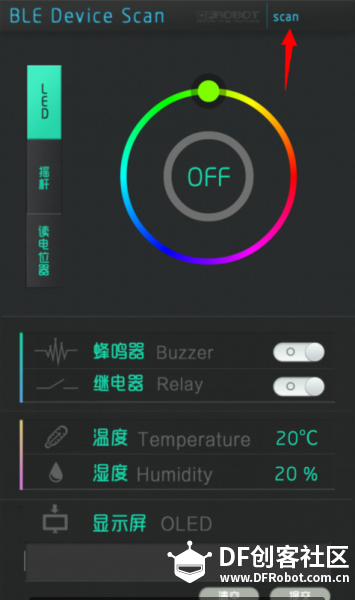
second sample,Bluno蓝牙控制,嘎嘎
这个是可以通过手机app来控制的,当手机与Bluno蓝牙配对连接后就可以控制了,app的下载网址http://www.dfrobot.com.cn/goods-823.html
app界面如下(箭头所指处事蓝牙连接)
QQ截图20151227175320.png (201.77 KB, 下载次数: 3)
下载附件
保存到相册
2015-12-27 17:53 上传
代码(注意提前导入库)
#include <Adafruit_NeoPixel.h>#include "WS2812_Definitions.h"#include <avr/pgmspace.h>#include <Wire.h>#include "Arduino.h"#include "PlainProtocol.h"#include <Metro.h>#include <AudioAnalyzer.h>#define PIN 6 //Arduino Pin connect to the LED Strip #define LED_COUNT 220 //set the Amount of LED to 180 and this number depend on how many you really havePlainProtocol BLUNOPlainProtocol(Serial,115200);//set Serial baud rate to 115200 Adafruit_NeoPixel leds = Adafruit_NeoPixel(LED_COUNT, PIN, NEO_GRB + NEO_KHZ800);// NEO_GRB means the type of your LED Strip Metro ledMetro = Metro(18);// Metro for data receive in a regular timeAnalyzer Audio = Analyzer(4,5,0); // Strobe->4 RST->5 Analog->0int humid=0;int temper=0; //humid and temper means nothing in this program,just for the software in your phoneint State01=2,State02=0; //the value will change when your press "BUZZER" in your phone int Red=10,Green=0,Blue=10,Number_Position_RGB=100;//the value of RGB and the position of the LEDsint FreqVal[7];//the spectrum value int color[]={0xDC143C,0xFFA500,0xFFFF00, 0x32CD32,0x0000FF,0x2F4F4F,0x4B0082,0xDA70D6};int Num_Channel=0,Buff_Channel=0;int Num_Color[7],Buff_Num_Color[7];boolean Dis_En=false;int Num_First_Color=0,Buf_Max=0; //int Num_Shark02_High=0,Number_Shark02_LOW=0;void setup(){Audio.Init();//Init moduleleds.begin();// Call this to start up the LED strip.clearLEDs(); // This function, defined below, turns all LEDs off...leds.show(); // ...but the LEDs don't actually update until you call this.Serial.begin(115200);TCCR1B &= ~((1<<CS12)|(1<<CS11)|(1<<CS10)); //Clock select: SYSCLK divde 8;TCCR1B |= (1<<CS11);TCCR2B &= ~((1<<CS12)|(1<<CS11)|(1<<CS10)); //Clock select: SYSCLK divde 8;TCCR2B |= (1<<CS11);}void loop(){temper=State01;humid=State02;if (BLUNOPlainProtocol.available()) { if(BLUNOPlainProtocol.receivedCommand=="TEMP") BLUNOPlainProtocol.write("TEMP", temper); else if(BLUNOPlainProtocol.receivedCommand=="HUMID") BLUNOPlainProtocol.write("HUMID", humid); if (BLUNOPlainProtocol.receivedCommand=="BUZZER") //get command of "BUZZER" { if(BLUNOPlainProtocol.receivedContent[