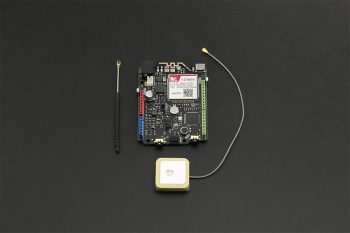
SIM808 with Leonardo mainboard
![]()
DFR0355 SIM808 with Leonardo mainboard
目录
1 概 述
2 技术规格
3 接口示意图
4 SIM808模块的省电模式
5 使用该主控板给3.7V锂电池充电
6 通过 USB接/AT指令 调试SIM808模块
7 GSM/GPRS的基本功能
7.1 拨打电话
7.2 接听与挂断电话
7.3 发送短信
7.4 读取短信
7.5 TCP通讯
8 GPS功能
8.1 GPS通信
9 通过代码调试SIM808模块
9.1 下载与安装
9.2 部分功能说明
9.2.1 打电话
9.2.2 接电话
9.2.3 发送短信
9.2.4 获取GPS数据并上报到TCP
10 常见问题
11 更多
概 述
SIM808 with Leonardo mainboard是DFRobot最新开发的一款具备GSM/GPRS/GPS功能的Arduino兼容的多功能型控制板。板载SIM808模块是一个完整的四频GSM/GPRS以及卫星GPS导航技术相结合的通信模块。采用4层PCB板布线设计,使得主板的尺寸得以更加紧凑,大小仅与一张信用卡相当。所有的原件,包括麦克风,耳机接口,外接电源,GSM & GPS功能集中在一个标准的Arduino板中,能够为您节约大量的开发周期和材料成本。并且对尺寸上的限制也会大大减小。
SIM808主控板同时支持多种供电方式,包括USB,外接电源,3.7V锂电池供电,板载锂电池充电电路,可以在外接供电的同时为锂电池充电。此外,SIM808主板支持低功耗睡眠模式,可以极大地延长了待机时间。这些特性对实际的应用开发有着非常大的帮助,特别是在车辆追踪,安保安防和将来的物联网使用。
SIM808 主控板采用SIMCOM最新版SIM808模块,与市面上现有的SIM808模块相比,新版的模块具有更好的稳定性。(注意GPS部分的AT指令与老版的SIM808模块无法兼容)。
技术规格
AVR Arduino 微控制器:ATmega32u4(Bootloader:Arduino Leonardo)
工作电压:5V
输入电压:5V(USB)/ 7~23V(外接电源)/ 3.5~4.3V(电池)
数字I/O管脚:20(7个PWM:3, 5, 6, 9, 10, 11, 13)
模拟输入管脚:12
Flash内存:32 KB (4 KB 用于bootloader)
SRAM:2.5 KB
EEPROM:1 KB
Clock Speed:16 MHz
GSM芯片:SIM808 四频GSM/GPRS+GPS模块
四频 850/900/1800/1900MHz
GPRS multi-slot class 12/10
GPRS mobile station class B
符合 GSM phase 2/2+
Class 4 (2 W @ 850/900MHz)
Class 1 (1 W @ 1800/1900MHz)
Bluetoot协议h:3.0+EDR
支持低功耗模式:100mA@7V-GSM模式
通过AT指令控制(3GPP TS 27.007,27.005 和 SIMCOM enhanced AT Commands)
支持GPS卫星导航技术
支持LED状态显示:显示电源供应状态,网络状态和工作模式
工作环境:-40℃ ~85℃
大小:73*54mm
接口示意图
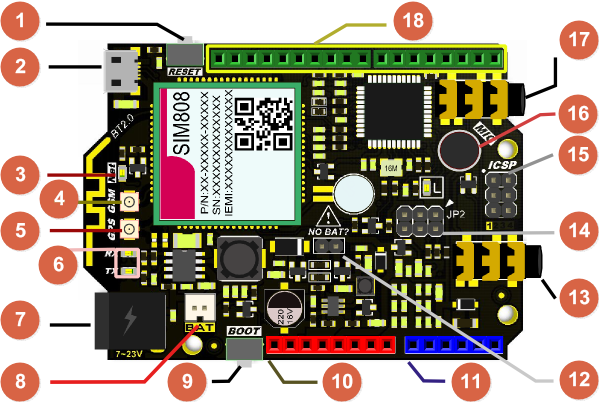
序号
标签
描述
1
RESET
Arduino复位按钮
2
USB
MicroUSB接口
3
Net
SIM808 网络信号指示
快闪:搜寻网络
慢闪(3s一次):网络注册完成
4
GSM
GSM/GPRS 天线接口
5
GPS
GPS 天线接口
6
RX/TX
串口指示灯
7
7-23V
外界供电接口,7~23V直流电
8
BAT
3.7V锂电池接口 点击购买3.7V锂电池
*9
BOOT
SIM808启动开关
10
电源接口
Arduino 标准电源接口
11
模拟接口
Arduino 模拟输入接口
*12
NO BAT?
锂电池供电切换跳帽
13
3.5mm耳机插口
3.5mm耳机插口
14
JP2
RI/DTR 信号控制管脚
15
ICSP
Arduino ICSP 接口
16
MIC
板载麦克风
*17
MIC 插孔
外部麦克风插孔
18
数字接口
Arduino 数字I/O接口
*模块开/关机控制引脚
数字口“D12”已内部连接至SIM808模块开/关引脚,可用于SIM808模块开/关机控制。
*BOOT按钮SIM808模块开关,短按Boot开机,长按3s关机
注意:当模块通过外接电源供电的时候(VIN端接入7~23V直流电源,非锂电池供电),模块会自动开机(即使处在关机状态下),“D12”引脚及BOOT按钮此时将无法使模块开机,此问题受限于模块的充电功能,可通过复位Arduino重新开机
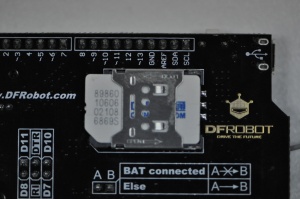
*NO BAT? 3.7V锂电池供电切换跳帽
若使用3.7V锂电池供电时(接入BAT接口),请将接在下图黄色箭头所指“NO BAT?”的2-Pin排针上的跳线帽拔掉(若跳线帽存在)。

即BAT连接锂电池时(BAT connected)将A、B点断开,其它情况将A、B点通过跳线连接起来。(接入锂电池的时候,即使外接USB,也请将跳帽断掉)
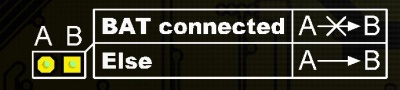
![]()
注意:若用户操作不当,即:VIN电源及BAT同时接在主板上,且“NO BAT?”口接上了跳线帽,虽然不会造成主板的损坏,但有可能会使得接入BAT接口的锂电池寿命减少。
*JP2信号输出接口
JP2接口为SIM808模块RI引脚及DTR引脚的控制口,两个功能引脚可通过跳线帽进行切换(主板背面有详细的标注)。RI及DTR控制口介绍如下:
*RI端口
RI端口是用来检测模块的通话状态,具体如下:
在通话时,如果模块作为被呼叫一方,当有收到来电时RI电平会被拉低,当呼叫方或被呼叫方挂断又或者模块接通来电之后RI电平又会返回高电平状态,如下图所示。
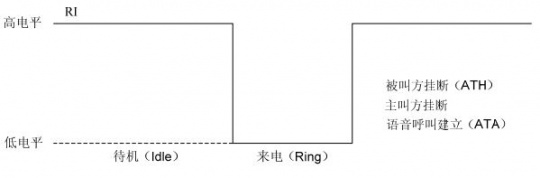
![]() 被叫通话时RI电平变化
被叫通话时RI电平变化
在接收短信或串口主动上报(URC)时,RI电平将会产生一个120ms的低脉冲,之后恢复到高电平状态,如下图所示。
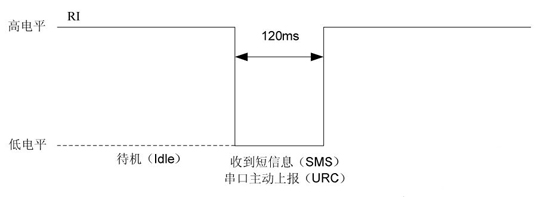
![]() 短信或URC上报时RI电平变化
短信或URC上报时RI电平变化
在通话时,如果模块作为主呼出一方,RI端口将一直保持高电平,不会有任何变化。
*DTR端口
DTR端口为SIM808模块休眠唤醒使用的端口,未操作时DTR为高电平。当模块进入休眠,拉低DTR大概50ms后,模块会被唤醒。(即睡眠唤醒功能引脚)
SIM808模块的省电模式
SIM808 with Leonardo mainboard在BAT供电的情况下,我们在硬件设计上已经尽量为用户考虑——降低功耗。SIM808模块包含两种省电模式: 休眠模式和最小功能模式。当模块被设置为最小功能模式并且进入休眠模式后,模块的电流消耗值会达到最低。
参考数据:实际测试中使用4V电源接入VBAT,板上未接其它电源的情况下,使SIM808模块进入休眠模式,电流约为15mA。
1 休眠模式
用户可以通过命令"AT+CSCLK=1"使模块进入休眠模式(AT命令的使用方式,请参考章节6)。在休眠模式下,模块的电流消耗会变得非常小。设置"AT+CSCLK=1"后,如果模块处于待机状态并且DTR是高电平,没有其它中断产生(来电,短信等),模块将自动进入休眠模式。在这种模式下,模块仍然能接收来自网络的呼叫和短息。
注意:在休眠模式下,串口将不可使用。
当模块处于休眠模式下,可以通过以下几种方式唤醒模块:
接收到外部中断信号(DTR信号);
接收到语音或数据呼叫;
接收到短信消息(SMS);
拉低DTR引脚;
2 最小功能模式
最小功能模式就是将模块功能减小到最少,所以也使得模块的电流消耗减小到最少。可以通过命令"AT+CFUN=<fun>"把模块设置到该模式下,这条命令提供三种选择,用于设置不同功能。
AT+CFUN=0:最小功能模式。这种模式下,串口仍然可以继续使用,但是与射频和SIM卡相关的功能以及部分AT命令不能使用。
AT+CFUN=1:全功能模式(默认)。
AT+CFUN=4:飞行模式。这种模式下,模块仍然可以使用串口,但是与射频相关以及部分AT指令不能使用。
使用该主控板给3.7V锂电池充电
SIM808模块集成了3.7V锂电池充电功能,最大充电电流为1A。下面将介绍如何使用SIM808 with Leonardo mainboard主板为3.7V锂电池充电:
将3.7V锂电池接入BAT接口,锂电池购买链接,请注意将“NO BAT?”处的跳线帽去掉。
USB口通过MicroUSB线连接到电脑上,下载调试代码。
短按BOOT按钮,让模块开机。
通过串口助手发送命令"AT+ECHARGE=1"控制模块进入充电模式。
VIN电源接口接入7-23V外接直流电源。(如之前已经接入VIN,请断开后重新接入)
上述五个步骤完成之后通过发送"AT+CBC"指令可查询电池电量及充电状态。关于指令的详细介绍请参考AT指令手册(详见本页尾"更多")。
通过 USB接/AT指令 调试SIM808模块
![]() 安装SIM卡
安装SIM卡
![]() 连接天线,启动模块
连接天线,启动模块
您需要做以下准备工作。
SIM卡安装
将一张可用的SIM卡插在板子背面。将天线插在板子上
如果您需要继续做GPS功能,也可以将GPS模块连上。供电并与电脑连接
插入外部供电,可通过外部供电插口或VIN管脚输入7-23V DC电源,也可以将NO BAT?接口上的跳帽拔掉,用3.7V锂电池供电。
插上USB线,并连接到电脑,如果您已经安装Arduino软件,会自动为板子安装Leonardo的驱动,设备管理器里可以看到COM串口。
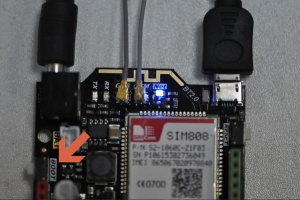
启动SIM808
按住BOOT键,启动SIM808模块,然后观察板子,Net指示灯开始闪烁,快速闪烁代表在寻找网络,慢速闪烁(约3S一次)代表已经找到网络。下载串口AT指令调试代码
由于Leonardo USB转串口是通过内部软件实现的,所以不能够通过Arduino USB接口直接调试SIM808模块,但我们只需要给Leonardo添加一段程序将其作为一个USB转串口芯片,这样便可以通过Leonardo的USB口调试SIM808模块!
将下面的代码下载到我们的主板上,之后便可以通过USB口调试SIM808模块了。
void setup() {
Serial.begin(115200); //初始化Serial(即USB串口)
Serial1.begin(115200);//初始化Serial1
}
void loop() {
while (Serial1.available()) {
Serial.write(Serial1.read());//如果Serial1收到数据则通过Serial输出
}
while (Serial.available()) {
Serial1.write(Serial.read());//如果Serial收到数据则通过Serial1输出
}
delay(1);//短暂延时,避免USB-COM不稳定
}
GSM/GPRS的基本功能
串口助手选择:网络上的串口助手种类很多,调试过程可以在任意的串口工具上实现,也可以直接在Arduino IDE的串口监视器上完成。
NOTE: 对于用AT指令发短信的功能,Arduino串口窗不能发送结束符。推荐串口工具Coolterm 或DF Serial Debugger by Lisper。
下面将以图文方式演示教大家最基本的AT指令使用。指令具体参数含义及更多的AT指令介绍请参照本页末尾中“更多”中的AT指令手册。
拨打电话

![]() SIM808拨打电话
SIM808拨打电话
接听与挂断电话
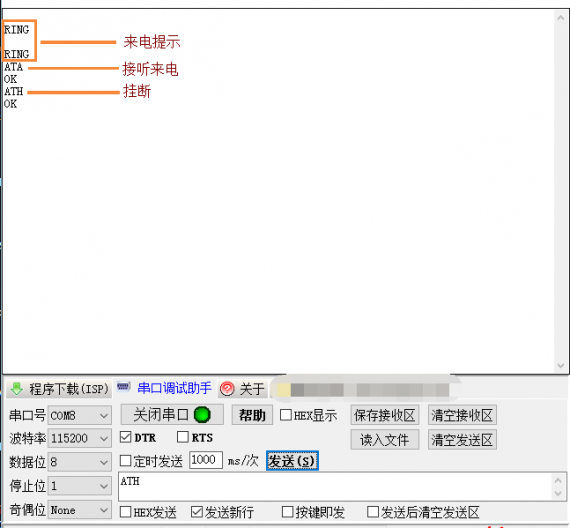
![]() SIM808来电接听与挂断
SIM808来电接听与挂断
发送短信

![]() SIM808发送短信
SIM808发送短信
读取短信
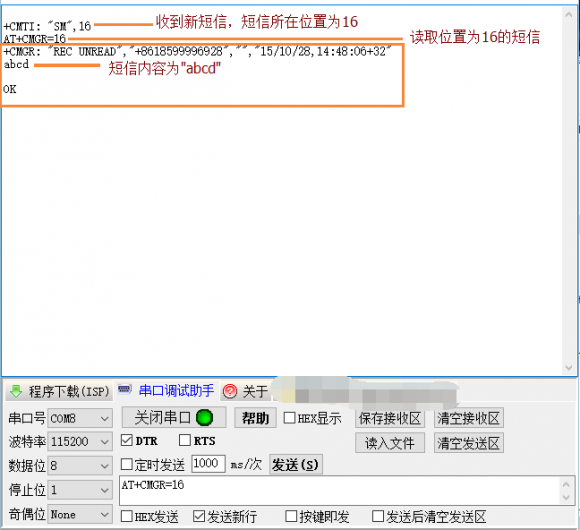
![]() SIM808读取短信
SIM808读取短信
TCP通讯
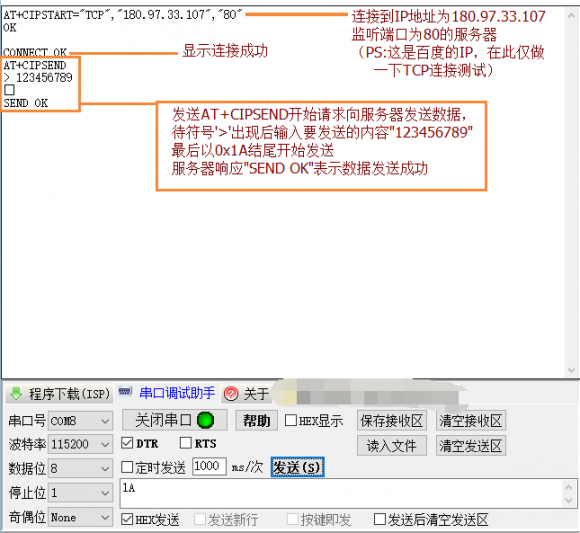
![]() SIM808 TCP连接发送
SIM808 TCP连接发送
GPS功能
GPS通信
注意:GPS天线必须置于室外,才可以获得稳定的GPS定位数据输出。
- 硬件连接
DC2.1 VIN接口接入(7-23V)外接电源。(注意板上NO BAT提示,没有接锂电池时请将跳线帽接上。)
将上面的Arduino代码下载到主板,通过Micro USB线将计算机与主板连接,通过 串口调试助手 调试SIM808模块。
将GSM天线及GPS天线接在板上对应位置。 - 开机
可编程通过Leonardo控制D12控制开机,也可以按住Boot按钮开机。(当Net灯开始闪烁表示模块已经启动)
![]()
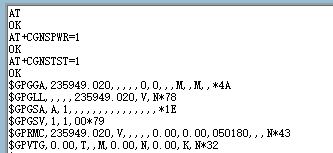
- 打开串口助手软件发送AT命令控制GPS通信
发送AT+CGNSPWR=1命令(打开GPS电源)
发送AT+CGNSTST=1命令 (开始从串口接收GPS数据)
如果GPS天线已经放置露天位置并收到GPS数据,等待几分钟后,会有正确的GPS定位数据输出。
当想暂停GPS数据输出,可发送AT+CGNSTST=0命令可暂停GPS数据输出。
当想关闭GPS,可发送AT+CGNSPWR=0命令关断GPS电源。
发送AT+CPOWD=1,将模块关机。
想重新开机再次按下RST按键。
通过代码调试SIM808模块
请先下载SIM808库文件并安装库文件。
如果你的编译器是1.6及以上版本,请下载SIM808文件,如果是1.6以下版本请下载SIM808文件
注意:建议使用Arduino1.5.5及以上版本使用。
下载与安装
将下载好的SIM808库文件放到arduino-1.5.5-r2\libraries文件夹下。
部分功能说明
注意:
库文件中已经将初始化设置等功能完成,不需要用户自己去设置。
在\SIM808\src文件夹下有debugDF.h文件,修改相关的宏定义,可以通过USB口打印相应的调试信息。
打电话
函数说明:
gsmAccess.begin():初始化SIM808模块,其中一些AT指令的设置就是在这里面完成的,正常启动后返回SIM808_READY
remoteNumber.toCharArray():将用户输入的电话号码转换
vcs.getvoiceCallStatus():获取当前通话状态
vcs.hangCall():挂电话
/***************************************************
SIM808 with Leonardo mainboard
<http://www.dfrobot.com.cn/goods-1074.html>
This example show you how to use SIM808 with Leonardo mainboard to make a call.
Created 2016-1-15
By Andy zhou <Andy.zhou@dfrobot.com>
GNU Lesser General Public License.
See <http://www.gnu.org/licenses/> for details.
All above must be included in any redistribution
****************************************************/
/***********Notice and Trouble shooting***************
1.Connection and Diagram can be found here
<http://wiki.dfrobot.com.cn/index.php?title=(SKU:DFR0355)SIM808_with_Leonardo_mainboard>
2.This code is tested on SIM808 with Leonardo mainboard.
****************************************************/
// libraries
#include "sim808.h"
// PIN Number
#define PINNUMBER ""
// initialize the library instance
SIM808 gsmAccess; // include a 'true' parameter for debug enabled
SIM808VoiceCall vcs;
String remoteNumber = ""; // the number you will call
char charbuffer[20];
void setup()
{
// initialize serial communications and wait for port to open:
Serial.begin(9600);
while (!Serial) {
; // wait for serial port to connect. Needed for Leonardo only
}
Serial.println("Make Voice Call");
// connection state
boolean notConnected = true;
// Start GSM shield
// If your SIM has PIN, pass it as a parameter of begin() in quotes
while(notConnected)
{
if(gsmAccess.begin(PINNUMBER)==SIM808_READY)
notConnected = false;
else
{
Serial.println("Not connected");
delay(1000);
}
}
Serial.println("GSM initialized.");
Serial.println("Enter phone number to call.");
}
void loop()
{
// add any incoming characters to the String:
while (Serial.available() > 0)
{
char inChar = Serial.read();
// if it's a newline, that means you should make the call:
if (inChar == '\n')
{
// make sure the phone number is not too long:
if (remoteNumber.length() < 20)
{
// let the user know you're calling:
Serial.print("Calling to : ");
Serial.println(remoteNumber);
Serial.println();
    // Call the remote number
    remoteNumber.toCharArray(charbuffer, 20);


    // Check if the receiving end has picked up the call
    if (vcs.voiceCall(charbuffer))
    {
      Serial.println("Call Established. Enter line to end");
      // Wait for some input from the line
      while (Serial.read() != '\n' && (vcs.getvoiceCallStatus() == TALKING));
      // And hang up
      vcs.hangCall();
    }
    Serial.println("Call Finished");
    remoteNumber = "";
    Serial.println("Enter phone number to call.");
  }
  else
  {
    Serial.println("That's too long for a phone number. I'm forgetting it");
    remoteNumber = "";
  }
}
else
{
  // add the latest character to the message to send:
  if (inChar != '\r')
    remoteNumber += inChar;
}
}
}
接电话
函数说明:
vcs.retrieveCallingNumber():获取来电号码
vcs.answerCall():接听电话
/***************************************************
SIM808 with Leonardo mainboard
<http://www.dfrobot.com.cn/goods-1074.html>
This example show you how to use SIM808 with Leonardo mainboard to receive a call.
Created 2016-1-15
By Andy zhou <Andy.zhou@dfrobot.com>
GNU Lesser General Public License.
See <http://www.gnu.org/licenses/> for details.
All above must be included in any redistribution
****************************************************/
/***********Notice and Trouble shooting***************
1.Connection and Diagram can be found here
<http://wiki.dfrobot.com.cn/index.php?title=(SKU:DFR0355)SIM808_with_Leonardo_mainboard>
2.This code is tested on SIM808 with Leonardo mainboard.
****************************************************/
// Include the GSM library
#include <sim808.h>
// PIN Number
#define PINNUMBER ""
// initialize the library instance
SIM808 gsmAccess;
SIM808VoiceCall vcs;
// Array to hold the number for the incoming call
char numtel[20];
void setup()
{
// initialize serial communications and wait for port to open:
Serial.begin(9600);
while (!Serial) {
; // wait for serial port to connect. Needed for Leonardo only
}
Serial.println("Receive Voice Call");
// connection state
boolean notConnected = true;
// Start GSM shield
// If your SIM has PIN, pass it as a parameter of begin() in quotes
while (notConnected)
{
if (gsmAccess.begin(PINNUMBER) == SIM808_READY)
notConnected = false;
else
{
Serial.println("Not connected");
delay(1000);
}
}
// This makes sure the modem correctly reports incoming events
vcs.hangCall();
Serial.println("Waiting for a call");
}
void loop()
{
// Check the status of the voice call
switch (vcs.getvoiceCallStatus())
{
case IDLE_CALL: // Nothing is happening
  break;

case RECEIVINGCALL: // Yes! Someone is calling us

  Serial.println("RECEIVING CALL");

  // Retrieve the calling number
  vcs.retrieveCallingNumber(numtel, 20);

  // Print the calling number
  Serial.print("Number:");
  Serial.println(numtel);

  // Answer the call, establish the call
  vcs.answerCall();
  break;

case TALKING:  // In this case the call would be established

  Serial.println("TALKING. Press enter to hang up.");
  while (Serial.read() != '\n')
    delay(100);
  vcs.hangCall();
  Serial.println("Hanging up and waiting for the next call.");
  break;
}
delay(1000);
}
发送短信
函数说明:
sms.beginSMS():将转换后的号码格式传递给SIM808模块
sms.print():打印要发送的短信,这里是将短信内容输入到SIM808模块
sms.endSMS():完成短信发送任务
/***************************************************
SIM808 with Leonardo mainboard
<http://www.dfrobot.com.cn/goods-1074.html>
This example show you how to use SIM808 with Leonardo mainboard to send a message.
Created 2016-1-15
By Andy zhou <Andy.zhou@dfrobot.com>
GNU Lesser General Public License.
See <http://www.gnu.org/licenses/> for details.
All above must be included in any redistribution
****************************************************/
/***********Notice and Trouble shooting***************
1.Connection and Diagram can be found here
<http://wiki.dfrobot.com.cn/index.php?title=(SKU:DFR0355)SIM808_with_Leonardo_mainboard>
2.This code is tested on SIM808 with Leonardo mainboard.
****************************************************/
// Include the GSM library
#include <sim808.h>
#define PINNUMBER ""
// initialize the library instance
SIM808 gsmAccess;
SIM808SMS sms;
void setup()
{
// initialize serial communications and wait for port to open:
Serial.begin(9600);
while (!Serial) {
; // wait for serial port to connect. Needed for Leonardo only
}
Serial.println("SMS Messages Sender");
// connection state
boolean notConnected = true;
// Start GSM shield
// If your SIM has PIN, pass it as a parameter of begin() in quotes
while (notConnected)
{
if (gsmAccess.begin(PINNUMBER) == SIM808_READY)
notConnected = false;
else
{
Serial.println("Not connected");
delay(1000);
}
}
Serial.println("GSM initialized");
}
void loop()
{
Serial.print("Enter a mobile number: ");
char remoteNum[20]; // telephone number to send sms
readSerial(remoteNum);
Serial.println(remoteNum);
// sms text
Serial.print("Now, enter SMS content: ");
char txtMsg[200];
readSerial(txtMsg);
Serial.println("SENDING");
Serial.println();
Serial.println("Message:");
Serial.println(txtMsg);
// send the message
sms.beginSMS(remoteNum);
sms.print(txtMsg);
sms.endSMS();
Serial.println("\nCOMPLETE!\n");
}
/*
Read input serial
*/
int readSerial(char result[])
{
int i = 0;
while (1)
{
while (Serial.available() > 0)
{
char inChar = Serial.read();
if (inChar == '\n')
{
result[i] = '\0';
Serial.flush();
return 0;
}
if (inChar != '\r')
{
result[i] = inChar;
i++;
}
}
}
}
获取GPS数据并上报到TCP
函数说明:
char tcpip[]=""TCP","183.230.40.39","876""':是tcp上报格式,用户只要按照这个格式酌情修改即可
mygps.availableGPS():检测是否有有效的GPS数据接收到,有时候可能接收不到GPS数据,系统会自动的进行筛选,直到接收到有效的GPS数据
mygps.readGPS():获取GPS数据
mytcp.connectTCP():链接tcp
mytcp.setServerParameters():设置tcp的用户信息
mytcp.sendTCPdata():发送数据,示例中是发送gps数据
mytcp.disConnectTCP():断开tcp链接,当然如果想不断的发送数据,也可以再次发送,只要服务器支持不间断发送数据
/***************************************************
SIM808 with Leonardo mainboard
<http://www.dfrobot.com.cn/goods-1074.html>
This example show you how to use SIM808 with Leonardo mainboard.
Created 2016-1-15
By Andy zhou <Andy.zhou@dfrobot.com>
GNU Lesser General Public License.
See <http://www.gnu.org/licenses/> for details.
All above must be included in any redistribution
****************************************************/
/***********Notice and Trouble shooting***************
1.Connection and Diagram can be found here
<http://wiki.dfrobot.com.cn/index.php?title=(SKU:DFR0355)SIM808_with_Leonardo_mainboard>
2.This code is tested on SIM808 with Leonardo mainboard.
****************************************************/
// libraries
#include "sim808.h"
// PIN Number
#define PINNUMBER ""
// initialize the library instance
SIM808 gsmAccess; // include a 'true' parameter for debug enabled
SIM808GPS mygps;
SIM808TCP mytcp;
String remoteNumber = ""; // the number you will call
char tcpip[]=""TCP","183.230.40.39","876"";
char datastreams_id[]="GPS Data";
char device_id[]="135506";
char api_key[] ="Qjvc7i1UwteNzL1jOGZ8VsVJ04gA";
char *gpsbuffer;
char gpsdatalen=0;
void setup()
{
// initialize serial communications and wait for port to open:
Serial.begin(9600);
while (!Serial) {
; // wait for serial port to connect. Needed for Leonardo only
}
Serial.println("GPS debug...");
// connection state
boolean notConnected = true;
// Start GSM shield
// If your SIM has PIN, pass it as a parameter of begin() in quotes
while(notConnected)
{
if(gsmAccess.begin(PINNUMBER)==SIM808_READY)
notConnected = false;
else
{
Serial.println("Not connected");
delay(1000);
}
}
Serial.println("GSM initialized.");
delay(2000);
}
void loop()
{
while(mygps.availableGPS()==0){
Serial.println("NO GPS data...");
delay(500);
}
mygps.readGPS(gpsbuffer);
gpsdatalen = strlen(gpsbuffer);
Serial.println(gpsbuffer);
delay(100);
if(mytcp.connectTCP(tcpip)){
Serial.print(" TCP connected:");
Serial.println(tcpip);
mytcp.setServerParameters(datastreams_id,device_id,api_key);
mytcp.sendTCPdata(gpsbuffer);
mytcp.disConnectTCP();
}else{
Serial.println("Not connect tcp service!");
}
}
常见问题
问:4G卡AT调试行,代码调试不行
答: 要用3G、2G卡
问: 板子上的板载天线是蓝牙的天线吗?怎么使用蓝牙的功能?
答: 您好,是蓝牙的天线。但由于新的SIM808芯片中,固件对蓝牙的支持不稳定,很可能造成芯片固件擦除,故目前蓝牙功能还不开放使用。如果需要使用蓝牙功能,请购买蓝牙模块或带BLE功能的主板。
问:为什么插上USB线,调试没有反应
答: 您好,需要接入外部电源。
问:为什么拨打电话还没有回应
答: 需要在号码后面添加“;”
问:为什么烧程序时烧不进去,提示串口占用了
答: 可能把调试软件关掉就可以了
问:为什么用代码测试打电话的时候出现“Not connected”
答: 需要等一会
问:用Arduino IDE串口调试的话如下图
答: 需要调到“Both NL&CR”,而且需要点击发送按钮
更多问题及有趣的应用,可以 访问论坛 进行查阅或发帖!
更多
相关文档
文档一:新版SIM808模块定位系统使用手册
文档二:SIM808 with Leonardo mainboard原理图
文档三:SIM80X系列AT指令手册
论坛应用贴
使用SIM808 with Leonardo mainboard实现远程定位
![]() [Link ]
[Link ]