六足机器人套件
目录
1 STEP 1:安装蜘蛛
2 STEP 2: 设置舵机ID号
2.1 连接图
2.2 下载代码
2.3 串口发指令
2.4 设置每个舵机的ID号
2.5 函数介绍
3 STEP 3:硬件连接
4 STEP 4:下载代码
5 库说明
STEP 1:安装蜘蛛
这篇教程将教你怎么做个大蜘蛛,通过代码来控制蜘蛛的腿脚灵活运动。 第一步,安装蜘蛛。具体可参看蜘蛛详细安装教程
STEP 2: 设置舵机ID号
在连接蜘蛛之前,需要给每个舵机设置ID号,就像编号一样,每个舵机都有个独立的编号,便于之后代码中进行控制。我们通过直接代码串口发指令来完成设置。如果你是机器人高手的话,那直接看CDS5500机器人舵机用户手册
连接图
按下图将舵机连接到控制器上,舵机驱动板接上电源。

![]()
下载代码
插上USB线,下载下段代码,由于代码还有需要个.h文件,所以建议直接下载样例代码cds5516_set。
/*
- created: lisper
- by: 2013-09-10
- description: test the digitalservo shield with cds556 servo
*/
#include "cds55.h"
#define CMD_SIZE 32
#define CMDP_SIZE 8
char cmd_buf[CMD_SIZE]; //buf from serial
char *cmdp_buf[CMD_SIZE]; //build from cmd_buf, easy to get argument by index
//
void setup (void) {
Serial.begin(9600); // 开始串口通讯
Serial1.begin(1000000); // 开始串口通讯
}
uint8_t readBuf[10];
//
void loop (void) {
int readLeng = serialRead (Serial1, readBuf, 10, 4);
if (readLeng > 0) {
for (int i=0; i<readLeng; i++) {
Serial.print (readBuf[i], HEX);
Serial.print (" ");
}
Serial.println ();
}
if (serialRead (Serial, (uint8_t *)cmd_buf, CMD_SIZE, 4)) { //read serial data to cmd_buf
int leng = split (cmdp_buf, cmd_buf, CMDP_SIZE); //build cmdp_buf by cmd_buf
    char command = cmdp_buf[0][0];  //get command
    uint8_t id = atoi (cmdp_buf[1]); //get id
    uint16_t value = atoi (cmdp_buf[2]);    //get a argument

    Serial.print ("command = ");  // display command
    Serial.print (command);         //
    Serial.print ("  id = ");     //
    Serial.print (id);              //
    Serial.print ("  value = ");  //
    Serial.println (value);         //

    switch (command) {
        case 'p':       //move to value (0~300)
            cds55_pos (id, value);
            break;
        case 'r':       //reset servo
            cds55_reset (id);
            break;
        case 'l':       //open or close led by 1 or 0
            cds55_led (id, value);
            break;
        case 't':       //enable or disable torque by 1 or 0
            cds55_torque (id, value);
            break;
        case 'i':       //change id to newid by value
            cds55_setID (id, value);
            break;
        case 'v':       //change move velocity
            cds55_velocity (id, value);
            break;
        default:
            Serial.println ("error! no this command!");
    }
}
}
int split (char **cmdstr, char str, int leng) {
int i;
for (i=0; str && i<leng-1; i++) {
while (isspace (str))
str++='\0';
if (str == '\0')
break;
cmdstr[i] = str;
while (isgraph (str))
str++;
}
cmdstr[i] = '\0';
return i;
}
//call like : serialRead (Serial1, buffer, 12, 5)
uint8_t serialRead (HardwareSerial the_serial,
uint8_t *buf, uint8_t leng, uint8_t timeout) {
int sub;
if (the_serial.available ()) {
for (sub=0; sub<leng; sub++) {
uint32_t start_time = millis ();
while (!the_serial.available ()) {
if (millis () - start_time > timeout)
return sub;
}
buf[sub] = the_serial.read ();
}
return sub;
}
return 0;
}
串口发指令
其实真正用到的部分是下面这段:
switch (command) {
case 'p': //move to value (0~300)
cds55_pos (id, value);
break;
case 'r': //reset servo
cds55_reset (id);
break;
case 'l': //open or close led by 1 or 0
cds55_led (id, value);
break;
case 't': //enable or disable torque by 1 or 0
cds55_torque (id, value);
break;
case 'i': //change id to newid by value
cds55_setID (id, value);
break;
case 'v': //change move velocity
cds55_velocity (id, value);
break;
default:
Serial.println ("error! no this command!");
}
我这里举个例子,你就明白了。。
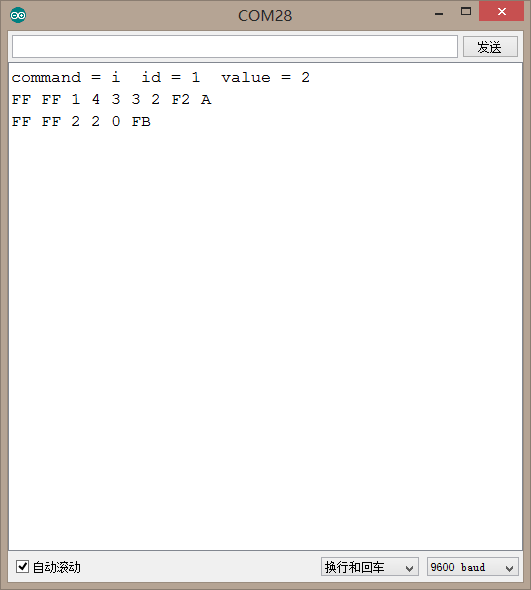
举例: CDS55数字舵机出厂ID号默认都是1,将舵机的ID号由1改为2。
打开串口监视器,波特率设置为9600,输入i 1 2,会有对应的返回数据。
"i": cds55_setID函数对应的command
"1": cds55_setID函数的参数id
"2": cds55_setID函数的参数value
如下图所示:

![]() 串口设置舵机ID号
串口设置舵机ID号
如何验证是否设置成功?
可以使用cds55_led (id, value)函数,继续串口发送l 2 1。
如果舵机ID号设置成功的话,舵机的LED会被打开,这条指令是设置2号舵机开灯。
"l": cds55_led函数对应的command
"2": cds55_led函数的参数id
"1": cds55_led函数的参数value
设置每个舵机的ID号
如果你已经学会如何设置了话,那就按照下表,每个位置对应的舵机,分别设置ID号。
左边前腿(前,中,后): 0, 1, 2
左边中腿(前,中,后):10, 11, 12
左边后腿(前,中,后): 20, 21, 22
右边前腿(前,中,后): 30, 31, 32
右边中腿(前,中,后):40, 41, 42
右边后腿(前,中,后): 50, 51, 52
函数介绍
- cds55_pos (id, value)
- cds55_reset (id)
- cds55_led (id, value)
- cds55_torque(id, value)
- cds55_setID (id, value)
- cds55_velocity (id, value)
STEP 3:硬件连接
如果前面舵机的ID号都设置好的话,可以继续往下走了,按下图进行整机连线。

![]()
STEP 4:下载代码
下载代码前,需先加载库,点击下载库Hexapod。如何加载库,可戳此处。建议使用Arduino 1.0及之前的版本下载,点击下载
#include <CDS5500_2Serials.h>
#include <Hexapod_Servo.h>
#include <ServoConsole.h>
// Below are the ID arrays of servos. You must set the IDs of the servo according
//to the documents :
//IDs of the servos of the left front leg: 0, 1, 2 (inner, middle, outer)
//IDs of the servos of the left middle leg: 10, 11, 12(inner, middle, outer)
//IDs of the servos of the left back leg: 20, 21, 22 (inner, middle, outer)
//IDs of the servos of the right back leg: 30, 31, 32(inner, middle, outer)
//IDs of the servos of the right middle leg: 40, 41, 42 (inner, middle, outer)
//IDs of the servos of the right front leg: 50, 51, 52(inner, middle, outer)
int axisA[] = {0, 20, 40};
int axisB[] = {10, 30, 50};
int hipA[] = {1, 21, 41};
int hipB[] = {11, 31, 51};
int legA[] = {2, 22, 32};
int legB[] = {12, 32, 52};
int axis[] = {0, 10, 20, 30, 40, 50};
int hips[] = {1, 11, 21, 31, 41, 51};
int legs[] = {2, 12, 22, 32 ,42, 52};
// servo controller
ServoConsole console;
void setup(){
Serial.begin(115200); //For printing out data, or debugging.
Serial2.begin(1000000); // Used for control servos on left side.
Serial1.begin(1000000);// Used for control servos on right side.
}
void loop(){
console.Move(legs, 6, 170, 511); //Legs move to 170 for standing up
console.Move(hips,6, 480, 511); // hips move to 480 for standing up
console.Move(axisA, 3, 130, 511); // axis group A move to 130. Prepare for walking
console.Move(axisB, 3, 70, 511); // axis group B move 70. Prepare for walking
delay(1000); // waits for their moving
while(1){
walk();
//walking loop
}
}
void walk(){
delay(500);
console.MoveUp(hipB, 3, 100, 500); //hips group B move up 100
console.MoveUp(axisB, 3, 60, 300);// axis group B move forward 60
console.MoveDown(axisA, 3, 60, 300);// axis group A move backward 60
delay(500);// waits for movement
console.MoveDown(hipB, 3, 100, 500);//hips group B move down 100
delay(500);// waits for movement
console.MoveUp(hipA, 3, 100, 500);//hips group A move up 100
console.MoveDown(axisB, 3, 60, 300);// axis group B move backward 60
console.MoveUp(axisA, 3, 60, 300);// axis group A move forward 60
delay(500);// waits for movement
console.MoveDown(hipA,3, 100, 500);//hips group A move down 100
}