Arduino内置教程-基本原理-闪烁
闪烁
这个例子展示你能用Arduino或者Genuino能做的最简单的东西,来看物理输出:它使一个LED灯闪烁
硬件要求
- Arduino 或者 Genuino开发板
- LED
- 220 ohm 电阻
电路
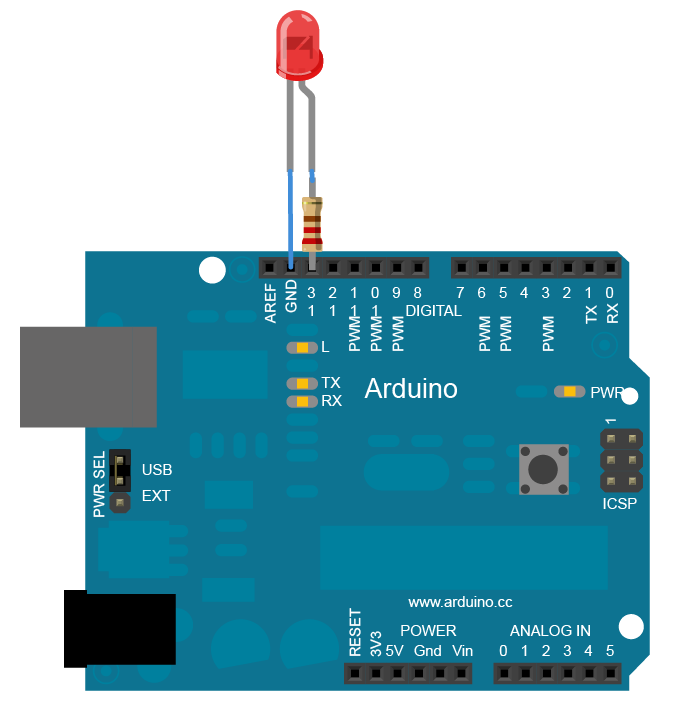
先连接电阻的一端到Arduino的PIN13引脚。再连接LED灯的长引脚(正脚,也叫阳极)到电阻的另一端。最后连接LED灯的短引脚(负脚,也叫负极)到Arduino的GND引脚。如图所示

大部分Arduino开发板上面就有一个LED灯连接到PIN13。如果你不连接硬件就运行这个例子,你应该也可以看到LED闪烁。
串联LED灯的电阻值可以在220 ohm之间;LED灯点亮时,其阻值直达1k ohm
原理图

样例代码
你插好电路板,连上电脑之后,打开Arduino IDE软件,输入以下代码。你也可以从菜单里载入。
File/Examples/01.Basics/Blink 。你最先要做的事是,作为一个输出引脚初始化pin13:
pinMode(13, OUTPUT);
在主循环里,你打开LED灯:
digitalWrite(13, HIGH);
这可以为PIN13提供5V电压。那可以在LED的引脚之间产生一个电压差,从而点亮它。然后你关闭LED灯:
digitalWrite(13, LOW);
那是把pin13短接到0V,从而关闭LED灯。在LED灯开和关之间,你想要足够的时间来让人看到这个变化,所以delay()命令告诉开发板1000毫秒内什么都不做。当你用delay()命令,在这段时间里没有其他的事情发生。如果你明白这个基本例子,查看BlinkWithoutDelay的例子来学习当在做其他事时怎么制作一个延时
如果你明白这个例子,查看 DigitalReadSerial 例子来学习读取一个连接到开发板的开关
/*
  Blink
  Turns on an LED on for one second, then off for one second, repeatedly.

  Most Arduinos have an on-board LED you can control. On the Uno and
  Leonardo, it is attached to digital pin 13. If you're unsure what
  pin the on-board LED is connected to on your Arduino model, check
  the documentation at http://www.arduino.cc

  This example code is in the public domain.

  modified 8 May 2014
  by Scott Fitzgerald
 */


// the setup function runs once when you press reset or power the board
void setup() {
  // initialize digital pin 13 as an output.
  pinMode(13, OUTPUT);
}

// the loop function runs over and over again forever
void loop() {
  digitalWrite(13, HIGH);   // turn the LED on (HIGH is the voltage level)
  delay(1000);              // wait for a second
  digitalWrite(13, LOW);    // turn the LED off by making the voltage LOW
  delay(1000);              // wait for a second
}
更多
- setup()
- loop()
- pinMode()
- digitalWrite()
- delay()
- AnalogReadSerial - 读取电位计,并打印它的状态到Arduino串口监视器
- BareMinimum - 需要开始一个新的程序的最简框架
- DigitalReadSerial - 读取一个开关,打印其状态到Arduino串口监视器
- Fade - 示范怎么用模拟输出来使LED灯的亮度变淡
- ReadAnalogVoltage - 读取一个模拟输入,并打印电压值到串口监视器