Arduino内置教程-数字-高音追随
用tone()函数来高音追随
这个例子展示怎么用tone()命令来产生一个模拟输入的音调。用上光敏电阻器,你的Arduino或Genuino开发板会变成一个简单的轻电子琴。
硬件要求
- Arduino or Genuino 开发板
- 8 ohm 扬声器
- 光敏电阻
- 4.7K ohm 电阻
- 100 ohm 电阻
- 连接线
- 开发板
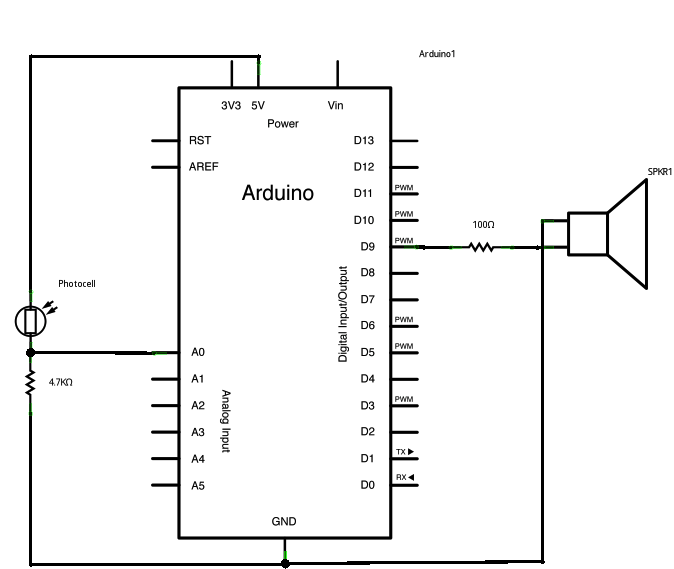
电路
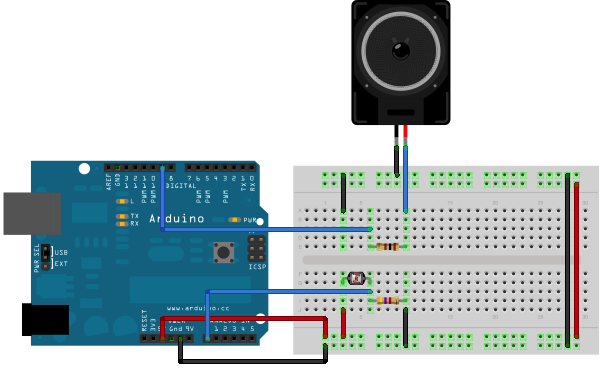
把扬声器的一段通过一个100 ohm电阻连接到数字引脚pin9,而另一端连接到地。用5V为光敏电阻提供电源,然后把它的另一端连接到模拟引脚A0,并在上面加上一个4.7k下拉电阻(连接到地)。
原理图
样例代码
这个例子的代码是很简单的。只是把一个模拟输入和它的值放到在可听见范围的音调。人类能听到20-20,000Hz的声音,而这个程序最好工作在120-1.500Hz会比较好点。
你需要获得你模拟输入值的实际范围。在所示电路里,模拟输入值范围在400-1000之间。用map()命令来改变这个值来匹配你传感器的范围。
程序如下:
/*
  Pitch follower

 Plays a pitch that changes based on a changing analog input

 circuit:
 * 8-ohm speaker on digital pin 9
 * photoresistor on analog 0 to 5V
 * 4.7K resistor on analog 0 to ground

 created 21 Jan 2010
 modified 31 May 2012
 by Tom Igoe, with suggestion from Michael Flynn

This example code is in the public domain.

 http://www.arduino.cc/en/Tutorial/Tone2

 */


void setup() {
  // initialize serial communications (for debugging only):
  Serial.begin(9600);
}

void loop() {
  // read the sensor:
  int sensorReading = analogRead(A0);
  // print the sensor reading so you know its range
  Serial.println(sensorReading);
  // map the analog input range (in this case, 400 - 1000 from the photoresistor)
  // to the output pitch range (120 - 1500Hz)
  // change the minimum and maximum input numbers below
  // depending on the range your sensor's giving:
  int thisPitch = map(sensorReading, 400, 1000, 120, 1500);

  // play the pitch:
  tone(9, thisPitch, 10);
  delay(1);        // delay in between reads for stability
}
更多
- Array()
- for()
- tone()
- map()
- BlinkWithoutDelay - 不用delay()函数,使LED灯闪烁
- Button - 用一个按钮来控制LED灯
- Debounce - 读取一个按钮,并滤掉噪音
- DigitalInputPullup - 示范怎么用pinMode()来上拉引脚
- StateChangeDetection - 记录按键按下的次数
- toneKeyboard - 一个用压力传感器和压电扬声器的三键音乐键盘
- toneMelody - 用压电扬声器弹奏一段旋律
- toneMultiple - 用tone()命令在多个扬声器上发音