URM06-RS485 大功率超声波测距模块
目录
1 概 述
2 性能描述
3 模块测量角度
4 安装尺寸
5 引脚定义
6 RS485接口命令说明
7 读取测量测距
8 读取温度
9 设置超声波模块地址
10 设置超声波模块测量距离上限值
11 读取超声波模块测量距离上限值
12 设置超声波模块RS485总线波特率
13 应用领域
14 接线图
15 Arduino示例代码
16 参考文档
概 述
URM06是基于senscomp公司6500超声波静电换能器设计的一款大功率超声波。测量距离可达10米,
另外一个显著的特点是超声波探测夹角只有15°,而大多数的超声波是60°。这样就可以提高超声波测量角度分辨率。是机器人等应用领域壁障导航方案的首选.
性能描述
工作电源 :6V-12V
工作电流 :平时电流16mA,发送时瞬间电流2A
工作温度 :-10℃~+70℃
接口方式 :RS485接口
工作频率 :49.5KHZ。探头方向角 15°(-6dB)
测量范围 :20厘米到10米
模块尺寸 :喇叭口最大尺寸50mm,安装螺纹50mm,长40mm
模块重量 :45g
模块测量角度
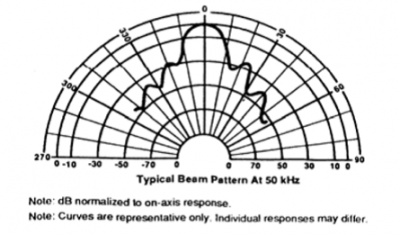
![]() 方向角 15°(-6dB)
方向角 15°(-6dB)
安装尺寸
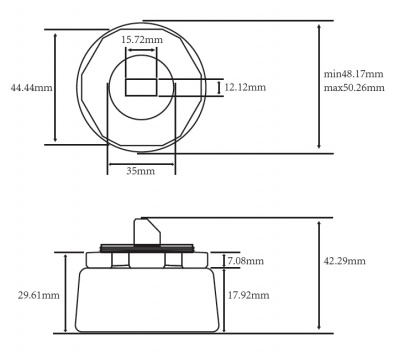
![]() 安装尺寸
安装尺寸
引脚定义
1.VCC :电源 6-12V 2A直流
2.GND :电源负
3.A :RS485总线通信线A
4.B :RS485总线通信线B
RS485接口命令说明
出厂参数:
波特率 19200 bps 8N1
出厂地址 0x11
通信命令帧格式为
帧头
地址
数据长度
命令
数据
校验和
0x55
0xAA
1字节
1字节
1字节
数据1~数据n
1字节
读取测量测距
主机通过RS485接口向超声波模块发送一帧命令,触发模块开始测距,之后接收模块返回的距离值命令。
例如超声波模块地址为 0x11,则主机发送:
0x55 0xAA 0x11 0x00 0x02 0x12
说明:
帧头---------0x55
帧头---------0xAA
对方地址-----0x11
数据长度-----0x00
超声波读取---0x02
校验和-------0x12
超声波模块返回数据为:
0x55 0xAA 0x11 0x02 0x02 0x12 0x34 0x5A
返回数据: 0x12 为距离的高位数据
0x34 为距离的低位数据
读取温度
主机通过RS485接口读取超声波模块测得的当前温度。
例如超声波模块地址为 0x11,则主机发送
0x55 0xAA 0x11 0x00 0x03 0x13
说明:
帧头---------0x55
帧头---------0xAA
对方地址-----0x11
数据长度-----0x00
温度读取-----0x03
校验和-------0x13
超声波模块返回数据为:
0x55 0xAA 0x11 0x02 0x03 0x00 0xFF 0x14
返回数据: 0x00 为温度的高位数据
0xFF 为温度的低位数据
设置超声波模块地址
主机通过RS485接口设置超声波模块地址。
例如设置超声波模块地址为 0x11,则主机发送
0x55 0xAA 0xAB 0x01 0x55 0x11 0x11
说明:
帧头---------0x55
帧头---------0xAA
对方地址-----0xAB
数据长度-----0x01
命令---------0x55
设置地址-----0x11
校验和-------0x11
设置成功则超声波模块返回命令为
0x55 0xAA 0x11 0x01 0x55 0xCC 0x32
0xAB为广播地址,即所有模块的共享地址,同时不确定模块地址的状态下,可以通过对地址0xAB发送0x55指令来设定模块的地址。内容0x11 为设置的新地址
返回状态数据字含义说明:
0xCC——操作完成
0xEE——操作失败
设备地址设定成功后,模块会根据自己新的设备地址返回状态;
设置超声波模块测量距离上限值
主机通过RS485接口设置超声波模块测量距离上限值。
例如超声波模块地址为 0x11,要设置测量上限3840毫米,则主机发送
0x55 0xAA 0x11 0x02 0x04 0x0F 0x00 0x25 //设置上限 0x0F00 转换为10进制为3840
说明:
帧头---------0x55
帧头---------0xAA
对方地址-----0x11
数据长度-----0x02
命令---------0x04
高字节-------0x0F
低字节-------0x00
校验和-------0x25
返回:
0x55 0xAA 0x11 0x00 0x04 0xCC 0xE0
指令说明:
设定超声波模块测量距离上限,以满足不同的应用需求,同时根据应用环境适当减小测量上限能够提高传感器数据输出刷新率
备注:出厂设定值为传感器最大测量范围
返回状态数据字含义说明:
0xCC——操作完成
0xEE——操作失败
读取超声波模块测量距离上限值
主机通过RS485接口读取超声波模块测量距离上限值。
例如超声波模块地址为 0x11,要读取该模块测量上限值,则主机发送:
0x55 0xAA 0x11 0x00 0x05 0x15
说明:
帧头---------0x55
帧头---------0xAA
对方地址-----0x11
数据长度-----0x00
命令---------0x05
校验和-------0x15
超声波模块返回上限值格式为:
0x55 0xAA 0x11 0x02 0x05 0x0F 0x00 0x26
返回设置上限距离 0x0F00 即十进制3840毫米。
指令说明:
读取当前传感器上限测量距离,单位mm。
设置超声波模块RS485总线波特率
主机通过RS485接口设置超声波模块通信波特率。
例如设置超声波模块地址为 0x11,则主机发送:
0x55 0xAA 0x11 0x01 0x08 0x05 0x1E //设置模块波特率为19200BPS
说明:
帧头---------0x55
帧头---------0xAA
对方地址-----0x11
数据长度-----0x01
命令---------0x08
波特率选择---0x05
校验和-------0x1E
设置成功则超声波模块返回命令为
0x55 0xAA 0x11 0x01 0x08 0xCC 0xE4
返回状态数据字含义说明:
0xCC——操作完成
0xEE——操作失败
设备地址设定成功后,模块会根据自己新的设备地址返回状态。
其他波特率:
55 AA 11 01 08 00 19 //设置模块波特率为1200BPS
55 AA 11 01 08 01 1A //设置模块波特率为2400BPS
55 AA 11 01 08 02 1B //设置模块波特率为4800BPS
55 AA 11 01 08 03 1C //设置模块波特率为9600BPS
55 AA 11 01 08 04 1D //设置模块波特率为14400BPS
55 AA 11 01 08 05 1E //设置模块波特率为19200BPS
55 AA 11 01 08 06 1F //设置模块波特率为28800BPS
55 AA 11 01 08 07 20 //设置模块波特率为38400BPS
55 AA 11 01 08 08 21 //设置模块波特率为57600BPS
55 AA 11 01 08 09 22 //设置模块波特率为115200BPS
55 AA 11 01 08 0A 23 //设置模块波特率为128000BPS
55 AA 11 01 08 0B 24 //设置模块波特率为256000BPS
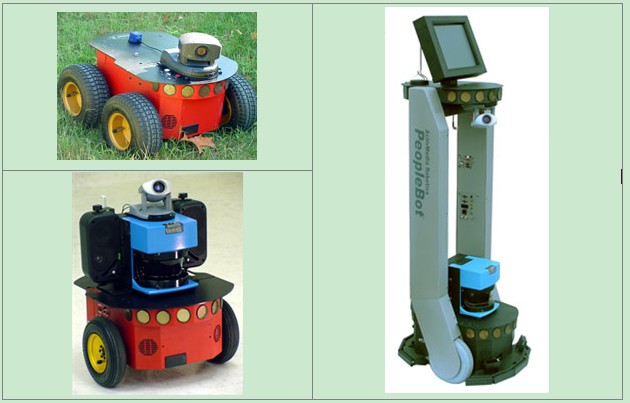
应用领域
机器人壁障导航
测距仪器
工程测量
工业控制
接线图
提示:如有通信问题(经常发生于leonardo版型),可尝试更换TX/RX的连接顺序。
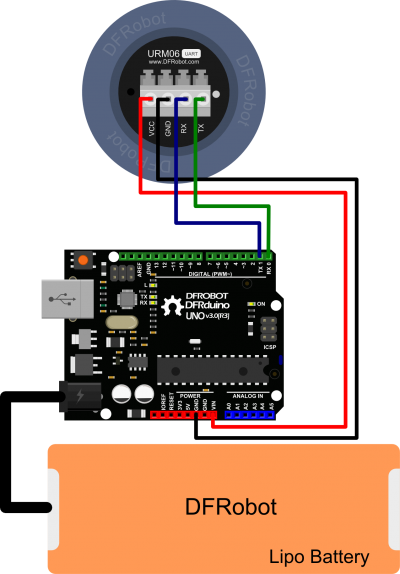
![]() Connection Diagram
Connection Diagram
Arduino示例代码
请先下载页面底部的URM_UART库文件,并加载到arduino库中,加载方法请点击
#include "Arduino.h"
// Include application, user and local libraries
#include "URM_RS485.h"
#define Rs485TriggerPin 2 //the pin to select whether the RS485 is output or input
#define DefaultBaudrate 19200UL //the Default Baudrate for the Urm06_485
#define DefaultAddress 0x11 //the Default Address for the Urm06_485
#define DefaultMaxDistance (-1) //the Default Max Distance for the Urm06_485. "-1" means there is no Max Distance limitation. Set the Max Distance can limit the Distance range and speed up the detection.
#define CustomizedTimeOutDuration 500 //Time Out Duration can be Customized in "ms" unit
// Define variables and constants
URM_RS485 urm(Serial,Rs485TriggerPin); //select the Serial port for communication with Urm_485 sensor
void onTimeOut()
{
//If there is no reply from Urm_485 lasting for 1 second, this function will run. The time duration can be Customized
//TODO write your code here:
Serial.println("onTimeOut");
}
void onRequestDistance(byte theAddress, int theDistance)
{
//If received Distance reply, this function will run.
//theDistance is in "mm" unit
//TODO write your code here:
Serial.print("Address:");
Serial.println(theAddress);
Serial.print("Distance:");
Serial.print(theDistance);
Serial.println("mm");
}
void onRequestTemperature(byte theAddress, float theTemperature)
{
//If received Temperature reply, this function will run.
//theTemperature is in "°C" unit
//TODO write your code here:
Serial.print("Address:");
Serial.println(theAddress);
Serial.print("Temperature:");
Serial.print(theTemperature);
Serial.println(" C");
}
void onRequestMaxDistance(byte theAddress, int theMaxDistance)
{
//If received Max Distance reply, this function will run.
//theMaxDistance is in "mm" unit
//TODO write your code here:
Serial.print("Address:");
Serial.println(theAddress);
Serial.print("MaxDistance:");
Serial.print(theMaxDistance);
Serial.println("mm");
}
void onSetMaxDistance(byte theAddress, boolean isOperationSuccess)
{
//After setting the Max Distance and getting a reply, this function will run.
//Set the Max Distance can limit the Distance range and speed up the detection.
//TODO write your code here:
Serial.print("Address:");
Serial.println(theAddress);
Serial.print("SetMaxDistance:");
if (isOperationSuccess) {
Serial.println("Success");
}
else{
Serial.println("Failure");
}
}
void onSetBaudrate(byte theAddress, boolean isOperationSuccess)
{
//After setting the Baudrate and getting a reply, this function will run.
//TODO write your code here:
Serial.print("Address:");
Serial.println(theAddress);
Serial.print("SetBaudrate:");
if (isOperationSuccess) {
Serial.println("Success");
}
else{
Serial.println("Failure");
}
}
void onSetAddress(byte theAddress, boolean isOperationSuccess)
{
//After setting the Address and getting a reply, this function will run.
//TODO write your code here:
Serial.print("Address:");
Serial.println(theAddress);
Serial.print("SetAddress:");
if (isOperationSuccess) {
Serial.println("Success");
}
else{
Serial.println("Failure");
}
}
void onWrongStack()
{
//If received wrong command, this function will run.
//TODO write your code here:
Serial.println("WrongStack");
}
//Run the proper function based on the different kinds of states
void commandProcess()
{
if (urm.available()) {
switch (urm.callBackState) {
case URM_RS485::OnTimeOut:
onTimeOut();
break;
case URM_RS485::OnRequestDistance:
onRequestDistance(urm.receivedAddress, urm.receivedContent);
break;
case URM_RS485::OnRequestTemperature:
onRequestTemperature(urm.receivedAddress, urm.receivedContent/10.0);
break;
case URM_RS485::OnRequestMaxDistance:
onRequestMaxDistance(urm.receivedAddress, urm.receivedContent);
break;
case URM_RS485::OnSetMaxDistance:
onSetMaxDistance(urm.receivedAddress, urm.receivedContent);
break;
case URM_RS485::OnSetBaudrate:
onSetBaudrate(urm.receivedAddress, urm.receivedContent);
break;
case URM_RS485::OnSetAddress:
onSetAddress(urm.receivedAddress, urm.receivedContent);
break;
case URM_RS485::OnWrongStack:
onWrongStack();
break;
default:
break;
}
}
}
// Add setup code
void setup()
{
urm.begin(DefaultBaudrate);
}
// Add loop code
void loop()
{
commandProcess();
static unsigned long sendingTimer=millis();
if (millis()-sendingTimer>=1000) {
sendingTimer=millis();
//Each function below from URM_RS485 returns the state whether RS485 Bus is busy or not.
//If the Bus is busy, wait until the bus is released.
while(!urm.requestDistance(DefaultAddress)) {
  commandProcess();
}
//
// while(!urm.requestTemperature(DefaultAddress)) {
// commandProcess();
// }
//
// while(!urm.requestMaxDistance(DefaultAddress)) {
// commandProcess();
// }
//
// while(!urm.setAddress(DefaultAddress)) {
// commandProcess();
// }
//
// while(!urm.setBaudrate(DefaultAddress, DefaultBaudrate)) {
// commandProcess();
// }
//
// while(!urm.setMaxDistance(DefaultAddress, DefaultMaxDistance)) {
// commandProcess();
// }
//
//Time Out Duration can be Customized
// while(!urm.requestDistance(DefaultAddress, CustomizedTimeOutDuration)) {
// commandProcess();
// }
//
// while(!urm.requestTemperature(DefaultAddress, CustomizedTimeOutDuration)) {
// commandProcess();
// }
//
// while(!urm.requestMaxDistance(DefaultAddress, CustomizedTimeOutDuration)) {
// commandProcess();
// }
//
// while(!urm.setAddress(DefaultAddress, CustomizedTimeOutDuration)) {
// commandProcess();
// }
//
// while(!urm.setBaudrate(DefaultAddress, DefaultBaudrate, CustomizedTimeOutDuration)) {
// commandProcess();
// }
//
// while(!urm.setMaxDistance(DefaultAddress, DefaultMaxDistance, CustomizedTimeOutDuration)) {
// commandProcess();
// }
}
}
参考文档
Arduino 代码库文件
![]() 购买 URM05大功率静电超声波测距模块 (SKU:SEN0003)
购买 URM05大功率静电超声波测距模块 (SKU:SEN0003)