JoyStick摇杆模块
<img alt="" src="http://images.ncnynl.com/arduino/2016/250px-Joystick_Module_For_Arduino.jpg" width="250" height="271" class="thumbimage" /> <img src="http://images.ncnynl.com/arduino/2016/magnify-clip.png" width="15" height="11" alt="" />Joystick Module For Arduino (SKU:DFR0061)
目录
1 简介
2 产品参数
3 应用
4 引脚说明
5 使用教程
5.1 连线图
5.2 示例代码
6 疑难解答
7 更多
简介
采用原装优质金属PS2摇杆电位器制作,具有(X,Y)2轴模拟输出,(Z)1路按钮数字输出。配合Arduino传感器扩展板可以制作遥控器等互动作品。
产品参数
接口类型:模拟
三轴(X,Y,Z(按钮))
PH2.0接口
尺寸:37x25x32mm
重量:15克
应用
游戏手柄
引脚说明

引脚X
S——模拟输出
GND——GND
VCC——VCC
引脚Y
S——模拟输出
GND——GND
VCC——VCC
引脚Z
DATA——数字输出
VCC——VCC
GND——VCC
使用教程
连线图
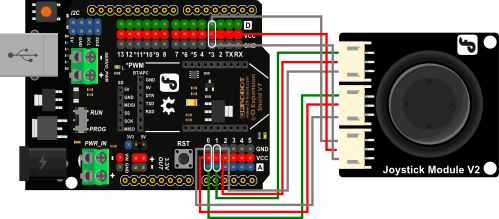
引脚X
S——A1
GND——GND
VCC——VCC
引脚Y
S——A0
GND——GND
VCC——VCC
引脚Z
DATA——D3
VCC——VCC
GND——VCC
示例代码
库安装
// #
// # Editor : Lauren from DFRobot
// # Date : 17.01.2012
// # Product name: Joystick Module
// # Product SKU : DFR0061
// # Version : 1.0
// # Description:
// # Modify the Sample code for the Joystick Module
// # Connection:
// # X-Axis -> Analog pin 0
// # Y-Axis -> Analog pin 1
// # Z-Axis -> Digital pin 3
// #
int JoyStick_X = 0; //x
int JoyStick_Y = 1; //y
int JoyStick_Z = 3; //key
void setup()
{
pinMode(JoyStick_Z, INPUT);
Serial.begin(9600); // 9600 bps
}
void loop()
{
int x,y,z;
x=analogRead(JoyStick_X);
y=analogRead(JoyStick_Y);
z=digitalRead(JoyStick_Z);
Serial.print(x ,DEC);
Serial.print(",");
Serial.print(y ,DEC);
Serial.print(",");
Serial.println(z ,DEC);
delay(100);
}
疑难解答
更多问题及有趣的应用,请访问论坛
更多
![]()