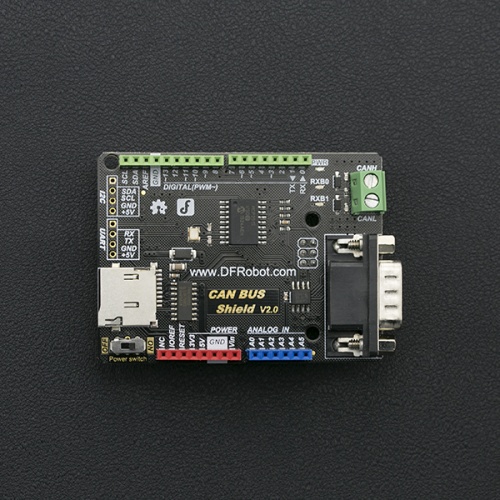
CAN-BUS Shield V2
目录
1 简介
2 特性
3 参数
4 接口说明
5 CAN-BUS节点配置
6 Arduino库函数功能说明
7 实验教程
7.1 准备
7.2 基本的CAN收发功能(轮询接收)
7.2.1 实验接线
7.2.2 例程代码
7.2.2.1 接收端点例程
7.2.2.2 发射端点例程
7.2.3 实验现象
7.3 基本收发功能(中断接收)
7.3.1 实验接线
7.3.2 例程代码
7.3.2.1 接收端点例程
7.3.2.2 发射端点例程
7.3.3 实验现象
7.4 接受指定ID数据帧(中断接收)
7.4.1 实验接线
7.4.2 例程代码
7.4.2.1 接收端点例程
7.4.2.2 发射端点例程
7.4.3 实验现象
7.5 三模块组网
7.5.1 实验接线
7.5.2 例程代码
7.5.2.1 Node 1例程
7.5.2.2 Node 2例程
7.5.2.3 Node 3例程
7.5.3 实验现象
7.6 SD卡存取
7.6.1 实验接线
7.6.2 例程代码
7.6.2.1 发送节点例程
7.6.2.2 接收节点例程
7.6.3 实验现象
8 协议/库资料
9 常见问题
10 更多
简介
CAN-BUS Shield V2.0是专为Arduino控制器设计的扩展板,板载MCP2515总线控制芯片能够实现CAN总线上的数据控制,实现设备与设备之间的数据通信。扩展板兼容Arduino标准卡槽,可以完美适配于Arduino UNO,Leonardo等主控板。并且提供一个DB9和一个接线柱形式的接口,您可以根据需要自主选择接口。内嵌MicroSD卡槽,可直插MicroSD卡,存储数据。多种扩展接口使得用户在DIY过程中得到更大的便利。
特性
支持标准帧、扩展帧收发,支持轮训和中断两种接收方式
提供uart、I2C、DB9及接线柱等多种接口
支持SD卡数据存储
支持Arduino主板供电以及DB9接口供电
参数
芯片:MCP2515
供电:3.3~5VDC Arduino 主板供电/DB9接口供电
尺寸:76 mm * 54mm *19mm
重量:40g
接口说明
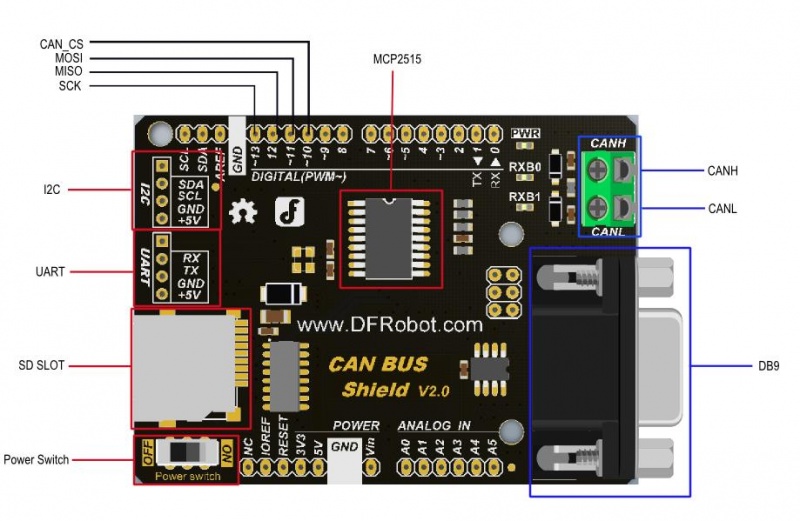
![]()
两种供电方式:
Power Switch 处于“ON”端,电源由DB9接口的供电
Power Switch 处于“OFF”端,电源由Arduino主板供应
注意:
当DP9接口处的电压大于7V时可以为arduino主控板供电,开关选择”ON“;
如果arduino主板是usb供电,那么USB和DB9可以同时供电;如果arduino是DC-Vin电源供电,DB9就不能同时供电了,必须将开关置于”OFF“处
CAN-BUS节点配置
本节内容主要介绍如何用我们提供的函数库去DIY您的创意或者说您的产品。为了能够表述的容易理解,我们决定从最基础的知识开始介绍,然后结合一个例子进一步阐述。
1、can-bus节点(设备)
什么叫做can-bus节点呢? 首先我们要明确的一点就是can-bus是一个局域网控制协议。既然是局域网,那么该网络上一定有很多设备相连的。每个设备就是一个节点,而每个节点上有一个can-bus协议控制器(控制芯片)。
2、can-bus总线上的节点即可以作为接收器,又可以作为发射器,即一般来地,我们称can-bus的节点为收发器。
3、can-bus总线上没有地址的概念,所有can-bus的数据帧都是被id所区分,每个设备对应一个id。
假如A节点发送id为0x1123的标准数据帧,D节点也可以发送id为0x1123的标准数据帧。当然实际工程中很少这样,一般来说,不同的id对应不同的收发器,不同的收发器完成不同的功能;又或者相同的收发器发送不同的id,不同的id发送不同需求的数据。
4、can-bus节点依靠自身的硬件屏蔽功能,实现选择性的接受来自在初始化时指定id的数据帧。
可以通过调用init_Mask(Masker_t Masker_num, INT8U ext, INT32U ulData)和init_Filter(Filter_t Filter_num, INT8U ext, INT32U Data)配置选择性接受指定的id。参见Arduino库函数功能说明
5、can-bus总线上的任意一个节点发送的数据都可以被其他节点选择性的接受。该节点也可以选择性的接收其他节点发送的数据。
结合以上5点分析can-bus总线上的数据传输情况:
举例来说,假如在一个由五个节点的局域网中,节点名称分别是:A、B、C、D、E。其中B节点只可以接收id为0x06的标准数据帧,那么当节点A要向节点B发送数据“hello world”,那么可以调用我们的sendMsgBuf(0x06, 0, 12, "hello world")函数即可。此时这五个节点组成的局域网的总线(H线和L线)上,传输的就是包括“hello world”数据在内的标准数据帧,且该数据帧的id为0x06,那么节点B就可以接受到该数据帧了。
那么其他节点可以接受该数据帧吗?答案是可以的,只要你设定的id与发送时指定的id相符合,既可以接受数据,例如:
假设:
节点B的数据帧接收id:0x06
节点C的数据帧接收id:0x06和0x08
节点D的数据帧接收id:0x07
节点E的数据帧接收id:任意
那么:
当节点A发送id为0x06的标准数据帧时,那么可接收到的节点是B、C、E;
当节点A发送id为0x07的标准数据帧时,那么可接收到的节点是D、E;
当节点A发送id为0x08的标准数据帧时,那么可接收到的节点是C、E;
当节点A发送id为0x12的标准数据帧时,那么可接收到的节点是E;
Arduino库函数功能说明
MCPCAN(INT8U _CS)
函数功能: 构造函数,指定CAN-BUS Shield V1.0模块的CAN接口SPI的片选信号引脚。
参数说明:
_CS:端口编号。
返回值:无。
使用方法:
MCPCAN CAN(4); // 用MCPCAN类实例化了一个CAN对象,可以用该对象调用该类的方法去控制can控制器。_CS 此处为4,表明arduino的数字管脚4作为spi的cs脚与can总线控制器相连接。
void init(void) 函数功能: 初始化spi模块,以及对MCP2515进行软件复位。 参数说明: 无 返回值:无。 使用方法:
该函数应该在一开始就调用,以初始化can总线控制器等。
INT8U begin(INT8U speedset) 函数功能: 初始化设置CAN的波特率,在init()后面使用。 参数说明:
speedset:波特率,可以是:CAN_5KBPS、CAN_10KBPS、CAN_20KBPS、CAN_31K25BPS、CAN_33KBPS、CAN_40KBPS、CAN_50KBPS、CAN_80KBPS、CAN_83K3BPS、CAN_95KBPS、CAN_100KBPS、CAN_125KBPS、CAN_200KBPS、CAN_250KBPS、CAN_500KBPS、CAN_1000KBPS。
返回值:如果初始化成功返回CAN_OK,如果初始化失败返回CAN_FAILINIT。
使用方法:
begin(CAN_500KBPS);
INT8U sendMsgBuf(INT32U id, INT8U ext, INT8U len, INT8U *buf) 函数功能:发送一帧数据。 参数说明:
id:该数据帧的id编号。
ext:如果ext = 0,则表示该数据帧是标准的数据帧,如果ext = 1,则表示该数据帧是扩展数据帧。
len:数据长度,len < 8。
buf:将要发送的数据缓存指针。
返回值:如果发送成功,则返回CAN_OK,如果发送超时,则返回CAN_SENDMSGTIMEOUT。如果获取下一个空闲buffer失败,则返回CAN_GETTXBFTIMEOUT。
使用方法:
unsigned char data[8] = {'D', 'F', 'R', 'O', 'B', 'O', 'T', '!'};
sendMsgBuf(0x06, 0, sizeof(data), data);
INT8U MCPCAN::setMsg(INT32U id, INT8U ext, INT8U len, INT8U rtr, INT8U *pData) 函数功能:发送远程发送请求报文。 参数说明:
id:该数据帧的id编号。
ext:如果ext = 0,则表示该数据帧是标准帧,如果ext = 1,则表示该数据帧是扩展帧。
len:数据长度,len < 8。
rtr: 如果rtr = 1,则表示此帧数据为远程发送请求帧;如果rtr = 0,则表示此帧数据为数据帧。
buf:将要发送的数据缓存指针。
返回值:如果发送成功,则返回CAN_OK,如果发送超时,则返回CAN_SENDMSGTIMEOUT。如果获取下一个空闲buffer失败,则返回CAN_GETTXBFTIMEOUT。
使用方法:
unsigned char data[8] = {'D', 'F', 'R', 'O', 'B', 'O', 'T', '!'};
setMsg(0x06, 0, sizeof(data), 0, data);
INT8U isRemoteRequest(void) 函数功能:判断是否是远程遥控帧。 参考说明 无 返回值:如果返回1,表示该数据帧是远程遥控帧,如果返回0,则表示不是远程遥控帧。
INT8U init_Mask(Masker_t Masker_num, INT8U ext, INT32U Data) 函数功能:初始化屏蔽寄存器。 参数说明:
Masker_num: Masker_num 可以为:MCP_RXM0、MCP_RXM1。若Masker_num = MCP_RXM0 ,表示初始化屏蔽寄存器0(屏蔽寄存器0是接收buffer0的);若Masker_num = MCP_RXM1,表示初始化屏蔽寄存器1(屏蔽寄存器0是接收buffer1的)
ext: 如果ext = 0,表示对标准数据帧进行屏蔽寄存器设置,如果ext=1,表示对扩展帧进行配置。
Data: 该值写入到屏蔽寄存器中,用于配置哪些为将被屏蔽。
返回值:如果Masker_num即不是MCP_RXM0也不是MCP_RXM1或者初始化屏蔽寄存器失败,则返回MCP_FAIL;如果初始化屏蔽寄存器成功则返回MCP_OK;
使用方法:
init_Mask(MCP_RXM0, 0, 0x3ff); //在init()函数之后使用,begin()之前。期望对标准帧的0~9位进行过滤共10位,因为0x3ff的二进制形式是11 1111 1111,这里刚好10位。
INT8U checkReceive(void) 函数功能:检测是否接收到有效的数据帧。 参数说明: 无 返回值:如果接收到有效的数据帧,则返回CAN_MSGAVAIL;如果没有接收到有效的数据帧,则返回CAN_NOMSG; 使用方法:
在can总线控制器工作起来后,可以轮训调用该函数来检测是否接收到有效的数据帧,请参见下面样例。
INT8U init_Filter(Filter_t Filter_num, INT8U ext, INT32U Data) 函数功能:初始化报文验收滤波寄存器。 参数说明:
Filter_num: 报文验证滤波器编号。Filter_num取值可以为:MCP_RXF0 = 0、 MCP_RXF1、 MCP_RXF2、 MCP_RXF3、 MCP_RXF4、 MCP_RXF5。
ext:如果ext = 0,则表示该报文验收滤波器只验收标准数据帧报文,如果ext = 1,则表示该报文验收滤波器只验收扩展数据帧报文。
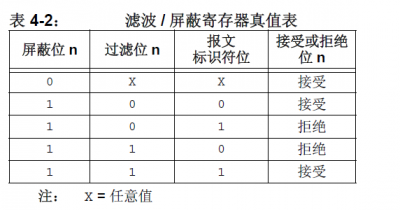
Data:将被过滤的报文id。只有能被过滤的id的数据帧才能被can控制器接收。因此一个即将到来的数据帧能否被接收到,取决与init_Mask()函数中对MCP_RXM0,MCP_RXM0寄存器所写的值、init_Filter()函数对MCP_RXF0等寄存器
所写的值以及即将到来的报文标识符ID。这三者的值按位查看表4-2的真值表。如果每一位的真值结果全为接收,那么该报文将被can控制器接收,否则将被其丢弃。比如说init_Mask(MCP_RXM0, 0, 0x7ff)函数把MCP_RXM0寄存器配置为0x7ff,表示将要对
标准帧ID的11个位进行屏蔽功能。且此时init_Filter(MCP_RXF0,0, 0x20)函数把MCP_RXF0寄存器配置为0x20,将0x20(000 0010 0000对应表4.2中的过滤位)与0x7ff(111 1111 1111 对应表4.2中的屏蔽位)中每一位按照表4.2中的真值表来决定是否接受,如果每一位的对应的真值都是接受的话,那么该ID就可以被接收,如果这11位中有一个真值是拒绝的话就表示该ID所代表的数据帧会被丢弃。该例中根据真值情况,控制器能接收id为0x20的标准报文,而不能接收其他id的报文。当然根据真值表,
当用init_Mask(MCP_RXM0, 0, 0x7DF)把MCP_RXM0改为了0x7DF后,MCP_RXF0仍为0x20,此时根据真值表,can控制器可以接受即将到来的0x20数据帧。
返回值:如果初始化成功,则返回MCP_OK;反之,返回MCP_FA
使用方法:
init_Mask(MCP_RXM0, 0, 0x7ff);
init_Filter(MCP_RXF0, 0, 0x04);//在init()函数之后,begin()之前使用,且和init_Mask()共同起作用。设置can控制器对标准帧id0x04进行接收。
INT8U readMsgBuf(INT8U *len, INT8U *buf) 函数功能:从MCP2515接收buffer中读取数据。 参数说明:
len:保存接收到的数据长度。
buf:保存接收到的数据。
返回值:如果返回CAN_OK,则表示读取数据成功;反之返回CAN_NOMSG。
使用方法:
在can总线工作起来后,如果有数据帧到来调用该函数可以把该数据帧读出来,参见后续章节样例。
INT8U readMsgBufID(INT32U *ID, INT8U *len, INT8U *buf) 函数功能:从MCP2515接收buffer中读取数据,并读取此帧数据的id。 参数说明:
ID : 保存此帧数据的id。
len:保存接收到的数据长度。
buf:保存接收到的数据。
返回值:如果返回CAN_OK,则表示读取数据成功;反之返回CAN_NOMSG。
使用方式:
用法同readMsgBuf()函数类似只是多了一个ID用于返回该帧数据的ID号。
INT8U checkError(void) 函数功能:检测MCP2515是否发送控制错误。 参数说明: 无。 返回值:如果发送了控制错误,则返回CAN_CTRLERROR;反之返回CAN_OK。
INT32U getCanId(void) 函数说明:获取当前帧的id。 参数说明: 无。 返回值:帧id。
当接收到数据后,调用此函数用于得到接收到的数据帧的ID,参见后续章节样例。
INT8U isExtendedFrame(void) 函数说明:判断当前帧是否为扩展帧。 参数说明: 无 返回值:如果返回1,则表示当前帧为扩展帧;如果返回0,则表示当前帧是标准帧。
在接收中断处理函数中调用,以判断数据帧是标准数据帧还是扩展帧。
实验教程
准备
硬件
UNO x3
CAN-BUS Shield V2 x3
杜邦线 x4
软件
Arduino IDE 版本1.6.6 点击下载Arduino IDE
CAN-BUS Shield库文件。如何安装库?
基本的CAN收发功能(轮询接收)
本实验测试基本的CAN收发功能,其中接收采用轮询方式,可以接受任意id的标准数据帧或扩展帧。发射节点每隔100ms发送一帧id为0x06的标准数据帧。
实验接线
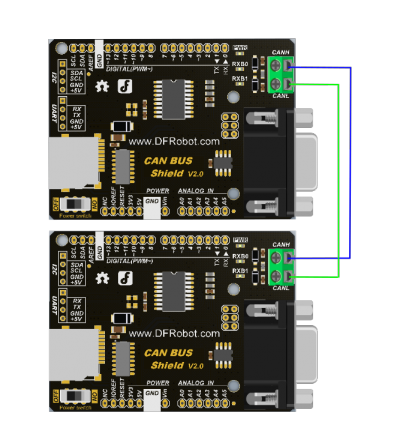
CAN-BUS Shield V2.0模块组网时,模块间连线为:CANH与CANH相连接,CANL与CANL相连接,如下图:
例程代码
接收端点例程
/******************************************************************************
demo: CAN-BUS Shield, receive data with check mode
send data coming to fast, such as less than 10ms, you can use this way
Jansion, 2015.5.27
******************************************************************************/
#include <SPI.h>
#include "df_can.h"
const int SPI_CS_PIN = 10;
MCPCAN CAN(SPI_CS_PIN); // Set CS pin
void setup()
{
Serial.begin(115200);
int count = 50; // the max numbers of initializint the CAN-BUS, if initialize failed first!.
do {
CAN.init(); //must initialize the Can interface here!
if(CAN_OK == CAN.begin(CAN_500KBPS)) // init can bus : baudrate = 500k
{
Serial.println("DFROBOT's CAN BUS Shield init ok!");
break;
}
else
{
Serial.println("DFROBOT's CAN BUS Shield init fail");
Serial.println("Please Init CAN BUS Shield again");delay(100); if (count <= 1) Serial.println("Please give up trying!, trying is useless!"); } }while(count--);
}
void loop()
{
unsigned char len = 0;
unsigned char buf[8];
if(CAN_MSGAVAIL == CAN.checkReceive()) // check if data coming
{
CAN.readMsgBuf(&len, buf); // read data, len: data length, buf: data buf
for(int i = 0; i<len; i++) // print the data
{
Serial.write(buf[i]);
Serial.print("\t");
}
Serial.println();
}
}
发射端点例程
// demo: CAN-BUS Shield, send data
#include <df_can.h>
#include <SPI.h>
const int SPI_CS_PIN = 10;
MCPCAN CAN(SPI_CS_PIN); // Set CS pin
void setup()
{
Serial.begin(115200);
int count = 50; // the max numbers of initializint the CAN-BUS, if initialize failed first!.
do {
CAN.init(); //must initialize the Can interface here!
if(CAN_OK == CAN.begin(CAN_500KBPS)) // init can bus : baudrate = 500k
{
Serial.println("DFROBOT's CAN BUS Shield init ok!");
break;
}
else
{
Serial.println("DFROBOT's CAN BUS Shield init fail");
Serial.println("Please Init CAN BUS Shield again");
        delay(100);
        if (count <= 1)
            Serial.println("Please give up trying!, trying is useless!");
    }

}while(count--);
}
unsigned char data[8] = {'D', 'F', 'R', 'O', 'B', 'O', 'T', '!'};
void loop()
{
// send data: id = 0x06, standrad flame, data len = 8, data: data buf
CAN.sendMsgBuf(0x06, 0, 8, data);
delay(100); // send data per 100ms
}
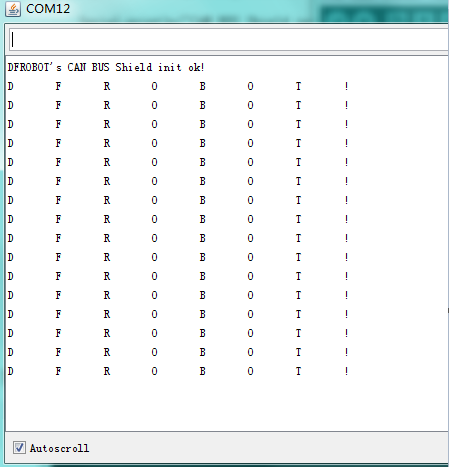
实验现象
接收方:串口输出:
基本收发功能(中断接收)
本实验测试基本收发功能,接收采用中断方式。
实验接线
例程代码
接收端点例程
/*********************************************************** *demo: CAN-BUS Shield, receive data with interrupt mode
- when in interrupt mode, the data coming can't be too fast, must >20ms, or else you can use check mode
- Jansion, 2015-5-27
***********************************************************/
#include <SPI.h>
#include "df_can.h"
const int SPI_CS_PIN = 10;
MCPCAN CAN(SPI_CS_PIN); // Set CS pin
unsigned char flagRecv = 0;
unsigned char len = 0;
unsigned char buf[8];
char str[20];
void setup()
{
Serial.begin(115200);
int count = 50; // the max numbers of initializint the CAN-BUS, if initialize failed first!.
do {
CAN.init(); //must initialize the Can interface here!
if(CAN_OK == CAN.begin(CAN_500KBPS)) // init can bus : baudrate = 500k
{
Serial.println("DFROBOT's CAN BUS Shield init ok!");
break;
}
else
{
Serial.println("DFROBOT's CAN BUS Shield init fail");
Serial.println("Please Init CAN BUS Shield again");
          delay(100);
          if (count <= 1)
              Serial.println("Please give up trying!, trying is useless!");
      }

  }while(count--);
attachInterrupt(0, MCP2515_ISR, FALLING); // start interrupt
}
void MCP2515_ISR()
{
flagRecv = 1;
}
void loop()
{
if(flagRecv)
{ // check if get data
flagRecv = 0; // clear flag
// iterate over all pending messages
// If either the bus is saturated or the MCU is busy,
// both RX buffers may be in use and after having read a single
// message, MCU does clear the corresponding IRQ conditon.
while (CAN_MSGAVAIL == CAN.checkReceive())
{
// read data, len: data length, buf: data buf
CAN.readMsgBuf(&len, buf);
// print the data
for(int i = 0; i<len; i++)
{
Serial.write(buf[i]);Serial.print("\t");
}
Serial.println();
}
}
}
发射端点例程
// demo: CAN-BUS Shield, send data
#include <df_can.h>
#include <SPI.h>
const int SPI_CS_PIN = 10;
MCPCAN CAN(SPI_CS_PIN); // Set CS pin
void setup()
{
Serial.begin(115200);
int count = 50; // the max numbers of initializint the CAN-BUS, if initialize failed first!.
do {
CAN.init(); //must initialize the Can interface here!
if(CAN_OK == CAN.begin(CAN_500KBPS)) // init can bus : baudrate = 500k
{
Serial.println("DFROBOT's CAN BUS Shield init ok!");
break;
}
else
{
Serial.println("DFROBOT's CAN BUS Shield init fail");
Serial.println("Please Init CAN BUS Shield again");
delay(100);
if (count <= 1)
Serial.println("Please give up trying!, trying is useless!");
}
}while(count--);
}
unsigned char data[8] = {'D', 'F', 'R', 'O', 'B', 'O', 'T', '!'};
void loop()
{
// send data: id = 0x06, standrad flame, data len = 8, data: data buf
CAN.sendMsgBuf(0x06, 0, 8, data);
delay(100); // send data per 100ms
}
实验现象
接收方:串口中输出:
接受指定ID数据帧(中断接收)
本实验测试只接受初始化CAN模块时指定id的数据帧,接收采用中断方式。
实验接线
例程代码
接收端点例程
/************************************************************************************************************** *demo: CAN-BUS Shield, receive data with interrupt mode, and set mask and filter
when in interrupt mode, the data coming can't be too fast, must >20ms, or else you can use check mode
Jansion, 2015-5-27
****************************************************************************************************************/
#include <SPI.h>
#include "df_can.h"
const int SPI_CS_PIN = 10;
MCPCAN CAN(SPI_CS_PIN); // Set CS pin
unsigned char flagRecv = 0;
unsigned char len = 0;
unsigned char buf[8];
char str[20];
void setup()
{
Serial.begin(115200);
int count = 50; // the max numbers of initializint the CAN-BUS, if initialize failed first!.do {
CAN.init(); //must initialize the Can interface here!
CAN.init_Mask(MCP_RXM0, 0, 0x3ff); // there are 2 mask in mcp2515, you need to set both of them
CAN.init_Mask(MCP_RXM1, 0, 0x3ff);
/* * set filter, we can receive id from 0x04 ~ 0x09 except for 0x06
* // there are 6 filter in mcp2515,so it can filter six id,i.e.0x04~0x09.
*/
CAN.init_Filter(MCP_RXF0, 0, 0x04); // filter 0 for id = 0x04
CAN.init_Filter(MCP_RXF1, 0, 0x05); // filter 1 for id = 0x05
// CAN.init_Filter(MCP_RXF2, 0, 0x06); // filter 2 for id = 0x06
CAN.init_Filter(MCP_RXF3, 0, 0x07); // filter 3 for id = 0x07
CAN.init_Filter(MCP_RXF4, 0, 0x08); // filter 4 for id = 0x08
CAN.init_Filter(MCP_RXF5, 0, 0x09); // filter 5 for id = 0x09
if(CAN_OK == CAN.begin(CAN_500KBPS)) // init can bus : baudrate = 500k
{
Serial.println("DFROBOT's CAN BUS Shield init ok!");
break;
}
else
{
Serial.println("DFROBOT's CAN BUS Shield init fail");
Serial.println("Please Init CAN BUS Shield again");delay(100); if (count <= 1) Serial.println("Please give up trying!, trying is useless!"); }}while(count--);
attachInterrupt(0, MCP2515_ISR, FALLING); // start interrupt
/*
* set mask, set both the mask to 0x3ff
*/
}
void MCP2515_ISR()
{
flagRecv = 1;
}
void loop()
{
if(flagRecv) // check if get data
{
flagRecv = 0; // clear flag
CAN.readMsgBuf(&len, buf); // read data, len: data length, buf: data buf
Serial.println("\r\n------------------------------------------------------------------");
Serial.print("Get Data From id: ");
Serial.println(CAN.getCanId());
for(int i = 0; i<len; i++) // print the data
{
Serial.print("0x");
Serial.print(buf[i], HEX);
Serial.print("\t");
}
Serial.println();
}
}
发射端点例程
/***************************************************************
demo: set_mask_filter_send
this demo will show you how to use mask and filter
Jansion, 2015-5-27
*****************************************************************/
#include <df_can.h>
#include <SPI.h>
const int SPI_CS_PIN = 10;
MCPCAN CAN(SPI_CS_PIN); // Set CS pin
void setup()
{
Serial.begin(115200);
int count = 50; // the max numbers of initializint the CAN-BUS, if initialize failed first!.
do {
CAN.init(); //must initialize the Can interface here!
if(CAN_OK == CAN.begin(CAN_500KBPS)) // init can bus : baudrate = 500k
{
Serial.println("DFROBOT's CAN BUS Shield init ok!");
break;
}
else
{
Serial.println("DFROBOT's CAN BUS Shield init fail");
Serial.println("Please Init CAN BUS Shield again");delay(100); if (count <= 1) Serial.println("Please give up trying!, trying is useless!"); }}while(count--);
}
unsigned char data[8] = {'D', 'F', 'R', 'O', 'B', 'O', 'T', '!'};
void loop()
{
for(int id=0; id<10; id++)
{
memset(data, id, sizeof(data)); // set id to send data buff, id is arranged form 0x00 to 0x09.
CAN.sendMsgBuf(id, 0, sizeof(data), data);
delay(100);
}
}
实验现象
接收方:串口输出:
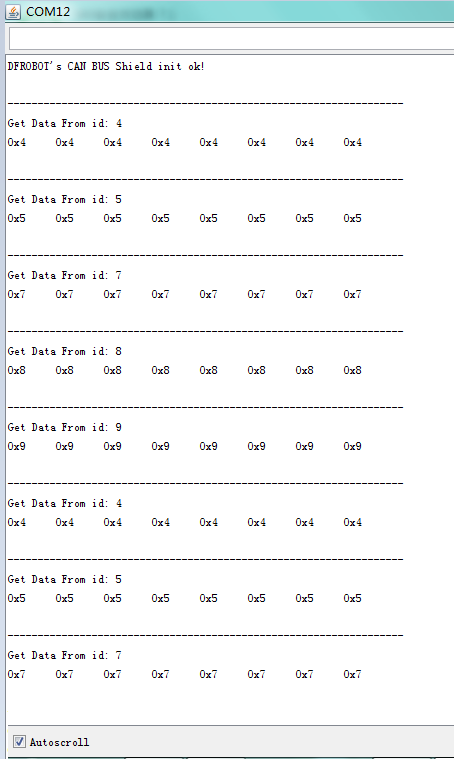
注意:接收到的数据帧中既没有没有id号为0x06的报文,也没有id为0x00,0x01,0x02等与报文验收滤波器设置的id不匹配的其他报文。这说明,滤波器可以单个工作,或者几个滤波器同时工作,又或者全部滤波器同时工作。当不使用时,可接受任意报文。
三模块组网
本实验测试三个模块组网,数据的收发情况。三个模块中每个模块既可以作为接收者,也可以作为发送者。本实验中3个节点设备,分别为称为node 1,node 2, node 3。其中node 1只作为接收节点,可以接收id为0x04,0x05,0x07,0x08,0x09的数据帧;node 2只接收id 为0x09的数据帧和发送id为0x08且数据为”node 2“的数据帧;node 3只接收id 为0x08的数据帧和发送id为0x09且数据为”node 3“的数据帧;
实验接线
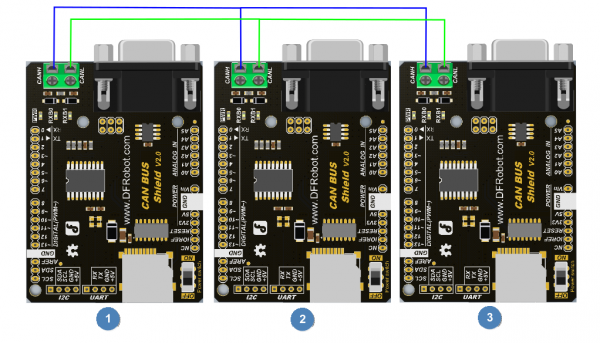
3个CAN-BUS Shield V2.0模块组网时,模块间连线为:CANH与CANH相连接,CANL与CANL相连接,如下图:
例程代码
Node 1例程
/************************************************************************************************************** *demo: CAN-BUS Shield, receive data with interrupt mode, and set mask and filter
- when in interrupt mode, the data coming can't be too fast, must >20ms, or else you can use check mode
- Jansion, 2015-5-27
****************************************************************************************************************/
#include <SPI.h>
#include "df_can.h"
const int SPI_CS_PIN = 10;
MCPCAN CAN(SPI_CS_PIN); // Set CS pin
unsigned char flagRecv = 0;
unsigned char len = 0;
unsigned char buf[8];
char str[20];
void setup()
{
Serial.begin(115200);
int count = 50; // the max numbers of initializint the CAN-BUS, if initialize failed first!.
do {
CAN.init(); //must initialize the Can interface here!
CAN.init_Mask(MCP_RXM0, 0, 0x3ff); // there are 2 mask in mcp2515, you need to set both of them
CAN.init_Mask(MCP_RXM1, 0, 0x3ff);
/*
* set filter, we can receive id from 0x04 ~ 0x09 except for 0x06
* // there are 6 filter in mcp2515,so it can filter six id,i.e.0x04~0x09.
*/
CAN.init_Filter(MCP_RXF0, 0, 0x04); // filter 0 for id = 0x04
CAN.init_Filter(MCP_RXF1, 0, 0x05); // filter 1 for id = 0x05
// CAN.init_Filter(MCP_RXF2, 0, 0x06); // filter 2 for id = 0x06
CAN.init_Filter(MCP_RXF3, 0, 0x07); // filter 3 for id = 0x07
CAN.init_Filter(MCP_RXF4, 0, 0x08); // filter 4 for id = 0x08
CAN.init_Filter(MCP_RXF5, 0, 0x09); // filter 5 for id = 0x09
if(CAN_OK == CAN.begin(CAN_500KBPS)) // init can bus : baudrate = 500k
{
Serial.println("DFROBOT's CAN BUS Shield init ok!");
break;
}
else
{
Serial.println("DFROBOT's CAN BUS Shield init fail");
Serial.println("Please Init CAN BUS Shield again");
          delay(100);
          if (count <= 1)
              Serial.println("Please give up trying!, trying is useless!");
      }

  }while(count--);


  attachInterrupt(0, MCP2515_ISR, FALLING); // start interrupt
/*
* set mask, set both the mask to 0x3ff
*/
}
void MCP2515_ISR()
{
flagRecv = 1;
}
void loop()
{
if(flagRecv) // check if get data
{
flagRecv = 0; // clear flag
CAN.readMsgBuf(&len, buf); // read data, len: data length, buf: data buf
Serial.println("\r\n------------------------------------------------------------------");
Serial.print("Get Data From id: ");
Serial.println(CAN.getCanId());
for(int i = 0; i<len; i++) // print the data
{
Serial.write(buf[i]);
Serial.print("\t");
}
Serial.println();
}
}
Node 2例程
#include <SPI.h>
#include "df_can.h"
const int SPI_CS_PIN = 10;
MCPCAN CAN(SPI_CS_PIN); // Set CS pin
unsigned char flagRecv = 0;
unsigned char len = 0;
unsigned char buf[8];
char str[20];
void setup()
{
Serial.begin(115200);
int count = 50; // the max numbers of initializint the CAN-BUS, if initialize failed first!.
do {
CAN.init(); //must initialize the Can interface here!
CAN.init_Mask(MCP_RXM0, 0, 0x3ff); // there are 2 mask in mcp2515, you need to set both of them
CAN.init_Mask(MCP_RXM1, 0, 0x3ff);
/*
* set filter, we can receive id from 0x04 ~ 0x09 except for 0x06
* // there are 6 filter in mcp2515,so it can filter six id,i.e.0x04~0x09.
*/
CAN.init_Filter(MCP_RXF5, 0, 0x09); // filter 5 for id = 0x09
if(CAN_OK == CAN.begin(CAN_500KBPS)) // init can bus : baudrate = 500k
{
Serial.println("DFROBOT's CAN BUS Shield init ok!");
break;
}
else
{
Serial.println("DFROBOT's CAN BUS Shield init fail");
Serial.println("Please Init CAN BUS Shield again");
          delay(100);
          if (count <= 1)
              Serial.println("Please give up trying!, trying is useless!");
      }

  }while(count--);
attachInterrupt(0, MCP2515_ISR, FALLING); // start interrupt
/*
* set mask, set both the mask to 0x3ff
*/
}
void MCP2515_ISR()
{
flagRecv = 1;
}
unsigned char data[] = "node 2";
void loop()
{
if(flagRecv) // check if get data
{
flagRecv = 0; // clear flag
CAN.readMsgBuf(&len, buf); // read data, len: data length, buf: data buf
Serial.println("\r\n------------------------------------------------------------------");
Serial.print("Get Data From id: ");
Serial.println(CAN.getCanId());
for(int i = 0; i<len; i++) // print the data
{
Serial.write(buf[i]);
Serial.print("\t");
}
Serial.println();
}
// send data: id = 0x08, standrad flame, data len = 8, data: data buf
CAN.sendMsgBuf(0x08, 0, sizeof(data), data);
delay(1000); // send data per 100ms
}
Node 3例程
#include <SPI.h>
#include "df_can.h"
const int SPI_CS_PIN = 10;
MCPCAN CAN(SPI_CS_PIN); // Set CS pin
unsigned char flagRecv = 0;
unsigned char len = 0;
unsigned char buf[8];
char str[20];
void setup()
{
Serial.begin(115200);
int count = 50; // the max numbers of initializint the CAN-BUS, if initialize failed first!.
do {
CAN.init(); //must initialize the Can interface here!
CAN.init_Mask(MCP_RXM0, 0, 0x3ff); // there are 2 mask in mcp2515, you need to set both of them
CAN.init_Mask(MCP_RXM1, 0, 0x3ff);
/*
* set filter, we can receive id from 0x04 ~ 0x09 except for 0x06
* // there are 6 filter in mcp2515,so it can filter six id,i.e.0x04~0x09.
*/
CAN.init_Filter(MCP_RXF5, 0, 0x08); // filter 5 for id = 0x09
if(CAN_OK == CAN.begin(CAN_500KBPS)) // init can bus : baudrate = 500k
{
Serial.println("DFROBOT's CAN BUS Shield init ok!");
break;
}
else
{
Serial.println("DFROBOT's CAN BUS Shield init fail");
Serial.println("Please Init CAN BUS Shield again");
     delay(100);
     if (count <= 1)
         Serial.println("Please give up trying!, trying is useless!");
 }
}while(count--);
attachInterrupt(0, MCP2515_ISR, FALLING); // start interrupt
  /*
   * set mask, set both the mask to 0x3ff
   */
}
void MCP2515_ISR()
{
flagRecv = 1;
}
unsigned char data[] = "node 3";
void loop()
{
if(flagRecv) // check if get data
{
flagRecv = 0; // clear flag
CAN.readMsgBuf(&len, buf); // read data, len: data length, buf: data buf
Serial.println("\r\n------------------------------------------------------------------");
Serial.print("Get Data From id: ");
Serial.println(CAN.getCanId());
for(int i = 0; i<len; i++) // print the data
{
Serial.write(buf[i]);
Serial.print("\t");
}
Serial.println();
}
// send data: id = 0x08, standrad flame, data len = 8, data: data buf
CAN.sendMsgBuf(0x09, 0, sizeof(data), data);
delay(1000); // send data per 100ms
}
实验现象
CAN接收方串口不断输出下图信息:
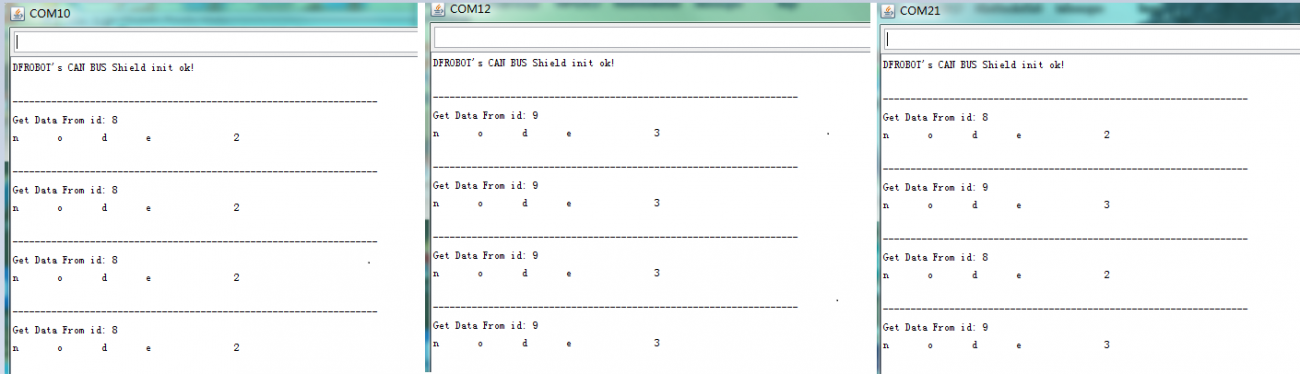
实验现象分析: COM21烧写的是Node 1例程代码,它接收到了id为0x09和id为0x08的数据帧。COM10是Node 3的串口输出,Node 3既可以接收id为0x08的数据帧也可以发送id为0x09的数据帧。COM12是Node 2的串口输出,Node 2既可以接收id为0x09的数据帧也可以发送id为0x08的数据帧。
SD卡存取
本实验的目的是:接收节点接收十条发送节点传来的数据,然后将其出入到CAN-BUS Shield sd卡中。最后将其读出并通过串口打印出来。
实验接线
把SD卡插入到can-bus扩展板上,模块间连线为:CANH与CANH相连接,CANL与CANL相连接,如下图:
例程代码
发送节点例程
// demo: CAN-BUS Shield, send data
#include <df_can.h>
#include <SPI.h>
const int SPI_CS_PIN = 10;
MCPCAN CAN(SPI_CS_PIN); // Set CS pin
void setup()
{
Serial.begin(115200);
int count = 50; // the max numbers of initializint the CAN-BUS, if initialize failed first!.
do {
CAN.init(); //must initialize the Can interface here!
if(CAN_OK == CAN.begin(CAN_500KBPS)) // init can bus : baudrate = 500k
{
Serial.println("DFROBOT's CAN BUS Shield init ok!");
break;
}
else
{
Serial.println("DFROBOT's CAN BUS Shield init fail");
Serial.println("Please Init CAN BUS Shield again");
      delay(100);
      if (count <= 1)
          Serial.println("Please give up trying!, trying is useless!");
  }
}while(count--);
}
unsigned char data[8] = {'D', 'F', 'R', 'O', 'B', 'O', 'T', '!'};
void loop()
{
// send data: id = 0x60, standrad flame, data len = 8, data: data buf
CAN.sendMsgBuf(0x60, 0, 8, data);
delay(1000); // send data per 100ms
}
接收节点例程
/************************************************************************************************************** *demo: CAN-BUS Shield, receive data with interrupt mode, and set mask and filter
- when in interrupt mode, the data coming can't be too fast, must >20ms, or else you can use check mode
- Jansion, 2015-5-27
****************************************************************************************************************/
#include <SPI.h>
#include "df_can.h"
#include <SD.h>
const int SPI_CS_PIN = 10;
MCPCAN CAN(SPI_CS_PIN); // Set CS pin
unsigned char flagRecv = 0;
unsigned char len = 0;
unsigned char buf[8];
char str[20];
char sd_cspin = 4; //pin 4 as spi_cs pin
File myFile;
void setup()
{
Serial.begin(115200);
int count = 50; // the max numbers of initializint the CAN-BUS, if initialize failed first!.
Serial.print("Initializing can controlor...");
do {
CAN.init(); //must initialize the Can interface here!
CAN.init_Mask(MCP_RXM0, 0, 0x3ff); // there are 2 mask in mcp2515, you need to set both of them
CAN.init_Mask(MCP_RXM1, 0, 0x3ff);
/*
* set filter, we can receive id from 0x04, 0x05, 0x60, 0x07, 0x08, 0x09
*
*/
CAN.init_Filter(MCP_RXF0, 0, 0x04); // filter 0 for id = 0x04
CAN.init_Filter(MCP_RXF1, 0, 0x05); // filter 1 for id = 0x05
CAN.init_Filter(MCP_RXF2, 0, 0x60); // filter 2 for id = 0x60
CAN.init_Filter(MCP_RXF3, 0, 0x07); // filter 3 for id = 0x07
CAN.init_Filter(MCP_RXF4, 0, 0x08); // filter 4 for id = 0x08
CAN.init_Filter(MCP_RXF5, 0, 0x09); // filter 5 for id = 0x09
if(CAN_OK == CAN.begin(CAN_500KBPS)) // init can bus : baudrate = 500k
{
Serial.println("DFROBOT's CAN BUS Shield init ok!");
break;
}
else
{
Serial.println("DFROBOT's CAN BUS Shield init fail");
Serial.println("Please Init CAN BUS Shield again");
          delay(100);
          if (count <= 1)
              Serial.println("Please give up trying!, trying is useless!");
      }

  }while(count--);
attachInterrupt(0, MCP2515_ISR, FALLING); // start interrupt
Serial.print("Initializing SD card...");
if (!SD.begin(sd_cspin)) {
Serial.println("initialization failed!");
return;
}
Serial.println("initialization success!");
myFile = SD.open("Node0x60.txt", FILE_WRITE); //the file named Node0x60.txt use to save the data
// with the frame id equeling 0x60.
if (!myFile)
{
Serial.println("open Node0x60.text failed!");
}
else
{
Serial.println("open Node0x60.text success!");
}
/*
* set mask, set both the mask to 0x3ff
*/
}
void MCP2515_ISR()
{
flagRecv = 1;
}
char filewrite = 1, fileread = 0;
int i = 0, j = 0;
void loop()
{
if(flagRecv)                   // check if get data
{
    flagRecv = 0;                // clear flag
    CAN.readMsgBuf(&len, buf);    // read data,  len: data length, buf: data buf
    if (filewrite)
    {
        if (i++ < 1) //only recieve one frame
        {
            myFile.write(buf, len);
        }
        else
        {
            myFile.close();
            filewrite = 0;
            myFile = SD.open("Node0x60.txt", FILE_WRITE);
            if (SD.exists("Node0x60.txt")) {
                Serial.println("example.txt exists.");
                fileread = 1;
            }
            else {
                Serial.println("example.txt doesn't exist.");
            }
        }
    }
    if (fileread)
    {
        Serial.println("printf the data that myFile has saved! ");
        myFile.read(buf, len);
        Serial.println((char *)buf);
        Serial.println("");
        myFile.close();

        Serial.println("myFile closed!!!!");
        fileread = 0;
    }

}
}
实验现象
接收方:串口输出:

实验现象分析:接收节点接收到id为0x60的数据帧,并将其存入到文件名为Node0x60.text文件中,然后关闭文件。最后又打开文件,并从文件中读出刚才收到的数据通过串口打印出来,如上图所示。
协议/库资料
CAN总线百度百科
CAN-BUS Shield V2.0资料
常见问题
还没有客户对此产品有任何问题,欢迎通过qq群182152432或者论坛http://wenda.ncnynl.com联系我们!
更多问题及有趣的应用,可以 访问论坛 进行查阅或发帖!
更多
![]() [Link ]
[Link ]