自动浇花套件
![]()
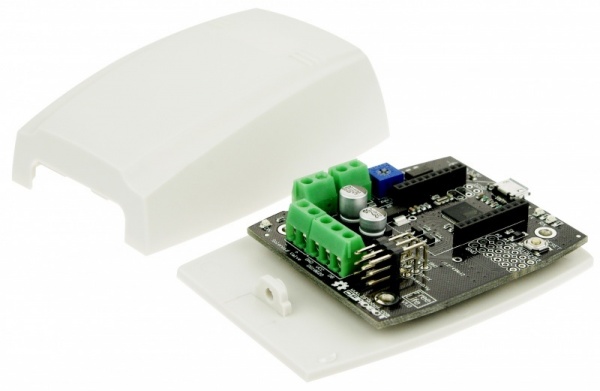
自动浇花套件(SKU:KIT0003)
目录
1 概述
2 技术规格
3 配送清单
4 组装示意图
5 单盆花的浇灌制作步骤
6 Arduino 样例程序
6.1 数据测量
6.2 水泵测试
7 产品相关文档
概述
随着人们生活节奏的加快,即使是最爱的花草浇水也无法顾及,偶而出差、旅行、探亲也是很正常的事情,而家中花草谁来管?花草生长问题80%以上是由花儿浇灌问题引起;好不容易种植几个月的花草,因为浇水不及时,长势不好,用来美化家园的花草几乎成了“鸡肋”;对于广大DIY爱好者,我们要介绍一款可以自己编程、设置参数、自己动手组装的自动浇花控制器,这是一款基于Arduino的控制器,使用土壤湿度传感器对土壤湿度进行监测,通过温湿度传感器对室内温度、湿度进行测量,控制水泵或电池阀进行浇水,从而达到自动浇灌的目的。
技术规格
输入电源:6-12V
支持湿度传感器和碳棒检测土壤湿度
支持潜水泵和双稳态电磁阀浇水
具有室内温度和湿度检测
具有土壤湿度阀值调节
具有4个模拟口,5个数字口
支持xbee无线数传
支持USB接口下载程序
支持防水型DS18B20温度传感器
潜水泵额定电压:3.5-12V
潜水泵最大扬程:200cm
模块尺寸:70 x 60mm
配送清单
Free Life自动浇花系统控制器 1个
Micro USB线 1根
DHT11温湿度传感器 1个
土壤湿度传感器 1个
模拟接口转数字接口传感器连接线 2根
潜水泵 1个(注意:潜水泵必须在水中使用,不能露出水面!)
潜水泵电源连接线 1根
主板电源连接线 1根
橡胶水管 1米
塑料外壳 1个
2mm一字螺丝刀 1个
1号十字螺丝刀 1个
电子文档上位机软件 1份
组装示意图
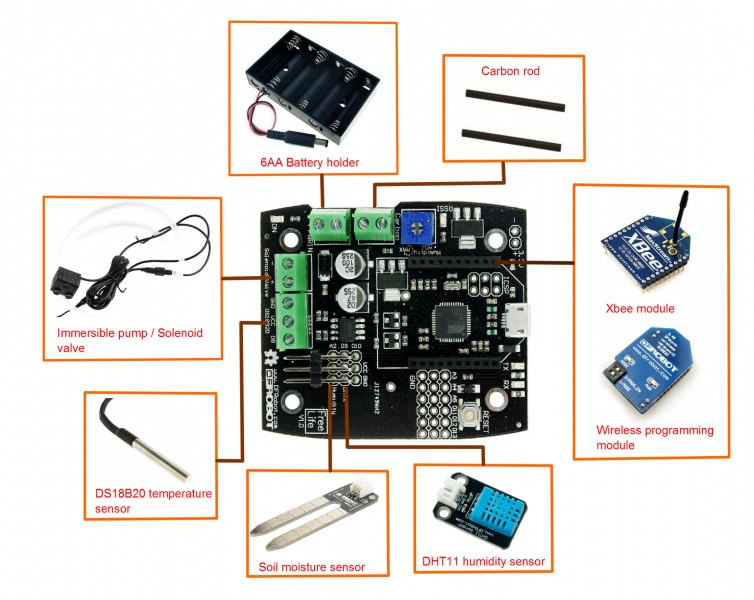
![]()
单盆花的浇灌制作步骤
1、将Moisture Sensor与Arduino自动浇花系统控制器连接起来。Moisture Sensor连接到控制板的任意可用模拟口,用于采集土壤湿度参数(选择不同的模拟口,程序中需对应应模拟口设置),默认选择模拟口2(注意区分电源正负,红色为+,黑色为-),然后将Moisture Sensor插到土壤中(插入2/3即可)。
2、水泵连接到控制器的MOTOR插座上,注意区分正负(棕色为正,蓝色为负),将橡胶水管插到潜水泵的出水口上,另一端固定在花盆上。
3、将水装到水桶或水盆里,放在离花盆较近的位置,将潜水泵置于水桶或水盆内,保证蓄水充足,以供浇水(注意潜水泵必须在水中使用)。
4、 Arduino自动浇花系统控制器需要使用程序下载器连接到电脑才能与上位机通讯。程序下载器在使用前需要安装USB驱动程序。注意,如果自动浇花使用了电池盒供电,下载器上有一个电源跳线,需要拔掉。如果没有供电,那么可以使用下载器给控制器供电,跳线插接到5V端。
5、为了能方便用户观察土壤湿度及室内环境的参数,我们开发了flower's life这款软件,通过该软件把土壤湿度和环境温湿度数据呈现在我们面前,打开flower's life软件。界面如下:
6、该软件主要是通过对串口数据的监听来实现对当前控制器串口返回的土壤湿度和室内温度、湿度等参数的读取。其读取时间不定,该软件会自动监测串口数据的接收并自动读取,不会在没有数据的时候随意读取,避免了一定的数据读取冲突造成错误。
7、通过这款软件,能对浇水的动力和湿度传感器进行选择,动力包括潜水泵和双稳态电磁阀,传感器包括土壤湿度传感器和碳棒,我们默认设置为潜水泵和土壤湿度传感器,在没有其他装置的情况下请勿乱设置。点击设置,选择当前串口端口号和通讯波特率,串口号请到设备管理器中查看Arduino下载器的端口号,波特率默认为115200。
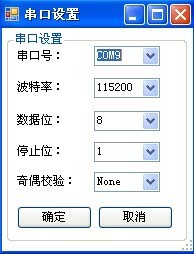
![]()
8、设置好后,单击链接按钮,连接成功后,我们就可以看到当前土壤湿度以及室内温湿度的情况了。

![]()
9、不同的花,对土壤湿度的需求也尽不相同,我们可以根据自动浇花控制器上的湿度调整电位器来改变浇水阈值,以适应不同花儿对土壤湿度的需求,轻轻转动电位器旋钮(如下图箭头所示),软件上的浇水阈值的数据也会随之发生改变,这样,我们就能根据花儿的最佳生长状态调节一个适合的浇水阈值了,浇水上限在库文件中做修改即可。
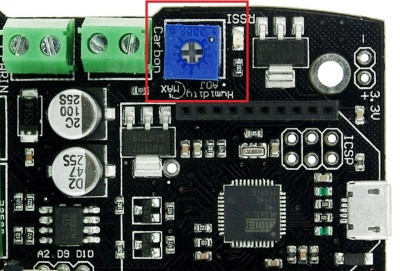
![]()
10、另外,如果环境温度过高,花儿不宜浇水,否则可能会导致花儿枯死,浇水的温度阈值在程序中进行设置,默认为35摄氏度以上不启动浇水系统,用户也可以根据自己意愿进行修改。
11、用户可以根据我们提供的资料,对自动浇花系统进行二次开发,使用Arduino IDE环境编程,Arduino下载器将程序下载进去。
程序代码:
功能定义:实现从上位机软件选择湿度传感器(湿度传感器或碳棒)和浇水形式(潜水泵或电池阀),同时返回土壤湿度、室内温度、湿度到上位机上显示。
/*
http://www.dfrobot.com.cn
http://dfrobot.taobao.com/
*/
#include <Free_Life.h> //我们提供的库函数
#include <DHT.h>
#define temperature 40 //设置环境最大温度
Free_Life flower;
void setup()
{
flower.Initialization(); //初始化主控制器,默认选择湿度传感器和水泵
Serial.begin(115200); ///波特率115200
}
void loop()
{
flower.process(temperature);//室内温度、湿度检测�
flower.print(); //输出室内温度、土壤湿度、室内湿度、土壤湿度阀值、传感器和驱动器参数给上位机
delay(500);
}
Arduino 样例程序
数据测量
/*
This Sample code is for testing the Auto flower watering kit.
Product: EcoDuino - An auto plant kit
SKU : KIT0003
Library:AutoWatering
Library Functions:
1.Power a pump to water flowers according to the humidity and temperature
2.Use the DHT11 Sensor to test the ambient humidity and temperature
3.Use the Moisture Sensor to test the moisture of the soil
Hardwares:
- Auto flower watering control board
- DHT11 Teaperature and Humidity Sensor
- Moisture Sensor
- Immersible pump
Connection:
1.DHT11 & Free Life v1.0 board
S --- Digital Pin9
VCC --- VCC
GND --- GND
2.Moisture Sensor(Humidity) & Free Life v1.0 board
1S --- Analog Pin2
2GND --- GND
3VCC --- VCC
*/
#include <AutoWatering.h>
#include <DHT.h>
#define MaxTemprature 40 //The Maximum Value of the Temperature
#define Sensor 1
#define Carbon 0
AutoWatering flower;
int temperature;
int moisture_dat;
int humidity;
void setup()
{
flower.Initialization();//Initialization for the watering kit
Serial.begin(115200);//Buad Rate is set as 115200bps
}
void loop()
{
//Obtain the Temperasture from DHT11 Sensor
temperature = flower.getTemperature();
Serial.print("Temperature is:" );
Serial.println(temperature);
//Obtain the Humidity from DHT11 Sensor
humidity = flower.getHumidity();
Serial.print("Humidity is:" );
Serial.println(humidity);
//Obtain the Soil Moisture from the Moisture Sensor
moisture_dat = flower.MoistureSensor();
Serial.print("Soil Moisture is:" );
Serial.println(moisture_dat);
Serial.println();
Serial.println();
delay(1500);
}
水泵测试
/*
Library:AutoWatering
Library Functions:
1.Power a pump to water flowers according to the humidity and temperature
2.Use the DHT11 Sensor to test the ambient humidity and temperature
3.Use the Moisture Sensor to test the moisture of the soil
Hardwares:
- Auto flower watering control board
- DHT11 Teaperature and Humidity Sensor
- Moisture Sensor
- Immersible pump
Connection:
1.DHT11 & Free Life v1.0 board
S --- Digital Pin9
VCC --- VCC
GND --- GND
2.Moisture Sensor(Humidity) & Free Life v1.0 board
1S --- Analog Pin2
2GND --- GND
3VCC --- VCC
*/
#include <AutoWatering.h>
#include <DHT.h>
#define MaxTemprature 100 //The Maximum Value of the Temperature
#define SensorTest 1
#define CarbonTest 0
AutoWatering flower;
void setup()
{
flower.Initialization();//Initialization for the watering kit
Serial.begin(115200);//Buad Rate is set as 115200bps
}
void loop()
{
//Power on the pump according to the ambient temperature and humidity
pumpOn(SensorTest,CarbonTest,MaxTemprature);
//Power on the pump for testing whether the pump can work properly
//flower.pumpTestOn();
delay(2000);
flower.pumpOff();
delay(2000);
Serial.println();
}
//Power on the pump according to the ambient temperature and humidity
void pumpOn(int MoiSensor, int Carbon, int Temperature_max)
{
int humidity;
int humidity_max;
float dht_t;
//Choose to use the Moisture Sensor or the Carbon
//to test the soil moisture
if(MoiSensor==1&&Carbon==0)
{
humidity = flower.MoistureSensor();
}else if(MoiSensor==0&&Carbon==1)
{
humidity = flower.CarbonRod();
}else{
humidity = 0;
}
Serial.print("Soil Moisture is :");
Serial.println(humidity);
humidity_max = flower.ADJ_humMax();
dht_t = flower.getTemperature();
Serial.print("Temperature is :");
Serial.println(dht_t);
digitalWrite(6,LOW);
digitalWrite(5,LOW);
digitalWrite(7,LOW);
digitalWrite(4,LOW);
if(humidity<=humidity_max&&dht_t<=Temperature_max)
{
digitalWrite(6,HIGH);
digitalWrite(5,HIGH);
}
else
{
digitalWrite(6,LOW);
digitalWrite(5,LOW);
}
Serial.println("Pump is on!");
}
产品相关文档
内含上位机软件库Free_Life
Autowatering Library
DHT library
DHT11温湿度传感器
土壤湿度传感器
在运行样例程序前,请先安装库
注: FreeLife只是在上位机上显示温湿度等相关信息,里面的程序没有自动浇花功能。如果需要浇花时同时使用此上位机,参考FreeLife的库文件中print函数即可。
![]() 购买 Arduino 自动浇花套件(SKU:KIT0003)
购买 Arduino 自动浇花套件(SKU:KIT0003)